Maytag MEW7630WDB Installation Instructions
Maytag MEW7630WDB Manual
 |
View all Maytag MEW7630WDB manuals
Add to My Manuals
Save this manual to your list of manuals |
Maytag MEW7630WDB manual content summary:
- Maytag MEW7630WDB | Installation Instructions - Page 1
.2 CM) ELECTRIC SINGLE AND DOUBLE BUILT-IN OVEN INSTRUCTIONS D'INSTALLATION FOUR ÉLECTRIQUE ENCASTRÉ DE 27" (68,6 CM) ET 30" (76,2 CM) - SIMPLE ET DOUBLE Table of Contents/Table des matières BUILT-IN OVEN SAFETY 2 INSTALLATION REQUIREMENTS 2 Tools and Parts 2 Location Requirements 2 Electrical - Maytag MEW7630WDB | Installation Instructions - Page 2
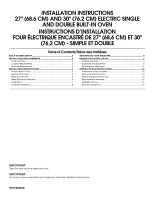
OVEN SAFETY Your safety and the safety of others are very important. We have provided many important safety messages in this manual instructions. WARNING You can be killed or seriously injured if you don't follow instructions below the support surface when the oven is installed in a wall cabinet. A - Maytag MEW7630WDB | Installation Instructions - Page 3
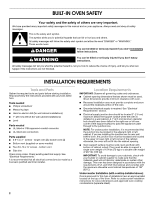
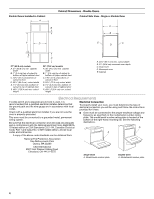
Dimensions - Single Ovens A Single Ovens Installed in Cabinet A B B E D C 27" (68.6 cm) models A. 25 64.3 cm) max. recessed width B. 29" (73.7 cm) max. overall height C. 26³⁄₄" (67.9 cm) overall width D. 23" (58.4 cm) max. recessed depth E. 27¹⁄₂" (69.9 cm) recessed height 30" (76.2 cm - Maytag MEW7630WDB | Installation Instructions - Page 4
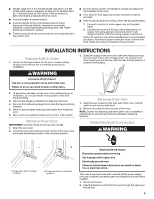
to top of cabinet door F. 49³⁄₄" (126.4 cm) min. cutout height 30" (76.2 cm) models A. 30" (76.2 cm) min. cabinet width B. 1" (2.5 cm) top of cutout install your oven, you must determine the type of electrical connection you will be using and follow the instructions provided for it here. ■ Oven - Maytag MEW7630WDB | Installation Instructions - Page 5
require a separate 30-amp circuit. ■ provided is for serviceability of the oven. ■ A UL INSTALLATION INSTRUCTIONS Prepare Built-In Oven 1. Decide on the final location for the oven. Locate existing wiring to avoid drilling into or severing wiring during installation. 3. Grasp the edges of the oven - Maytag MEW7630WDB | Installation Instructions - Page 6
wire (H) from the oven cable to the green (or bare) ground wire (in the junction box) using a UL listed wire connector. 6. Install junction box cover. through neutral, New Branch circuit installations (1996 NEC), mobile homes and recreational vehicles, new construction and in Canada. A B E F G - Maytag MEW7630WDB | Installation Instructions - Page 7
not push against outside edges. A. Mounting rail B. Insert screw. 6. On some models, the oven vent is taped to the side of the oven. See the following instructions to install. ■ Insert the vent tabs (B) into slots (A) in the oven frame. ■ With one # 8-18 x ³⁄₈" screw (C) for each side of the vent - Maytag MEW7630WDB | Installation Instructions - Page 8
Service" section of the Use and Care Guide or contact the dealer from whom you purchased your oven. Complete Installation 1. Check that all parts are now installed Electrical supply is connected. ■ See "Troubleshooting" section in the Use and Care Guide. 4. When oven has been on for 5 minutes, feel - Maytag MEW7630WDB | Installation Instructions - Page 9
immédiatement les instructions. AVERTISSEMENT Risque possible de décès ou de blessure grave si vous ne suivez pas les instructions. Tous les tre situé à moins de 3" (7,6 cm) au-dessous de la surface de support lorsque le four est installé dans un placard mural. Un trou de diamètre 1" (2,5 cm) ou - Maytag MEW7630WDB | Installation Instructions - Page 10
installée au-dessus) : Les fours homologués pour ce type d'installation comportent une étiquette d'homologation placée sur le dessus. Voir les instructions d'installation l'ouverture découpée 27³⁄₄" (70,5 cm) Modèles de 30" (76,2 cm) A. Largeur du placard 30" (76,2 cm) min. B. 1" (2,5 cm) entre le - Maytag MEW7630WDB | Installation Instructions - Page 11
du placard F. Hauteur d'encastrement 49³⁄₄" (126,4 cm) min. Modèles de 30" (76,2 cm) A. Largeur du placard 30" (76,2 cm) min. B. 1" (2,5 cm) entre le sommet de l'ouverture installer le four correctement, il faut établir le type de raccords électriques que l'on utilisera et suivre les instructions - Maytag MEW7630WDB | Installation Instructions - Page 12
/cuivre doit être conforme aux codes locaux et aux pratiques de câblage acceptées par l'industrie. INSTRUCTIONS D'INSTALLATION Préparation du four encastré 1. Choisir l'emplacement final pour l'installation du four. Repérer le câblage existant pour éviter de le percer ou de l'endommager lors - Maytag MEW7630WDB | Installation Instructions - Page 13
four à la terre. Le non-respect de ces instructions peut causer un décès, un incendie ou un choc ant, enlever le couvercle du boîtier de connexion. 4. Installer un connecteur de conduit (homologation UL ou CSA) sur le récréatifs, dans les nouvelles constructions, et au Canada. A B E F G C H D I - Maytag MEW7630WDB | Installation Instructions - Page 14
du four AVERTISSEMENT Risque du poids excessif Utiliser deux ou plus de personnes pour déplacer et installer le four. Le non-respect de cette instruction peut causer une blessure au dos ou d'autre blessure. 1. À l'aide de 2 personnes ou plus, soulever partiellement le four pour l'introduire - Maytag MEW7630WDB | Installation Instructions - Page 15
service" du Guide d'utilisation et d'entretien ou contacter le marchand qui vous a vendu le four. Achever l'installation 1. Vérifier que toutes les pièces sont maintenant install devrait indiquer "PF". 2. Appuyer sur UPPER OVEN (four supérieur) ou LOWER OVEN (four inférieur) pour sélectionner le four - Maytag MEW7630WDB | Installation Instructions - Page 16
W10192049A © 2008 Whirlpool Corporation. All rights reserved. Tous droits réservés. 4/08 Printed in U.S.A. Imprimé aux É.-U.
-
 1
1 -
 2
2 -
 3
3 -
 4
4 -
 5
5 -
 6
6 -
 7
7 -
8
-
9
-
10
-
11
-
12
-
13
-
14
-
15
-
16
 |
 |

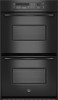
INSTALLATION INSTRUCTIONS
27" (68.6 CM) AND 30" (76.2 CM) ELECTRIC SINGLE
AND DOUBLE BUILT-IN OVEN
INSTRUCTIONS D’INSTALLATION
FOUR ÉLECTRIQUE ENCASTRÉ DE 27" (68,6 CM) ET 30"
(76,2 CM) - SIMPLE ET DOUBLE
Table of Contents/Table des matières
BUILT-IN OVEN SAFETY
.........................................................................
2
INSTALLATION REQUIREMENTS
..........................................................
2
Tools and Parts
......................................................................................
2
Location Requirements
..........................................................................
2
Electrical Requirements
.........................................................................
4
INSTALLATION INSTRUCTIONS
............................................................
5
Prepare Built-In Oven
............................................................................
5
Remove Oven Door
...............................................................................
5
Remove Oven Trim
................................................................................
5
Make Electrical Connection
...................................................................
5
Install Oven
............................................................................................
7
Complete Installation
.............................................................................
8
SÉCURITÉ DU FOUR ENCASTRÉ
...........................................................
9
EXIGENCES D'INSTALLATION
................................................................
9
Outillage et pièces
..................................................................................
9
Exigences d'emplacement
.....................................................................
9
Spécifications électriques
.....................................................................
11
INSTRUCTIONS D'INSTALLATION
.......................................................
12
Préparation du four encastré
................................................................
12
Dépose de la porte du four
...................................................................
12
Dépose des garnitures du four
.............................................................
13
Raccordement électrique
.....................................................................
13
Installation du four
................................................................................
14
Achever l'installation
.............................................................................
15
IMPORTANT:
Save for local electrical inspector's use.
IMPORTANT :
À conserver pour consultation par l'inspecteur local des installations électriques.
W10192049A