Maytag MFI2665XEB Owners Manual
Maytag MFI2665XEB Manual
 |
View all Maytag MFI2665XEB manuals
Add to My Manuals
Save this manual to your list of manuals |
Maytag MFI2665XEB manual content summary:
- Maytag MFI2665XEB | Owners Manual - Page 1
REFRIGERATOR USER INSTRUCTIONS THANK YOU for purchasing this high-quality product. If you should experience a problem not covered in TROUBLESHOOTING, please visit our website at www.maytag.com for additional information. If you still need assistance, call us at 1-800-688-9900. In Canada, visit our - Maytag MFI2665XEB | Owners Manual - Page 2
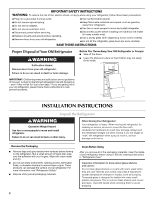
servicing. ■ Replace all parts and panels before operating. ■ Remove doors from your old refrigerator. ■ Keep flammable materials and vapors, such as gasoline, away from refrigerator. ■ Use two or more people to move and install refrigerator. ■ Disconnect power before installing ice maker (on ice - Maytag MFI2665XEB | Owners Manual - Page 3
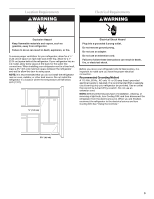
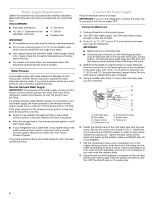
of space on each side and at the top. Allow for a 1" (2.54 cm) space behind the refrigerator. If your refrigerator has an ice maker, allow extra space at the back for the water line connections. When installing your refrigerator next to a fixed wall, leave a 3³⁄₄" (9.5 cm) minimum space between the - Maytag MFI2665XEB | Owners Manual - Page 4
the water filter. See "Water Filtration System." If you have questions about your water pressure, call a licensed, qualified plumber. Connect the Water Supply Read all directions before you begin. IMPORTANT: If you turn the refrigerator on before the water line is connected, turn the ice maker OFF - Maytag MFI2665XEB | Owners Manual - Page 5
tubing B. "P" clamp C. Compression nut D. Compression sleeve 3. Turn on water supply to refrigerator and check for leaks. Correct any leaks. Complete the Installation WARNING Refrigerator Doors and Drawer All graphics referenced in the following instructions are included later in this section - Maytag MFI2665XEB | Owners Manual - Page 6
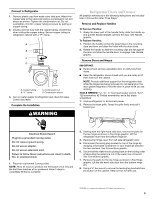
plug on top of the left-hand side refrigerator door. 5. Reconnect the water line by pulling back the locking collar ring while firmly pushing the water line into the connector. 6. Check for leaks. Replace the top hinge covers. Remove and Replace Freezer Drawer IMPORTANT: Two people may be required - Maytag MFI2665XEB | Owners Manual - Page 7
A. Hinge Cover Screw B. Top Hinge Cover C. 5/16" Hex Head Hinge Screws D. Top Hinge Bottom Hinges A B C A. Hinge Pin Cover B. Bottom Hinge C. Hinge Screws Connections A 2 B A. Wiring Plug B. Water Line Connection Drawer Front Removal Drawer Front Replacement A A. Loosen 4 Door Bracket Screws 7 - Maytag MFI2665XEB | Owners Manual - Page 8
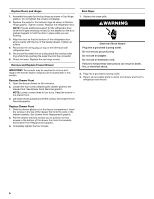
amount. 4. Replace the base grille. Using the Controls The refrigerator and freezer controls are located on the dispenser panel. IMPORTANT: The display screen on the dispenser control panel will turn off automatically and enter "sleep" mode when the control buttons and dispenser levers have not - Maytag MFI2665XEB | Owners Manual - Page 9
hours unless manually turned off. ■ To manually turn off the Fast Cool feature, press FAST COOL again or adjust the refrigerator temperature set point. The Fast Cool icon will disappear when the feature is off. NOTE: Setting the freezer to a colder temperature may make some foods, such as ice cream - Maytag MFI2665XEB | Owners Manual - Page 10
and refrigerator temperature. See "Using the Controls." Wait 24 hours between adjustments. NOTE: Setting the freezer to a colder temperature may make some foods, such as ice cream, harder. Remember ■ The quality of your ice will be only as good as the quality of the water supplied to your ice maker - Maytag MFI2665XEB | Owners Manual - Page 11
lights are not working, see "Troubleshooting" for more information. The Dispenser Lock The dispenser can be turned off for easy cleaning or to avoid unintentional dispensing by small children and pets. NOTE: The lock feature does not shut off power to the refrigerator, to the ice maker, or to the - Maytag MFI2665XEB | Owners Manual - Page 12
2. Turn filter counterclockwise to remove. 3. Remove sealing label from replacement filter and insert the filter end into the filter head. 4. Turn the filter clockwise until it stops. Snap the filter cover closed. 5. Flush the water system. See "Water and Ice Dispensers." NOTE: The dispenser feature - Maytag MFI2665XEB | Owners Manual - Page 13
to this reduction, you may hear intermittent noises from your new refrigerator that you did not notice from your old model. Below are listed some normal sounds with explanations. ■ Buzzing - heard when the water valve opens to fill the ice maker ■ Pulsating - fans/compressor adjusting to optimize - Maytag MFI2665XEB | Owners Manual - Page 14
of low water pressure. ■ Water shutoff valve not fully open? Turn the water shutoff valve fully open. ■ Kink in the water source line? A kink in the line can reduce water flow. Straighten the water source line. ■ Water filter installed on the refrigerator? Remove filter and operate ice maker. If ice - Maytag MFI2665XEB | Owners Manual - Page 15
and fill the water system. See "Water and Ice Dispensers." ■ Is the water pressure at least 35 psi (241 kPa)? The water pressure to the home determines the flow from the dispenser. See "Water Supply Requirements." ■ Water filter installed on the refrigerator? Remove filter and operate dispenser - Maytag MFI2665XEB | Owners Manual - Page 16
every 6 months. Use replacement filter model UKF8001AXX-200. 2010 suggested retail price of $44.99 U.S.A./$49.95 Canada. Prices are subject to change without notice. Application Guidelines/Water Supply Parameters Water Supply Water Pressure Water Temperature Service Flow Rate City or Well 35 - Maytag MFI2665XEB | Owners Manual - Page 17
MAYTAG® REFRIGERATION LIMITED WARRANTY FIRST YEAR LIMITED WARRANTY (PARTS AND LABOR) For one year from the date of purchase, when this major appliance is installed, operated and maintained according to instructions attached to or furnished with the product, Maytag brand of Whirlpool Corporation or - Maytag MFI2665XEB | Owners Manual - Page 18
you would like to schedule service, you may contact Maytag at the number below. Have your complete model number ready. You can find your model number and serial number on the label, located on the inside wall of the refrigerator compartment. For assistance or service in the U.S.A., call 1-800-688 - Maytag MFI2665XEB | Owners Manual - Page 19
ámenos al 1-800-688-9900. En Canadá, visite nuestro sitio de internet en www.maytag.ca o llámenos al 1-800-807-6777. Necesitará tener a mano su número muy importante. Hemos incluido muchos mensajes importantes de seguridad en este manual y en su electrodoméstico. Lea y obedezca siempre todos los - Maytag MFI2665XEB | Owners Manual - Page 20
Cómo deshacerse adecuadamente de su refrigerador viejo ADVERTENCIA Peligro de Asfixia Remueva las puertas de su refrigerador viejo. No seguir esta instrucción puede ocasionar la muerte o daño al cerebro. Antes de tirar su viejo refrigerador o congelador: ■ Saque las puertas. ■ Deje los estantes en - Maytag MFI2665XEB | Owners Manual - Page 21
NOTA: No se recomienda instalar el refrigerador cerca de un horno, radiador u otra fuente de calor. No instale el refrigerador en un lugar donde la temperatura puede ser menor de 55°F (13°C). ¹⁄₂" (1,25 cm) 3³⁄₄" (9,5 cm) Requisitos eléctricos ADVERTENCIA Peligro de Choque Eléctrico Conecte a un - Maytag MFI2665XEB | Owners Manual - Page 22
se acumule el sedimento normal en la válvula. 4. Determine la longitud de la tubería de cobre que necesite. Mida desde la conexión de la parte baja trasera derecha del refrigerador hasta la tubería de agua. Agregue 7 pies (2,1 m) para poder mover el refrigerador para limpiarlo. Use tubería de cobre - Maytag MFI2665XEB | Owners Manual - Page 23
se incluyen más adelante en esta sección después de "Pasos finales". Para quitar y volver a colocar las manijas Para quitar las manijas: 1. Tome la parte inferior de la manija con firmeza, deslice la manija hacia arriba y jálela directo fuera de la puerta. Vea la ilustración Manija. Para volver - Maytag MFI2665XEB | Owners Manual - Page 24
guías del cajón fuera del compartimiento del congelador. Inserte los tornillos en la parte superior del frente del cajón, dentro de las ranuras que están en los soportes de 3 terminales. 3. Vuelva a colocar todas las piezas removibles en las puertas y el cajón, y los alimentos, al refrigerador y al - Maytag MFI2665XEB | Owners Manual - Page 25
Cómo quitar y volver a poner la puerta en su lugar Bisagras superiores A B C 1 D A. Tornillo para la cubierta de la bisagra B. Cubierta de la bisagra superior C. Tornillos de cabeza hexagonal para bisagra de 5/16" D. Bisagra superior Bisagras inferiores A B C A. Cubierta del pasador de la - Maytag MFI2665XEB | Owners Manual - Page 26
de ¹⁄₄", gire el tornillo nivelador que está a cada lado, para levantar o bajar ese lado del refrigerador. NOTA: Haga que alguien empuje la parte superior del refrigerador, lo cual quita el peso de los tornillos niveladores. Esto facilita el giro de los tornillos. Puede precisar darle varias vueltas - Maytag MFI2665XEB | Owners Manual - Page 27
y del congelador, presione FILTER (Filtro) para guardar los ajustes. NOTA: Para salir sin guardar los cambios, presione ICE TYPE (Tipo de hielo) congelador en la pantalla. Cuando el área se haya cambiado, aparecerá "FREEZER" (Congelador) en la pantalla. ■ Presione LOCK (Bloquear) para aumentar el - Maytag MFI2665XEB | Owners Manual - Page 28
la luz de "Replace Filter" (Reemplazar el filtro). Control de humedad del cajón para verduras Usted puede controlar el nivel de humedad en el cajón hermético para verduras. Dependiendo de su modelo, regule el control a cualquier ajuste entre FRUIT (Fruta) y VEGETABLES (Vegetales) o LOW (Bajo) y HIGH - Maytag MFI2665XEB | Owners Manual - Page 29
de sacar hielo, seleccione el tipo de hielo que desea, presionando el botón de ICE TYPE (Tipo de hielo). La pantalla indica qué tipo de hielo se ha seleccionado. deseado. Para cambiar de hielo en cubos a picado y viceversa, presione ICE TYPE (Tipo de hielo). ADVERTENCIA Peligro de Cortaduras Use un vaso - Maytag MFI2665XEB | Owners Manual - Page 30
Normal (agua azul) a Order (Pedir) (ondas rojas) y a "Order Filter" (anaranjado), esto le dice que es casi hora de cambiar el filtro de agua. Reemplace el filtro de agua desechable cuando se ilumine "Replace Filter" (Cambiar el filtro) (rojo) y los íconos destellen continuamente durante - Maytag MFI2665XEB | Owners Manual - Page 31
tibia, lave a mano, enjuague y seque a fondo las piezas removibles y las superficies interiores. 3. Enchufe el refrigerador o reconecte el limpiador es solamente para partes de acero inoxidable! No permita que el limpiador de acero inoxidable entre en contacto con ninguna parte de plástico tales - Maytag MFI2665XEB | Owners Manual - Page 32
que se hacen con frecuencia", para evitar posiblemente el costo de una visita de servicio técnico. En EE.UU., www.maytag.com En Canadá, www.maytag.ca Funcionamiento del refrigerador El refrigerador no funciona ADVERTENCIA Parece que el motor funciona excesivamente Es posible que su nuevo - Maytag MFI2665XEB | Owners Manual - Page 33
Las puertas no cierran completamente ■ ¿Está bloqueada la puerta? Mueva los paquetes de alimentos lejos de la puerta. ■ ¿Hay un recipiente o un estante bloqueando el paso? Empuje el recipiente o el estante nuevamente a la posición correcta. Es difícil abrir las puertas ADVERTENCIA Peligro de Explosi - Maytag MFI2665XEB | Owners Manual - Page 34
puertas recientemente? Asegúrese de que el conjunto de tubería/alambre del despachador de agua se haya vuelto a conectar como es debido en la parte superior de la puerta del refrigerador. Vea "Puertas y cajón del refrigerador". ■ ¿Se ha conectado un sistema de filtración de agua de ósmosis inversa - Maytag MFI2665XEB | Owners Manual - Page 35
ón en Máximo el agua a tratar efluente 2,00 mg/L 2,0 mg/L ± 10% 0,06 mg/L 14.000.000 #/mL Por lo menos 10.000 370.000 #/mL** partículas/mL Promedio influente Concentración en Máximo el agua a tratar efluente 0,150 mg/L† 0,150 mg/L† 0,15 mg/L ± 10% 0,15 mg/L ± 10% < 0,001 mg/L < 0,001 - Maytag MFI2665XEB | Owners Manual - Page 36
SERÁ EL DE REPARAR EL PRODUCTO SEGÚN SE ESTIPULA EN LA PRESENTE. El servicio deberá ser suministrado por una compañía de servicio designada por Maytag. Esta garantía limitada es válida en Estados Unidos o en Canadá y se aplica solamente cuando el electrodoméstico principal se use en el país en - Maytag MFI2665XEB | Owners Manual - Page 37
688-9900. En Canadá, llame al 1-800-807-6777. Si necesita asistencia adicional, puede escribir a Maytag con sus preguntas o dudas a la dirección que aparece a continuación: En los EE.UU.: Maytag Brand Home Appliances Customer eXperience Center 553 Benson Road Benton Harbor, MI 49022-2692 En Canad - Maytag MFI2665XEB | Owners Manual - Page 38
INSTRUCTIONS D'UTILISATION DU RÉFRIGÉRATEUR Nous vous REMERCIONS d'avoir acheté ce produit de haute qualité. Si vous rencontrez un problème non mentionné dans la section DÉPANNAGE, veuillez visiter notre site Web www.maytag.com pour des informations supplémentaires. Si vous avez toujours besoin d' - Maytag MFI2665XEB | Owners Manual - Page 39
érateur AVERTISSEMENT Risque du poids excessif Utiliser deux ou plus de personnes pour déplacer et installer le réfrigérateur. Le non-respect de cette instruction peut causer une blessure au dos ou d'autre blessure. Enlèvement des matériaux d'emballage ■ Enlever tout résidu de ruban adhésif et de - Maytag MFI2665XEB | Owners Manual - Page 40
pas enlever la broche de liaison à la terre. Ne pas utiliser un adaptateur. Ne pas utiliser un câble de rallonge. Le non-respect de ces instructions peut causer un décès, un incendie ou un choc électrique. Avant de placer le réfrigérateur à son emplacement final, il est important de vous assurer - Maytag MFI2665XEB | Owners Manual - Page 41
en tirant sur le tube en cuivre. 2. Créer une boucle de service avec le tube de cuivre. Éviter les déformations en pliant le tube un adaptateur. Ne pas utiliser un câble de rallonge. Le non-respect de ces instructions peut causer un décès, un incendie ou un choc électrique. 1. Brancher sur une prise - Maytag MFI2665XEB | Owners Manual - Page 42
soulever pour les dégager de la caisse. REMARQUE : Prévoir un support additionnel des portes pendant le retrait des charnières. La force d' adaptateur. Ne pas utiliser un câble de rallonge. Le non-respect de ces instructions peut causer un décès, un incendie ou un choc électrique. 2. Brancher sur une - Maytag MFI2665XEB | Owners Manual - Page 43
Dépose et réinstallation de la porte Charnières supérieures A B C 1 D A. Vis du couvercle de la charnière B. Couvercle de la charnière supérieure C. Vis à tête hexagonale de 5/16" D. Charnière supérieure Charnières inférieures A B C A. Couvercle de l'axe de la charnière B. Charnière inférieure - Maytag MFI2665XEB | Owners Manual - Page 44
facilement, faire le réglage de l'inclinaison du réfrigérateur en suivant les instructions cidessous. ■ Avant de déplacer le réfrigérateur, soulever les vis pour ée dans les 2 minutes qui suivent, l'affichage passe de nouveau au mode "veille". ■ Appuyer sur n'importe quel bouton de commande sur le - Maytag MFI2665XEB | Owners Manual - Page 45
FILTER (filtre) pour sauvegarder les réglages. REMARQUE : Pour sortir sans sauvegarder les modifications, appuyer sur ICE TYPE (type de glace) à tout moment à partir du mode "FREEZER" (congélateur) apparaît sur l'écran d'affichage. A A. Appuyer simultanément sur Lock (verrouillage) et Filter Reset - Maytag MFI2665XEB | Owners Manual - Page 46
FILTER RESET (réinitialisation du filtre) pendant 3 secondes, jusqu'à ce que le témoin "Replace Filter pendant 3 secondes, jusqu'à ce que le témoin "Ice Maker Off" (machine à glaçons arrêtée) s'allume. et VEGETABLES (légumes) ou LOW (faible) et HIGH (élevé). FRUIT (fruits) / LOW (bas) [ouvert] pour - Maytag MFI2665XEB | Owners Manual - Page 47
glaçons est normal et la dimension des morceaux de glace peut varier. Lorsqu'on passe du mode glace concassée au mode glaçons, quelques onces de glace ICE TYPE (type de glace). AVERTISSEMENT Risque de coupure Utiliser un verre robuste pour prendre des glaçons. Le non-respect de cette instruction - Maytag MFI2665XEB | Owners Manual - Page 48
DIM (faible luminosité) : Appuyer sur LIGHT une deuxième fois pour sélectionner le mode DIM. La lampe du distributeur restera allumée, mais à une intensité plus faible. Après 14 jours à l'étape "Replace Filter" (remplacer le filtre), les icônes "Replace Filter" et "water" (eau) s'allument (rouge) en - Maytag MFI2665XEB | Owners Manual - Page 49
ENTRETIEN DU RÉFRIGÉRATEUR Nettoyage AVERTISSEMENT Risque d'explosion Utiliser un produit de nettoyage ininflammable. Le non-respect de cette instruction peut causer un décès, une explosion ou un incendie. Les sections de réfrigération et de congélation se dégivrent automatiquement. Toutefois, - Maytag MFI2665XEB | Owners Manual - Page 50
pour éviter le coût d'un appel de service. Aux É.-U., www.maytag.com Au Canada, www.maytag.ca Le réfrigérateur ne fonctionne pas Fonctionnement adaptateur. Ne pas utiliser un câble de rallonge. Le non-respect de ces instructions peut causer un décès, un incendie ou un choc électrique. ■ Le cordon - Maytag MFI2665XEB | Owners Manual - Page 51
position correcte. Les portes sont difficiles à ouvrir AVERTISSEMENT Risque d'explosion Utiliser un produit de nettoyage ininflammable. Le non-respect de cette instruction peut causer un décès, une explosion ou un incendie. ■ Les joints d'étanchéité sont-ils sales ou collants? Nettoyer les joints et - Maytag MFI2665XEB | Owners Manual - Page 52
■ Un glaçon est-il coincé dans le bras éjecteur? Enlever le glaçon du bras éjecteur avec un ustensile en plastique. ■ Un filtre à eau est-il installé sur le réfrigérateur? Enlever le filtre et faire fonctionner la machine à glaçons. Si le volume de glace augmente, le filtre est probablement obstrué - Maytag MFI2665XEB | Owners Manual - Page 53
FEUILLE DE DONNÉES SUR LA PERFORMANCE Système de filtration d'eau intérieur Modèle UKF8001AXX-200 /Capacité : 200 gallons (757 litres) Système testé et certifié par NSF International en vertu de la norme NSF/ANSI 42 (réduction du goût et de l'odeur du chlore, et particules (classe I*)); et en vertu - Maytag MFI2665XEB | Owners Manual - Page 54
fournisseur de services d'entretien ou de réparation Maytag autorisé n'est pas disponible. 10. L'enlèvement et la réinstallation du gros appareil ménager si celui-ci est installé dans un endroit inaccessible ou n'est pas installé conformément aux instructions d'installation fournies par Maytag. 11 - Maytag MFI2665XEB | Owners Manual - Page 55
la paroi interne du compartiment de réfrigération. Pour assistance ou service aux É.-U., composez le 1-800-688-9900. Au Canada, composez le 1-800- écrire à Maytag en soumettant toute question ou problème à l'adresse suivante : Aux États-Unis : Maytag Brand Home Appliances Customer eXperience - Maytag MFI2665XEB | Owners Manual - Page 56
compañías asociadas. ®Marque déposée/™ Marque de commerce de Maytag Corporation ou de ses compagnies affiliées. Used under license by Maytag Limited in Canada. Usada bajo licencia por Maytag Limited en Canadá. Emploi sous licence par Maytag Limited au Canada. 7/10 Printed in U.S.A. Impreso en EE
-
 1
1 -
 2
2 -
 3
3 -
 4
4 -
 5
5 -
 6
6 -
 7
7 -
8
-
9
-
10
-
11
-
12
-
13
-
14
-
15
-
16
-
17
-
18
-
19
-
20
-
21
-
22
-
23
-
24
-
25
-
26
-
27
-
28
-
29
-
30
-
31
-
32
-
33
-
34
-
35
-
36
-
37
-
38
-
39
-
40
-
41
-
42
-
43
-
44
-
45
-
46
-
47
-
48
-
49
-
50
-
51
-
52
-
53
-
54
-
55
-
56
 |
 |
THANK YOU for purchasing this high-quality product. If you should experience a problem not covered in TROUBLESHOOTING,
please visit our website at
www.maytag.com
for additional information. If you still need assistance, call us at 1-800-688-9900.
In Canada, visit our website at
www.maytag.ca
or call us at 1-800-807-6777.
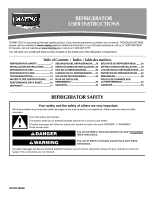
You will need your model and serial number, located on the inside wall of the refrigerator compartment.
REFRIGERATOR SAFETY
Table of Contents
/
Índice / Table des matières
REFRIGERATOR SAFETY
.......................
1
INSTALLATION INSTRUCTIONS
............
2
REFRIGERATOR USE
..............................
8
REFRIGERATOR CARE
.........................
12
TROUBLESHOOTING
............................
13
WATER FILTER CERTIFICATIONS
.......
15
PERFORMANCE DATA SHEET
............
16
WARRANTY
............................................
17
SEGURIDAD DEL REFRIGERADOR
.....
19
INSTRUCCIONES DE INSTALACIÓN...20
USO DE SU REFRIGERADOR
...............
26
CUIDADO DE SU REFRIGERADOR
.....
31
SOLUCIÓN DE PROBLEMAS
................
32
HOJA DE DATOS DEL
RENDIMIENTO
.......................................
35
GARANTÍA
...............................................
36
SÉCURITÉ DU RÉFRIGÉRATEUR
........
38
INSTRUCTIONS D’INSTALLATION
......
39
UTILISATION DU RÉFRIGÉRATEUR ... 44
ENTRETIEN DU RÉFRIGÉRATEUR
.....
49
DÉPANNAGE
..........................................
50
FEUILLE DE DONNÉES SUR
LA PERFORMANCE
..............................
53
GARANTIE
..............................................
54
REFRIGERATOR
USER INSTRUCTIONS
W10314959A
You can be killed or seriously injured if you don't immediately
You
can be killed or seriously injured if you don't follow
All safety messages will tell you what the potential hazard is, tell you how to reduce the chance of injury, and tell you what can
happen if the instructions are not followed.
Your safety and the safety of others are very important.
We have provided many important safety messages in this manual and on your appliance. Always read and obey all safety
messages.
This is the safety alert symbol.
This symbol alerts you to potential hazards that can kill or hurt you and others.
All safety messages will follow the safety alert symbol and either the word “DANGER” or “WARNING.”
These words mean:
follow instructions.
instructions.
DANGER
WARNING