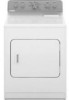
Maytag MGD5900TW Use and Care Guide
Maytag MGD5900TW - Centennial Gas Dryer Manual
 |
View all Maytag MGD5900TW manuals
Add to My Manuals
Save this manual to your list of manuals |
Maytag MGD5900TW manual content summary:
- Maytag MGD5900TW | Use and Care Guide - Page 1
GAS DRYER USE & CARE GUIDE SÉCHEUSE À GAZ GUIDE D'UTILISATION ET D'ENTRETIEN FOR QUESTIONS ABOUT FEATURES, OPERATION/PERFORMANCE, PARTS, ACCESSORIES OR SERVICE CALL: 1.800.688.9900 IN CANADA, CALL: 1.800.807.6777 VISIT OUR WEBSITE AT WWW.MAYTAG.COM IN CANADA, WWW.MAYTAG.CA AU CANADA, POUR - Maytag MGD5900TW | Use and Care Guide - Page 2
...15 Cleaning the Dryer Interior 16 Removing Accumulated Lint 16 Vacation and Moving Care 16 Changing the Drum Light...16 TROUBLESHOOTING...17 ASSISTANCE OR SERVICE...19 ACCESSORIES ...19 WARRANTY ...20 TABLE DES MATIÈRES SÉCURITÉ DE LA SÉCHEUSE 21 INSTRUCTIONS D'INSTALLATION 23 Outillage - Maytag MGD5900TW | Use and Care Guide - Page 3
. • Clear the room, building, or area of all occupants. • Immediately call your gas supplier from a neighbor's phone. Follow the gas supplier's instructions. • If you cannot reach your gas supplier, call the fire department. - Installation and service must be performed by a qualified installer - Maytag MGD5900TW | Use and Care Guide - Page 4
a T-handle type. ■ A flexible gas connector, when used, must not exceed 3 feet. IMPORTANT SAFETY INSTRUCTIONS WARNING: To reduce the risk of any part of the dryer or attempt any servicing unless specifically recommended in this Use and Care Guide or in published user-repair instructions that you - Maytag MGD5900TW | Use and Care Guide - Page 5
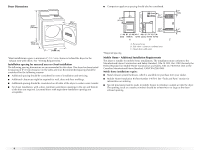
. (If slope is greater than 1" [2.5 cm], install Extended Dryer Feet kit, Part No. 279810.) Clothes may not tumble properly and models with automatic sensor cycles may not operate correctly if dryer is not level. Do not operate your dryer at temperatures below 45ºF (7ºC). At lower temperatures, the - Maytag MGD5900TW | Use and Care Guide - Page 6
servicing. ■ Additional clearances might be required for wall, door and floor moldings. ■ Additional spacing should be considered on all sides of the dryer from your dealer. ■ Mobile Home Installation Kit Part Number 346764. See "Tools and Parts" section for information on ordering. ■ Special - Maytag MGD5900TW | Use and Care Guide - Page 7
properly grounded. Do not modify the plug provided with the dryer: if it will not fit the outlet, have a proper outlet installed by a qualified electrician. SAVE THESE INSTRUCTIONS Explosion Hazard Use a new CSA International approved gas supply line. Install a shut-off valve. Securely tighten all - Maytag MGD5900TW | Use and Care Guide - Page 8
a metal foil vent. Failure to follow these instructions can result in death or fire. WARNING: To reduce the risk of fire, this dryer MUST BE EXHAUSTED OUTDOORS. IMPORTANT: Observe all governing codes and ordinances. The dryer exhaust must not be connected into any gas vent, chimney, wall, ceiling or - Maytag MGD5900TW | Use and Care Guide - Page 9
with rigid or flexible heavy metal vent. ■ Review Vent system chart. Modify existing vent system by calling Maytag Services. For more information, see the "Assistance or Service" section. be fully extended and supported when the dryer is in its final problems and health problems. Good Better 9 - Maytag MGD5900TW | Use and Care Guide - Page 10
Service" section. Recommended exhaust installations Typical installations vent the dryer from the rear of the dryer. Other installations are possible. B ■ Over-the-Top Installation: Part installations are shown. Refer to the manufacturer's instructions. A B A. Over-the-top installation (also - Maytag MGD5900TW | Use and Care Guide - Page 11
home installations require a Mobile Home Installation Kit. See "Tools and Parts" section for information on ordering. Make Gas Connection 1. Remove the red cap from the gas pipe. 2. Using a wrench to tighten, connect the gas supply to the dryer. Use pipe-joint compound on the threads of all non - Maytag MGD5900TW | Use and Care Guide - Page 12
. 2. Move dryer into its final location. Do not crush or kink vent. 3. (On gas models) Check that there are no kinks in the flexible gas line. 4. Once in cabinet are in large part of hinge slot. Pull door forward off screws. Set door (handle side up) on top of dryer. Remove top screws from cabinet - Maytag MGD5900TW | Use and Care Guide - Page 13
parts are now installed. If there is an extra part follow these instructions can result dryer. 7. Dispose of/recycle all packaging materials. 8. Read "Dryer Use." 9. Wipe the dryer drum interior thoroughly with a damp cloth dryer and check that the gas supply line shutoff valve is open. ■ If the gas - Maytag MGD5900TW | Use and Care Guide - Page 14
using an Air Cycle. Failure to follow these instructions can result in death or fire. This book covers several different models. Your dryer may not have all of the cycles and features described. Before using your dryer, wipe the dryer drum with a damp cloth to remove dust from storing and shipping - Maytag MGD5900TW | Use and Care Guide - Page 15
, you may be able to purchase one for your model. To find out whether your model allows drying rack usage and for information on ordering, please refer to the front page of the manual or contact the dealer from whom you purchased your dryer. 3. Select a timed drying cycle and temperature, or an air - Maytag MGD5900TW | Use and Care Guide - Page 16
may discolor the dryer interior. These stains are not harmful to your dryer and will not stain future loads of clothes. Dry unstable vacation or not using your dryer for an extended period of time, you should: 1. Unplug dryer or disconnect power. 2. Close shutoff valve in gas supply line. 3. Clean - Maytag MGD5900TW | Use and Care Guide - Page 17
TROUBLESHOOTING First try the solutions suggested here or visit our website and reference FAQs (Frequently Asked Questions) to possibly avoid the cost of a service call... In U.S.A. www.maytag.com/help - In Canada www.maytag.ca Dryer Operation Dryer will not run ■ Has a household fuse blown, or has - Maytag MGD5900TW | Use and Care Guide - Page 18
dryer require a minimum of 1" (2.5 cm) of airspace, and the rear of the dryer requires 5" (12.7 cm). See the Installation Instructions clothing (usually blue jeans). This will not transfer to other clothing. Loads are wrinkled ■ Was the load removed from dryer at the end of the cycle? ■ Was the dryer - Maytag MGD5900TW | Use and Care Guide - Page 19
Before calling for assistance or service, please check "Troubleshooting." It may save you the cost of a service call. If you still need help, follow the instructions below. When calling, please know the purchase date and the complete model and serial number of your appliance. This information - Maytag MGD5900TW | Use and Care Guide - Page 20
to determine if another warranty applies. If you need service, first see the "Troubleshooting" section of the Use & Care Guide. After checking "Troubleshooting," additional help can be found by checking the "Assistance or Service" section or by calling Maytag. In the U.S.A., call 1-800-688-9900. In - Maytag MGD5900TW | Use and Care Guide - Page 21
instructions. AVERTISSEMENT Risque possible de décès ou de blessure grave si vous ne suivez pas les instructions produire en cas de non-respect des instructions. AVERTISSEMENT : Pour votre sécurité, de gaz d'un téléphone voisin. Suivre ses instructions. • À défaut de joindre votre fournisseur de - Maytag MGD5900TW | Use and Care Guide - Page 22
la sécheuse est utilisée près d'eux. ■ Avant d'enlever la sécheuse du service ou la jeter, enlever la porte du compartiment de séchage. ■ Ne pas mettre d'une recommandation spécifique dans le guide d'utlilisation et d'entretien, ou publiée dans les instructions de réparation par l'utilisateur que - Maytag MGD5900TW | Use and Care Guide - Page 23
la section "Assistance ou service". ■ Trousse d'installation pour dans un garage. Le non-respect de ces instructions peut causer un décès, une explosion ou un incendie Voir "Spécifications électriques". ■ Un plancher robuste capable de supporter un poids total (sécheuse et charge) de 200 lb (90,7 - Maytag MGD5900TW | Use and Care Guide - Page 24
Espacements d'installation L'emplacement doit être assez grand pour permettre d'ouvrir complètement la porte de la sécheuse. Dimensions de la sécheuse ■ Il faut aussi prendre en compte l'espace requis entre les appareils voisins. 18"* (45,7 cm) 14" max* (35,6 cm) 48 po2* (310 cm2) 3"* (7,6 cm) - Maytag MGD5900TW | Use and Care Guide - Page 25
pas enlever la broche de liaison à la terre. Ne pas utiliser un adaptateur. Ne pas utiliser un câble de rallonge. Le non-respect de ces instructions peut causer un décès, un incendie ou un choc électrique. ■ L'appareil doit être alimenté par un circuit de 120 V, CA seulement, 60 Hz, 15 ou 20 - Maytag MGD5900TW | Use and Care Guide - Page 26
Canalisation d'arrivée de gaz ■ La canalisation doit comprendre un connecteur obturé (filetage NPT de ¹⁄₈"ou plus) accessible pour le raccordement de l'instrument de mesure immédiatement en amont de la connexion d'alimentation en gaz de la sécheuse (voir l'illustration). ■ Un tuyau IPS de ½" est - Maytag MGD5900TW | Use and Care Guide - Page 27
un conduit d'évacuation en feuille de métal. Le non-respect de ces instructions peut causer un décès ou un incendie. AVERTISSEMENT : Pour réduire le du marchand ou en téléphonant à Maytag Services. Pour plus de renseignements, voir la section "Assistance ou service". Conduit métallique rigide ■ Pour - Maytag MGD5900TW | Use and Care Guide - Page 28
■ Le conduit d'évacuation ne doit pas être connecté ou fixé avec des vis ou avec tout autre dispositif de serrage qui se prolonge à l'intérieur du conduit. Ne pas utiliser de ruban adhésif pour conduit. Bride de serrage Évacuation Les styles de clapets recommandés sont illustrés ci-dessous. B A 4" ( - Maytag MGD5900TW | Use and Care Guide - Page 29
installation. Deux installations à dégagement réduit sont illustrées. Voir les instructions du fabricant. A B A. Installation au-dessus de la sécheuse ( où le dégagement est réduit. Veuillez consulter la section "Assistance ou service" pour commander. ■ Installation au-dessus de la sécheuse : Piè - Maytag MGD5900TW | Use and Care Guide - Page 30
de nivellement AVERTISSEMENT Risque du poids excessif Utiliser deux ou plus de personnes pour déplacer et installer la sécheuse. Le non-respect de cette instruction peut causer une blessure au dos ou d'autre blessure. 1. Pour protéger le sol, utiliser un grand morceau plat de l'emballage en carton - Maytag MGD5900TW | Use and Care Guide - Page 31
3. Ouvrir le robinet d'arrêt du conduit d'alimentation. Le robinet est ouvert lorsque la poignée est parallèle au conduit d'alimentation en gaz. A B A. Robinet fermé B. Robinet ouvert 4. Vérifier tous les raccordements en les badigeonnant d'une solution de détection des fuites non corrosive approuv - Maytag MGD5900TW | Use and Care Guide - Page 32
la broche de liaison à la terre. Ne pas utiliser un adaptateur. Ne pas utiliser un câble de rallonge. Le non-respect de ces instructions peut causer un décès, un incendie ou un choc électrique. 5. Brancher la sécheuse sur une prise à 3 broches reliée à la terre. Connecter l'alimentation électrique - Maytag MGD5900TW | Use and Care Guide - Page 33
contenant mousse, caoutchouc ou plastique doivent être séchés sur une corde à linge ou par le programme de séchage à l'air. Le non-respect de ces instructions peut causer un décès ou un incendie. Ce manuel couvre plusieurs modèles différents. Votre modèle peut ne pas avoir tous les programmes ou - Maytag MGD5900TW | Use and Care Guide - Page 34
8. Ajouter une feuille d'assouplissant de tissus, si désiré. Suivre les instructions sur l'emballage. 9. Appuyer sur la touche START. Fonctionnement du programme de séchage automatique Lors de l'utilisation du programme Auto Moisture Sensing (détection automatique de l'humidité), - Maytag MGD5900TW | Use and Care Guide - Page 35
Nettoyage du filtre à charpie Nettoyer le filtre à charpie avant chaque charge. Un filtre obstrué de charpie peut augmenter le temps de séchage. IMPORTANT : ■ Ne pas faire fonctionner la sécheuse avec un filtre à charpie déplacé, endommagé, bloqué ou manquant. Une telle action peut causer une - Maytag MGD5900TW | Use and Care Guide - Page 36
ce qui vous évitera peut-être le coût d'une visite de service...www.maytag.ca Fonctionnement de la sécheuse La sécheuse ne fonctionne pas ■ Un La sécheuse peut vibrer si elle n'est pas correctement installée. Voir les Instructions d'installation. ■ Les vêtements sont-ils emmêlés ou en boule? Une - Maytag MGD5900TW | Use and Care Guide - Page 37
sécheuse. Placer la sécheuse au moins 46 cm (18 po) au-dessus du plancher pour une installation dans un garage. Le non-respect de ces instructions peut causer un décès, une explosion ou un incendie. ■ La sécheuse se trouve-t-elle dans une pièce où la température ambiante est inférieure à 45 - Maytag MGD5900TW | Use and Care Guide - Page 38
service, consulter la section "Dépannage". Ce guide peut vous faire économiser le coût d'une visite de service. Si vous avez encore besoin d'aide, suivre les instructions que celles utilisées dans la fabrication de chaque nouvel appareil MAYTAG®. Pour localiser des pièces spécifiées par l'usine dans - Maytag MGD5900TW | Use and Care Guide - Page 39
installé dans un endroit inaccessible ou n'est pas installé conformément aux instructions d'installation fournies. 11. Le coût des pièces de rechange et de Maytag autorisé pour déterminer si une autre garantie s'applique. Si vous avez besoin de service, voir d'abord la section "Dépannage" du Guide - Maytag MGD5900TW | Use and Care Guide - Page 40
2007 All rights reserved. Tous droits réservés. MAYTAG and the "M" Symbol are registered trademarks of Maytag Limited in Canada. MAYTAG et le symbole "M" sont des marques déposées de Maytag Limited au Canada. All other marks are trademarks of Maytag Corporation or its related companies. Toutes les
-
 1
1 -
 2
2 -
 3
3 -
 4
4 -
 5
5 -
 6
6 -
 7
7 -
8
-
9
-
10
-
11
-
12
-
13
-
14
-
15
-
16
-
17
-
18
-
19
-
20
-
21
-
22
-
23
-
24
-
25
-
26
-
27
-
28
-
29
-
30
-
31
-
32
-
33
-
34
-
35
-
36
-
37
-
38
-
39
-
40
 |
 |
GAS DRYER
USE & CARE GUIDE
SÉCHEUSE À GAZ
GUIDE D’UTILISATION ET D’ENTRETIEN
FOR QUESTIONS ABOUT FEATURES, OPERATION/PERFORMANCE, PARTS, ACCESSORIES OR SERVICE
CALL: 1.800.688.9900
IN CANADA, CALL: 1.800.807.6777
AU CANADA, POUR ASSISTANCE, INSTALLATION OU SERVICE, COMPOSEZ LE : 1.800.807.6777
VISIT OUR WEBSITE AT WWW.MAYTAG.COM
IN CANADA, WWW.MAYTAG.CA
OU VISITEZ NOTRE SITE INTERNET
WWW.MAYTAG.CA
PARA OBTENER ACCESO AL MANUAL DE USO Y CUIDADO EN ESPAÑOL, O PARA OBTENER INFORMACIÓN ADICIONAL ACERCA DE SU PRODUCTO, VISITE: WWW.MAYTAG.COM
TENGA LISTO SU NÚMERO DE MODELO COMPLETO. PUEDE ENCONTRAR EL NÚMERO DE MODELO Y DE SERIE DENTRO DE LA CAVIDAD SUPERIOR DE LA PUERTA.
W10151609A