Maytag MGDE500WR Installation Instructions
Maytag MGDE500WR - ADA Compliant, 7.2 Cu Ft Cap Manual
 |
UPC - 883049186757
View all Maytag MGDE500WR manuals
Add to My Manuals
Save this manual to your list of manuals |
Maytag MGDE500WR manual content summary:
- Maytag MGDE500WR | Installation Instructions - Page 1
GAS (U.S.A. AND CANADA) ELECTRIC (CANADA ONLY) INSTRUCTIONS D'INSTALLATION DE LA SÉCHEUSE À GAZ (É.-U. ET CANADA) ÉLECTRIQUE (CANADA UNIQUEMENT) Para una version de estas intrucciones en Español, visite www.Whirlpool.com TABLE OF CONTENTS DRYER SAFETY 2 INSTALLATION REQUIREMENTS 4 Tools and Parts - Maytag MGDE500WR | Installation Instructions - Page 2
DRYER SAFETY Your safety and the safety of others are very important. We have provided many important safety messages in this manual and if you don't immediately follow instructions. WARNING You can be killed or seriously injured if you don't follow instructions. All safety messages will tell - Maytag MGDE500WR | Installation Instructions - Page 3
from a neighbor's phone. Follow the gas supplier's instructions. • If you cannot reach your gas supplier, call the fire department. - Installation and service must be performed by a qualified installer, service agency, or the gas supplier. WARNING: Gas leaks cannot always be detected by smell - Maytag MGDE500WR | Installation Instructions - Page 4
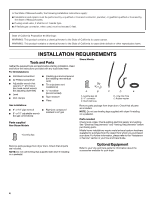
resistant to LP gas (for gas connections) Parts supplied Non-Steam Models 4 Leveling legs Remove parts package from dryer drum. Check that all parts are included. NOTE: Do not use leveling legs supplied with dryer if installing on a pedestal. Parts needed Check local codes. Check existing - Maytag MGDE500WR | Installation Instructions - Page 5
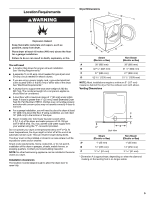
25 mm), install Extended Dryer Feet Kit, Part Number 279810. Clothes may not tumble properly and automatic sensor cycles may not operate correctly if dryer is not level. ■ For a garage installation, you will need to place the dryer at least 18" (460 mm) above the floor. If using a pedestal, you will - Maytag MGDE500WR | Installation Instructions - Page 6
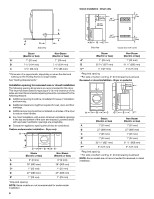
models are not recommended for undercounter installation. 6 A* B C** Side view Closet door with vents Steam (Electric or Gas) Non-Steam (Electric or Gas Recessed or closet installation - Dryer on pedestal (460 mm) A B C D* E F** Steam (Electric or Gas) Non-Steam (Electric or Gas) A 1" - Maytag MGDE500WR | Installation Instructions - Page 7
: Some models are not recommended for stacked recessed or closet installation. Mobile home - Additional installation requirements This dryer is suitable for mobile home installations. The installation must conform to the Manufactured Home Construction and Safety Standard, Title 24 CFR, Part 3280 - Maytag MGDE500WR | Installation Instructions - Page 8
the plug provided with the dryer: if it will not fit the outlet, have a proper outlet installed by a qualified electrician. SAVE THESE INSTRUCTIONS 4-wire receptacle 14-30R If using a replacement power supply cord, it is recommended that you use Power Supply Cord Replacement Part Number 9831317. 8 - Maytag MGDE500WR | Installation Instructions - Page 9
compounds that resist the action of LP gas must be used. Do not use TEFLON®† tape. ■ Must include a shutoff valve: In the U.S.A.: An individual manual shutoff valve must be installed within six (6) feet (1.8 m) of the dryer in accordance with the National Fuel Gas Code, ANSI Z223.1. In Canada: An - Maytag MGDE500WR | Installation Instructions - Page 10
mm) 1½" A (38 mm) A. 1/2" NPT gas supply line B. 3/8" NPT dryer pipe *NOTE: If the dryer is mounted on a pedestal, the gas pipe height must be an additional 10" (254 mm) or 15.5" (394 mm) from the floor, depending on the pedestal model. For a garage installation, the gas pipe height must be an - Maytag MGDE500WR | Installation Instructions - Page 11
. ■ Flexible metal vent must be fully extended and supported when the dryer is in its final location. ■ Remove excess flexible metal vent to avoid sagging and kinking that may result in reduced airflow and poor performance. ■ Do not install flexible metal vent in enclosed walls, ceilings, or floors - Maytag MGDE500WR | Installation Instructions - Page 12
installation NOTE: The following kits for close-clearance alternate installations are available for purchase. Please see the "Assistance or Service" section to order. ■ Over-the-Top Installation: Part Number 4396028 ■ Periscope Installation (For use with dryer vent to wall vent mismatch): Part - Maytag MGDE500WR | Installation Instructions - Page 13
flexible gas line. 4. Once the exhaust vent connection is made, remove the corner posts and cardboard. CONNECT INLET HOSE (STEAM MODELS) The dryer must be connected to the cold water faucet using the new inlet hoses. Do not use old hoses. 1. Turn cold water faucet off and remove washer inlet hose - Maytag MGDE500WR | Installation Instructions - Page 14
buildup of lime scale may clog different parts of the water system, which will reduce product performance. Excessive scale buildup may lead to the need for certain part replacement or repair. All Models: 15. Select a Timed Dry heated cycle, and start the dryer. Do not select the Air Only Temperature - Maytag MGDE500WR | Installation Instructions - Page 15
If you receive an L2 code, there may be a problem with your home power supply keeping the dryer's heater from turning on. See "Troubleshooting." 16. When the dryer has been running for 5 minutes, open the dryer door and feel for heat. If you feel heat, cancel cycle and close the door. If you do not - Maytag MGDE500WR | Installation Instructions - Page 16
or replace exhaust vent with heavy metal or flexible metal vent. See the Installation Instructions. ■ Are fabric softener sheets blocking the grille? Use only one fabric softener sheet, and use it only once. ■ Is the dryer located in a closet? Closet doors must have ventilation openings at the top - Maytag MGDE500WR | Installation Instructions - Page 17
: DANGER Risque possible de décès ou de blessure grave si vous ne suivez pas immédiatement les instructions. AVERTISSEMENT Risque possible de décès ou de blessure grave si vous ne suivez pas les instructions. Tous les messages de sécurité vous diront quel est le danger potentiel et vous disent - Maytag MGDE500WR | Installation Instructions - Page 18
. En cas de détection d'une fuite de gaz, exécuter les instructions "Que faire dans le cas d'une odeur de gaz". IMPORTANT : L'installation du gaz doit se conformer aux codes locaux, ou en l'absence de codes locaux, au code canadien d'installation B149.1 du gaz naturel ou du propane. La sécheuse doit - Maytag MGDE500WR | Installation Instructions - Page 19
service" de votre Guide d'utilisation et d'entretien. Équipement facultatif Consulter votre Guide d'utilisation et d'entretien pour en savoir plus sur les accessoires disponibles pour votre sécheuse. Exigences d'emplacement Installations plancher robuste capable de supporter un poids total (sécheuse - Maytag MGDE500WR | Installation Instructions - Page 20
intempéries. Vérifier les règlements locaux. Certains codes limitent ou n'autorisent pas l'installation des sécheuses dans un garage, un placard, A* B Vue latérale Steam (Electric or Gas) A* 1" (25 mm) B 7 5/8" (194 mm) C 3 3/8" (86 mm) Non-Steam (Electric or Gas) 1" (25 mm) 7 5/8" (194 mm - Maytag MGDE500WR | Installation Instructions - Page 21
une évacuation par le côté ou par le fond, un espacement de 0" (0 mm) est permis. REMARQUE : Certains modèles ne sont pas recommandés pour une installation dans un encastrement ou un placard. (460 mm) A* B C** Vue latérale Porte de placard avec orifices d'entrée d'air Vapeur (électrique ou à gaz - Maytag MGDE500WR | Installation Instructions - Page 22
tal qui peut être acheté chez votre marchand. ■ Il faut prendre des dispositions spéciales pour l'apport d'air extérieur dans la sécheuse lors d'une installation dans une maison mobile. La surface de toute ouverture pour l'apport d'air extérieur (telle qu'une fenêtre à proximité) doit être au moins - Maytag MGDE500WR | Installation Instructions - Page 23
sur une prise appropriée qui est bien installée et reliée à la terre conformément à tous les codes et règlements locaux. AVERTISSEMENT : Le raccordement courant, demander à un électricien qualifié d'installer une prise de courant appropriée. CONSERVEZ CES INSTRUCTIONS Prise murale à 4 fils (14-30R) - Maytag MGDE500WR | Installation Instructions - Page 24
entretien autorisé. Le non-respect de ces instructions peut causer un décès, un explosion ou service". Conversion au gaz de pétrole liquéfié : Un technicien qualifié doit effectuer la conversion installé à six (6) pieds (1,8 m) de la sécheuse conformément au Natural Gas and Propane Installation Code - Maytag MGDE500WR | Installation Instructions - Page 25
3048 m) : ■ Lors d'une installation au-dessus de 10 000 pi (3 048 m), une réduction de 4 % du débit thermique (en BTU) indiqué sur la plaque signalé utiliser un câble de rallonge. Le non-respect de ces instructions peut causer un décès, un incendie ou un choc électrique. †®TEFLON est une marque dé - Maytag MGDE500WR | Installation Instructions - Page 26
é d'installer une prise de courant appropriée. CONSERVEZ CES INSTRUCTIONS ÉVACUATION L'EXTÉRIEUR. IMPORTANT : Observer les dispositions de tous les codes et règlements en vigueur. Le conduit d'évacuation de la sé , consulter la section "Assistance ou service". Conduit métallique rigide ■ Pour un - Maytag MGDE500WR | Installation Instructions - Page 27
charge H E. Brides de serrage F. Conduit métallique rigide ou souple G. Longueur de conduit nécessaire pour raccorder les coudes H. Bouche de décharge Installations d'évacuation facultatives Cette sécheuse peut être convertie pour une évacuation par le côté droit, le côté gauche ou par le bas. Si - Maytag MGDE500WR | Installation Instructions - Page 28
instructions du fabricant. A. Installation au-dessus de la sécheuse (également disponible avec un coude décalé) B. Installation avec périscope REMARQUE : On peut acheter les trousses suivantes pour les installations où le dégagement est réduit. Voir la section "Assistance ou service performance - Maytag MGDE500WR | Installation Instructions - Page 29
DES PIEDS DE NIVELLEMENT AVERTISSEMENT Risque du poids excessif Utiliser deux ou plus de personnes pour déplacer et installer la sécheuse. Le non-respect de cette instruction peut causer une blessure au dos ou d'autre blessure. 1. Pour éviter d'endommager le plancher, utiliser un grand morceau - Maytag MGDE500WR | Installation Instructions - Page 30
à nouveau si elle est d'aplomb. ACHEVER L'INSTALLATION 1. Vérifier que toutes les pièces sont maintenant installées. S'il reste une pièce, passer en différentes parties du système d'eau, ce qui réduira la performance du produit. Des accumulations excessives de calcaire peuvent engendrer la nécessité - Maytag MGDE500WR | Installation Instructions - Page 31
exécute automatiquement une routine de diagnostic d'installation au début de son premier programme. Si vous recevez un code d'erreur "L2", il peut y avoir ici, ce qui vous évitera peut-être le coût d'une visite de service... Fonctionnement de la sécheuse Le sécheuse ne fonctionne pas ■ Un fusible - Maytag MGDE500WR | Installation Instructions - Page 32
n'est pas trop long ou ne comporte pas trop de changements de direction. Un long conduit augmentera les durées de séchage. Voir "Instructions d'installation". ■ Le diamètre du conduit d'évacuation a-t-il la taille correcte? Utiliser un composant de 4" (102 mm) de diamètre. La sécheuse est-elle
-
 1
1 -
 2
2 -
 3
3 -
 4
4 -
 5
5 -
 6
6 -
 7
7 -
8
-
9
-
10
-
11
-
12
-
13
-
14
-
15
-
16
-
17
-
18
-
19
-
20
-
21
-
22
-
23
-
24
-
25
-
26
-
27
-
28
-
29
-
30
-
31
-
32
 |
 |

DRYER INSTALLATION INSTRUCTIONS
GAS (U.S.A. AND CANADA)
ELECTRIC (CANADA ONLY)
INSTRUCTIONS D'INSTALLATION DE LA SÉCHEUSE
À GAZ (É.-U. ET CANADA)
ÉLECTRIQUE (CANADA UNIQUEMENT)
W10255469B
W10259188B - SP
Para una version de estas intrucciones en Español, visite www.Whirlpool.com
TABLE OF CONTENTS
DRYER SAFETY
..............................................................................
2
INSTALLATION REQUIREMENTS
................................................
4
Tools and Parts
............................................................................
4
Optional Equipment
.....................................................................
4
Location Requirements
................................................................
5
ELECTRIC DRYER POWER HOOKUP – CANADA ONLY
..........
8
Electrical Requirements
...............................................................
8
GAS DRYER POWER HOOKUP
....................................................
9
Gas Supply Requirements
...........................................................
9
Make Gas Connection
...............................................................
10
Electrical Requirements
.............................................................
10
VENTING
.......................................................................................
11
Venting Requirements
................................................................
11
Plan Vent System
.......................................................................
12
Install Vent System
.....................................................................
13
INSTALL LEVELING LEGS
...........................................................
13
CONNECT VENT
...........................................................................
13
CONNECT INLET HOSE
(STEAM MODELS)
........................................................................
13
LEVEL DRYER
..............................................................................
14
COMPLETE INSTALLATION
.......................................................
14
TROUBLESHOOTING
..................................................................
15
TABLE DES MATIÈRES
SÉCURITÉ DE LA SÉCHEUSE
....................................................
17
EXIGENCES D'INSTALLATION
...................................................
19
Outillage et pièces
......................................................................
19
Équipement facultatif
.................................................................
19
Exigences d'emplacement
.........................................................
19
RACCORDEMENT DE L'ALIMENTATION À LA
SÉCHEUSE ÉLECTRIQUE
...........................................................
23
Spécifications électriques
..........................................................
23
RACCORDEMENT DE L'ALIMENTATION
À LA SÉCHEUSE À GAZ
..............................................................
24
Alimentation en gaz
....................................................................
24
Raccordement au gaz
................................................................
25
Spécifications électriques
..........................................................
25
ÉVACUATION
................................................................................
26
Exigences concernant l'évacuation
...........................................
26
Planification du système d'évacuation
......................................
27
Installation du système d'évacuation
.........................................
28
INSTALLATION DES PIEDS DE NIVELLEMENT
........................
29
RACCORDEMENT DU CONDUIT D'ÉVACUATION
..................
29
RACCORDEMENT DES TUYAUX D'ALIMENTATION
(MODÈLES À VAPEUR)
................................................................
29
RÉGLAGE DE L'APLOMB DE LA SÉCHEUSE
...........................
30
ACHEVER L'INSTALLATION
.......................................................
30
DÉPANNAGE
.................................................................................
31