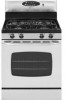
Maytag MGR5765QDS Use and Care Guide
Maytag MGR5765QDS - 30 Inch Gas Range Manual
 |
View all Maytag MGR5765QDS manuals
Add to My Manuals
Save this manual to your list of manuals |
Maytag MGR5765QDS manual content summary:
- Maytag MGR5765QDS | Use and Care Guide - Page 1
Oven Window & Light Removal of Gas Appliance Troubleshooting ...9=10 10=1 1 Warranty & Service ...19 Guide d'utilisation et d'entretien ...20 Gu[a de uso y cuidado ...40 Surface Cooking ...Surface Controls Sealed Gas Burners Form No. A/01/08 Part No. 8113P734-60 Rev. 1 _c)2006 Maytag Appliances - Maytag MGR5765QDS | Use and Care Guide - Page 2
. Have the installer show you the location of the gas shut off valve and how to shut it off in an emergency. Always disconnect power to appliance before servicing. portant Safety Warning and Important Safety Instructions appearing in this guide are not meant to cover all possible conditions and - Maytag MGR5765QDS | Use and Care Guide - Page 3
burners. NEVER leave any items on the cooktop. The hot air from the vent may ignite are vulnerable to heat. Keep plastics away from parts of the appliance that may become warm or the vent or a lighted surface burner. To eliminate the hazard of reaching over hot surface burners, cabinet storage should - Maytag MGR5765QDS | Use and Care Guide - Page 4
light or cooking utensils. manufacturer's instructions. If a plastic frozen food hot surface burners and ignite or get caught on appliance parts. Always specifically recommended in this guide. Do not use element manual can create serious safety hazards, result in performance problems, and reduce - Maytag MGR5765QDS | Use and Care Guide - Page 5
some of the listed substances, including benzene, formaldehyde and soot, due primarily to the incomplete combustion of natural gas or liquid petroleum (LP) fuels. Properly adjusted burners will minimize incomplete combustion. Exposure to these substances can also be minimized by properly venting the - Maytag MGR5765QDS | Use and Care Guide - Page 6
down in the display. * LOCK will appear in the display. * CLEAN will appear in the display. Before Self=Cleaning 1. Turn off the oven light before cleaning. The light may burn out during the clean cycle. 2. Remove all pans and oven racks from the oven. The oven racks will discolor and may not - Maytag MGR5765QDS | Use and Care Guide - Page 7
and Sealed Gas Burners Removable Burner Caps Allow burner to cool. Remove burner cap and wash in soapy water with a plastic scouring pad. For stubborn soils, clean with a soap-filled, nonabrasive pad or Cooktop Cleaning Creme* (Part #20000001:)** and a sponge. Do not clean in the dishwasher or self - Maytag MGR5765QDS | Use and Care Guide - Page 8
Part #20000001_)** and a sponge. If soil remains, reapply Cooktop Cleaning Creme*, cover with a damp paper towel and soak for 30 Turn on each burner to be sure on exterior finish of range. Side Panels, interior * Follow instructions on pages and embossed rack supports with a small Cleaning/Light Soil - Maytag MGR5765QDS | Use and Care Guide - Page 9
oven door on a new range may feel "spongy" when it is closed. This is normal and will decrease with use. To replace oven light bulb: Oven Window To -TIP BRACKET 1. Fit the ends of the drawer glides into the rails in the range. \LEVELINGLEG 2. Lift up the front of the drawer and gently push in to - Maytag MGR5765QDS | Use and Care Guide - Page 10
or a tripped main circuit breaker. * Check to be sure ignitor is dry and clicking. Burner will not light if ignitor is damaged, soiled or wet. If ignitor doesn't click, turn control knob OFF. The flame is uneven. * Burner ports may be clogged. Surface Burner flame lifts off ports. * Check to be sure - Maytag MGR5765QDS | Use and Care Guide - Page 11
light smoke when oven is turned on. * This is normal for a new range problem. servicer parts Ignition BURNER CAP 2. Push in and turn the knob counterclockwise to the LITE setti ng. * A clicking (spark) sound will be heard and the burner will light. (All four ignitors will spark when any surface burner - Maytag MGR5765QDS | Use and Care Guide - Page 12
will light within a few seconds. If using natural gas, the flame will be blue with a deeper blue inner cone. If the burner flame is yellow or is noisy, the air/gas mixture may be incorrect. Contact a service technician to adjust. (Adjustments are not covered by the warranty._) With LP gas, slight - Maytag MGR5765QDS | Use and Care Guide - Page 13
= pad, the time or temperature will automatically be entered, if more than 30 seconds elapse between touching a function pad and the More+ or Less- pad format. The clock is set at the factory for the 12-hour format. 0:00 lights in the display. The colon flashes in the display. 2. Press the More+ or - Maytag MGR5765QDS | Use and Care Guide - Page 14
alert you if there is an error or a problem. If BAKE or LOCK flash in the display, to the appliance and call an authorized servicer. Baking Differences Between Your Old and Press the Bake pad. * BAKE will flash. * 000 will light in the display. 2. Select the oven temperature. The oven temperature - Maytag MGR5765QDS | Use and Care Guide - Page 15
time. While DELAY is still flashing: 3. Press the Cook & Hold pad. 000 lights in the display. BAKE and HOLD flash. 4. Keep Warm For safely keeping foods 199°. Press or press and hold the More+ or Less= pad...* 170°will light when either pad is first pressed. . Press the More+ pad to increase the - Maytag MGR5765QDS | Use and Care Guide - Page 16
the current setting will be displayed (°F or °C). (if no change is made, the range will return to the existing setting after 30 seconds.) To change the setting, press the More+ or Less= pad. Press again . Important: This chart is a suggested guide. The times may vary with the food being cooked. 15 - Maytag MGR5765QDS | Use and Care Guide - Page 17
when Sabbath Mode is set, BAKE will go out at the end of the baking cycle. There will be no audible beeps. If the oven light is desired while in Sabbath Mode, it must be turned on before the Sabbath Mode is started. When the Sabbath Mode is started, no preheat - Maytag MGR5765QDS | Use and Care Guide - Page 18
replace: 1. Place rack on the rack support in the oven. 2. Tilt the front Ignition Your range is equipped with pilotless ignition. With this type of ignition system, the gas automatically shuts off and the oven will not operate during a power failure. A lighted match will not light the oven burner - Maytag MGR5765QDS | Use and Care Guide - Page 19
Oven Bottom: Place oven rack on raised sides of oven bottom. Use for additional space when cooking large oven meals. MULTIPLE RACK COOKING: Two rack: Use rack positions 3 and 6, or 2 and 4. t_ Baking Layer Cakes on Two Racks For best results when baking cakes on two racks, use racks 2 and 4. Place - Maytag MGR5765QDS | Use and Care Guide - Page 20
and maintained according to instructions attached to or furnished with the product, Maytag brand of Whirlpool Corporation or Whirlpool Canada LP (hereafter "Maytag") will pay for factory specified parts and repair labor to correct defects in materials or workmanship. Service must be provided by - Maytag MGR5765QDS | Use and Care Guide - Page 21
gaz _ touches de precision 500 /sin/ Table instructions de s_curit_ importantes ...,,.._;!:.:;,::::;i;;!::21-24 Nettoyage ...Four gaz Garantie etservice apr_s=vente ...39 Recherche des pannes ...29=30 Cuisson sur la sudace ...30=32 Commandes de la surface de cuisson BrQleurs b gaz scelles Guia - Maytag MGR5765QDS | Use and Care Guide - Page 22
fermer en cas d'urgence. Toujours d6brancher I'appareil avant d'y faire de I'entretien. securlte importentes Les instructions de s6curit6 importantes et les paragraphes _ avertissement ))de ce guide ne sont pas destin6s _ couvrir toutes les conditions et situations qui pourraient se pr6senter. II - Maytag MGR5765QDS | Use and Care Guide - Page 23
instructions g6n6rales Pour eliminer le besoin d'atteindre quelque chose par-dessus les curit6 pour los enfants NE JAMAIS laisser des enfants seuls ou sans supervision Iorsque I'appareil est en service ou encore chaud. NE JANIAIS laisser un enfant s'asseoir ou se tenir sur une partie quelconque - Maytag MGR5765QDS | Use and Care Guide - Page 24
de retirer/introduire un plat. AVERTISSEMENT : Mets prepares : Respecter les instructions du fabricant. Si le contenant ou le couvercle en plastique d'un du brOleur. Veiller _ toujours ajuster correctement la taille des flammes pour guide. qu'elles ne d@assent pas sur la peripherie de I'ustensile. - Maytag MGR5765QDS | Use and Care Guide - Page 25
four sans risque de bris sous reffet du choc thermique. Observer les instructions du fabricant Iors de rutiNsation d'un ustensile en verre. La securite de surface chaude. Four autonettoyant Nettoyer uniquement les pieces mentionnees dans ce guide. Ne pas nettoyer le joint de porte; le joint joue - Maytag MGR5765QDS | Use and Care Guide - Page 26
Four autonettoyant . Essuyerles residussucres et acides,commeles patatesdouces, la tomate ou lessauces9 basede lait. La porcelainevitrifiee possedeune certaine resistanceaux composesacides,mais qui n'est pas limitee. Ellepeut se decolorersi les residusacides ou sucresne sont pasenlevesavant de - Maytag MGR5765QDS | Use and Care Guide - Page 27
cycled'autonettoyage. Si los grilles oat 6t6 laiss6es tt I'int6rieur du four pendant le cycle d'autonettoyage et qu'elles glissent real sur leurs supports,les enduire,ainsi que lessupports, d'une fine couche d'huile vegetale. Be fines lignes peuvent apparaitre duns la porcelaine puree qu'elle a subi - Maytag MGR5765QDS | Use and Care Guide - Page 28
table de cuisson, recouvrir avec un essuie-tout humide,et laissertremper pendant 30 minutes.Frotterde nouveau,rincer et faire s6cher. • Ne pus effectuer le risqueraientde rayer le verre. Interieur du four • Ex6cuterlos instructions pr6sent6esaux pages25-26 pour I'autonettoyagedu four. Grilles du - Maytag MGR5765QDS | Use and Care Guide - Page 29
Porte du four Lampe du four important : On peut percevoir une certaine > lots de la fermeturede la porte du four d'une cuisiniere neuve;ceci est normal; cet effet disparait progressivement. Pour remplacer rampoule du four : CABOCHON Hublot du four Pour prot_ger le hublot de la - Maytag MGR5765QDS | Use and Care Guide - Page 30
demenag6et/ou enlev6pour 6tre repare,suivre la methode decrite dans los instructionsd'installation.Pourtoute information, prendre contact avec le service_ la clientele de Maytag au 1-800-688-9900I_.-U. ou 1-800-688-2002au Canada. II faut qua le pied arriere de la cuisinieresoit engagedans la bride - Maytag MGR5765QDS | Use and Care Guide - Page 31
un autonettoyage. Codes d'anomalie. • Les roots BAKE(Cuissoncourante) ou LOCKpeuvent clignoter rapidement9 rafficheur pour prevenird'une erreur ou d'un probleme.Si le mot BAKEou LOCKparait_ I'afficheur,appuyer sur la touche CANCEL(Annuler).Sile mot BAKEou LOCK continue _ clignoter,debrancher - Maytag MGR5765QDS | Use and Care Guide - Page 32
calage_ la position HI.On pout choisir toute position de reglage entre los deux positionsextremes. Un graphique pros de chaquebouton identifie le brQleurde surfacecommandopar ce bouton. Parexemple,le OC} graphique 9 droit identifie le brQleuravant/gauche. IFl'ont _[_ Surface de cuisson Pour - Maytag MGR5765QDS | Use and Care Guide - Page 33
erreur de programmation. Important : Quatresecondesapresavoir appuyesur les touches More+ ou Less=,la duree ou la temperaturesera automatiquement entree.Si plus de 30 secondess'ecoulententre la pressionet sur une touche de fonction sur lostouches More+ ou Less-,la fonction sera annulee et rafficheur - Maytag MGR5765QDS | Use and Care Guide - Page 34
emettre des bips. Codes d'anomalie Les roots BAKE(Cuissoncourante) ou LOCKpeuvent clignoter rapidement9 rafficheur pour preveniren cas d'erreur ou de probleme.Si tel est lecas, appuyersur la touche CANCEL.Si los roots BAKEou LOCKcontinuent 9 clignoter,debrancherI'appareil. Attendre quelques minutes - Maytag MGR5765QDS | Use and Care Guide - Page 35
• Appuyer sur la touche More+ (Plus+) pour augmenter la temperature. • Appuyer sur la touche Less- (Moins-) pour diminuer la temperature. . touche More+ ou Less- ou appuyersur la touche More+ ou Less- et la maintenir ainsi. • Appuyer sur la touche More+ pour augmenter la temperature. • Appuyer sur - Maytag MGR5765QDS | Use and Care Guide - Page 36
• 00:00 clignote _I'afficheur. 2. Appuyer sur latouche More+ ouLess- pour programmerla dur_ed'attente. Alors que le mot DELAYclignote toujours : 3. Appuyer sur la touche Cook & Hold (Cuisson et maintien). • 000s'allume _ I'afficheur. • Lesroots BAKE(Cuissoncourante) et HOLD(Maintien) clignotent. - Maytag MGR5765QDS | Use and Care Guide - Page 37
Pore Bacon Tranchede jambon precuit, 1,3cm (1/2 po) d'@aisseur C0telette,2,5 cm (1 po) d'@aisseur Volaille Blancs,avecos 30-45 min (Gril temperaturebasse) 8 - 12 min 10 - 15 min 7 - 10 min Fruits de mar Cetableau n'est qu'un guide de suggestions.Lesdureespeuventvarlet solon I'aliment_ cuire. 36 - Maytag MGR5765QDS | Use and Care Guide - Page 38
Arr t automatique/ Mode sabbat Le four s'arrete automatiquementapres12 heuress'il a ete accidentellementlaisseen marche.Cettecaracteristiquede securite pout ¢tre arretee. Annulation du mode sabbat : 1. Appuyer sur la touche Clock pendant cinqsecondes. OU 2. Apres 72 heures,le modesabbat setermine. - Maytag MGR5765QDS | Use and Care Guide - Page 39
la porte. Lorsquela porte est ferm6e,appuyersur le commutateurd'6clairagedu four pour allumer ou 6teindre la lampe. Positions des grilles Oven Light POSITION 7 (position la plus haute): Pour la cuissonau gril et la cuissonau four sur une seulegrille avec une tOle biscuits. --7 --6 --5 --4 Sole - Maytag MGR5765QDS | Use and Care Guide - Page 40
instructions jointes & ou fournies avec le produit, la marque Maytag de Whirlpool Corporation ou Whirlpool Canada LP (ci-apres designees "Maytag") marchand Maytag autorise pour determiner si une autre garantie s'applique. Si vous avez besoin de service, voir d'abord la section "Depannage" du Guide - Maytag MGR5765QDS | Use and Care Guide - Page 41
Y[AG Estufa a gas con control a precisi6n sensible al tacto 500 Cuidado y limpieza ...45=47 Homo autolimpiante Procedimientos del homo Mantenimiento ...48=49 Ventana y luz del homo Retiro de la estufa a gas Localizaci6n y soluci6. de averias ...49=50 Garantia y servicio ...P;igina _ltima - Maytag MGR5765QDS | Use and Care Guide - Page 42
deben set realizadas pot un t6cnico calificado. Pida al instaladorque le indique la ubicaci6n de la v_ilvula de cierre del gas y como cerrafla en caso de una emergencia. Siempre desenchufe el electrodom6stico antes de efectuar alguna reparaci6n. Las advertencias e instruccionesimportantes sobre - Maytag MGR5765QDS | Use and Care Guide - Page 43
debajo del protector trasero. Evite tocar el 4rea del respiradero mientras el homo est6 encendido y durante varios minutos despu6s de haberlo apagado. Algunas partes del respiradero y del 4rea que Io rodea se calientan Io suficiente como para causar quemaduras. Despu6s de apagar el homo, no toque el - Maytag MGR5765QDS | Use and Care Guide - Page 44
ni_os solos o sin supervision cuando el electrodomOstico est6 en uso o est6 caliente. NUNCA permita que los ni_os se sienten o se paren en ninguna parte del electrodomOstico pues se pueden lesionar o quemar. Se les debe ense_ar a los niNos que el electrodomOstico y los utensilios que est4n en 61o - Maytag MGR5765QDS | Use and Care Guide - Page 45
dealimentos quesevaa agregar aligual que el homo ni alrededor de cualquier parte del homo paralaformaci6n deburbujas delagrasa. autolimpiante. Para reducir a unm[ de esta estufa que la combustion cuando useutensilios devidrio. del gas puede resultar en exposiciOn de bajo nivel a algunas Este - Maytag MGR5765QDS | Use and Care Guide - Page 46
del homo. La junta estd diseSadapara sellar hermeticamenteel calor durante el ciclo de limpieza. 5. Limpieel excesode grasao derramesde la parte inferior del homo. Estoevita humo excesivoo Ilamaradasdurante el ciclo de limpieza. 6. Limpie los derramesazucaradoso dcidostales como papa dulce (camote - Maytag MGR5765QDS | Use and Care Guide - Page 47
Insfuncionesson canceladas. • La hera del dfase despliegaen el indicadorvisual. Durante el title de autolimpieza Tapas de quemadores y quemadores de gas sellados Tapas de quemadores removibles • Deje enfriar el quemador.Retirela tapay I_velaen agua jabonosa con una esponjade restregarde pl_stico - Maytag MGR5765QDS | Use and Care Guide - Page 48
Quemadores de gas seilados * Limpielos con frecuencia.Dejeenfriar el quemador.Limpie con jab6n y ,vuelvaa aplicar 'Cooktop CleaningCreme',cubra con una toalla de papel h_meday deje remojardurante 30 minutos.Restrieguenuevamente, enjuaguey seque. . No Inslave en el lavavajillasni en un homo - Maytag MGR5765QDS | Use and Care Guide - Page 49
MantenimJento Puerta del homo Cone×i6n electrica Los electrodom6sticos que requieren energia electrica est_n equipados con an enchufe de tres ciavijas con conexi0n a tierra, el cual debe set enchufado directamenteen un tomacorrienteel(!ctrico de tres agujeros,para 120voltios debidamenteconectadoa - Maytag MGR5765QDS | Use and Care Guide - Page 50
deslfcelahaciaafuera hasta la primeraposici0n tope. 2. Levantela parte delanterade la gaveta. 3. Tfrela hasta la segunda gas Los conectoresde la estufaa gas usadospara conectar este artefacto al suministro de gas contacto con el Servicioa los Clientes Maytag Ilamandoal 1-800-688-9900EE.UU. - Maytag MGR5765QDS | Use and Care Guide - Page 51
El homo no se autolimpia. . Verifique para asegurarsede que el ciclo no est(!ajustado para un comienzodiferido.Vet pdginas45-46. • Verifiquesi la puerta estd cerrada. • Verifiquesi el control estd en Modo Sabdtico.Vet pdg.57. • El homo puede estar a rodsde 205 ° C (400 ° F). La temperatura del homo - Maytag MGR5765QDS | Use and Care Guide - Page 52
pueden descolorarla porcelana. A diferencia de una estufa con quemadoresde gas estdndar,esta cubierta no se levantani tampocoes removible. No Sin embargo,los quemadorespueden ser limpiados despu(!sde cada uso. La parte de la cabezadel quemadorpuedeser fdcilmente sacada para su limpieza.(Ver en - Maytag MGR5765QDS | Use and Care Guide - Page 53
perder_nsu brillo y/o se descolorar_n,debido a las altas temperaturasde la llamadel gas. • Si la perilla de control se gira muy r@idamentede 'HI ='el tiempo o la temperaturaser_autom_ticamente programada.Si transcurrenm_s de 30 segundosdespu(!sde haber oprimido una tecla de funci0n y antesde - Maytag MGR5765QDS | Use and Care Guide - Page 54
2. Oprima 'More+' (Mas+) o'Less=' (Menos-) para programar el formato de12horas o24horas. 3. Programe lahora deldfa siguiendo lasinstrucciones indicadas abajo. Programaci6n del reloj: 1. Oprimala tecla 'Clock' (Reloj). • Losdos puntos destellanen el indicador. 2. Optima'More+' o 'Less='para - Maytag MGR5765QDS | Use and Care Guide - Page 55
• Cuandocualquierade estasdos teclasse oprime porprimeravez,175° (350°) se iluminar4. • Optima la tecla 'More+' (Mas+) para aumentarla temperatura. • Optima la tecla 'Less-' (Menos-) para disminuir la temperatura. . 2. Seleccionela temperaturadel horno. La temperatura del horno puede ser - Maytag MGR5765QDS | Use and Care Guide - Page 56
Para programar un ciclo de horneado diferido: 1. Oprimala tecla 'Delay' (Diferido). • 'DELAY'destella. • '00:00'destellaen el indicadorvisual. 2. Optima la tecla 'More+' (M_s+) 'Less=' (Menos-) para programarel tiempo diferido. Cuando 'DELAY'este todavia destellando: 3. Optima la tecla 'Cook & Hold - Maytag MGR5765QDS | Use and Care Guide - Page 57
de Polio,con hueso Filetesde pescado Tajadasde pescado, 2,5cm (1") de grosor Colasde langosta,85-115 g (3-4 onzas)cada una Came de ave Mariscos 30 - /45 minutos ('Lo Broil') 8- 12 minutos 10 - 15 minutos 7- 10 minutos Paraun exterior m_s doradoy m_s asadoy un interior a medio cocer,puedeser - Maytag MGR5765QDS | Use and Care Guide - Page 58
al sonoray el ajuste actual (°F o °C) se desplegar4en la pantalla.(Si no se realizaning@ cambio,la estufaregresar4al ajuste actual desp@s de 30 segundos). 4. Paracambiar el ajuste,optima la tecla 'More+' o 'Less-'. Oprfmalanuevamentepara regresaral ajuste anterior. Espere cinco segundosy el ajustese - Maytag MGR5765QDS | Use and Care Guide - Page 59
estetipo de encendido,el gas se apagaautomdticamentey el homo bandejas de hornear galletas,pastelesde una cap& cacerolas,asara la parrilla y para luz del homo. 'Oven Light' PARRILLA3: Parahomearcon una sola parrilla ni papel de aluminio directamente en la parte inferior del homo. _:_/ ...i -_LII - Maytag MGR5765QDS | Use and Care Guide - Page 60
Maytag de Whirlpool Corporation o Whirlpool Canada LP (en Io sucesivo denominado "Maytag obra y se le informe a Maytag en un lapso de 30 dias a partir de la fecha Maytag para determinar si corresponde otra garantia. Si necesita servicio, consulte primero la secci6n "Soluci6n de problemas" del Manual
-
 1
1 -
 2
2 -
 3
3 -
 4
4 -
 5
5 -
 6
6 -
 7
7 -
8
-
9
-
10
-
11
-
12
-
13
-
14
-
15
-
16
-
17
-
18
-
19
-
20
-
21
-
22
-
23
-
24
-
25
-
26
-
27
-
28
-
29
-
30
-
31
-
32
-
33
-
34
-
35
-
36
-
37
-
38
-
39
-
40
-
41
-
42
-
43
-
44
-
45
-
46
-
47
-
48
-
49
-
50
-
51
-
52
-
53
-
54
-
55
-
56
-
57
-
58
-
59
-
60
 |
 |

M_AYI'AG
®
Gas
- Precision Touch
Control 500
_
Care
& Cleaning
.......................
5=7
Self-Clean
Oven
Cleaning Procedures
Maintenance
.............................
8=9
Oven Window & Light
Removal of Gas Appliance
Troubleshooting
.....................
9=10
Surface
Cooking
..................
10=1 1
Surface Controls
Sealed Gas Burners
Delay Cook & Hold
Keep Warm
Broiling
Sabbath Mode
Oven Racks
Warranty
& Service
....................
19
Guide
d'utilisation
et
d'entretien
...................................
20
Gu[a de
uso
y
cuidado
..............
40
Form
No. A/01/08
Part
No. 8113P734-60
Rev.
1
_c)2006 Maytag
Appliances
Sales
Co. All rights
reserved.
Litho
U.S.A