Maytag MGR7662WS Owners Manual
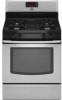
Maytag MGR7662WS - 30" Ing Gas Range Manual
 |
UPC - 883049176499
View all Maytag MGR7662WS manuals
Add to My Manuals
Save this manual to your list of manuals |
Maytag MGR7662WS manual content summary:
- Maytag MGR7662WS | Owners Manual - Page 1
GAS RANGE USER INSTRUCTIONS THANK YOU for purchasing this high-quality product. If you should experience a problem not covered in TROUBLESHOOTING, please visit our website at www.maytag.com for additional information. If you still need assistance, call us at 1-800-688-9900. In Canada, visit our - Maytag MGR7662WS | Owners Manual - Page 2
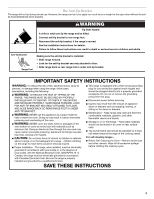
from a neighbor's phone. Follow the gas supplier's instructions. • If you cannot reach your gas supplier, call the fire department. - Installation and service must be performed by a qualified installer, service agency or the gas supplier. WARNING: Gas leaks cannot always be detected by smell - Maytag MGR7662WS | Owners Manual - Page 3
Top burner flame size should be adjusted so it does not extend beyond the edge of the cooking utensil. For self-cleaning ranges - ■ Before Self-Cleaning the Oven - Remove broiler pan and other utensils. Wipe off all excessive spillage before initiating the cleaning cycle. SAVE THESE INSTRUCTIONS 3 - Maytag MGR7662WS | Owners Manual - Page 4
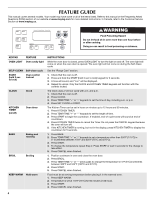
FEATURE GUIDE This manual covers several models. Your model may have some or all of the items listed. Refer to this manual or the Frequently Asked Questions (FAQs) section of our website at www.maytag.com for more detailed instructions. In Canada, refer to the Customer Service Section at www.maytag. - Maytag MGR7662WS | Owners Manual - Page 5
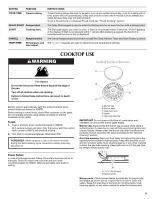
on the grate. To Set: 1. Push in and turn knob counterclockwise to IGNITE. All 4 surface burners will click. Only the burner with the control knob turned to IGNITE will produce a flame. 2. Turn knob to anywhere between HIGH and LOW. REMEMBER: When range is in use or (on some models) during the - Maytag MGR7662WS | Owners Manual - Page 6
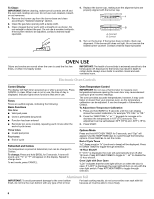
the alignment pins are properly aligned with the burner cap. A B A. Incorrect B. Correct 5. Turn on the burner. If the burner does not light, check cap alignment. If the burner still does not light, do not service the sealed burner yourself. Contact a trained repair specialist. OVEN USE Odors and - Maytag MGR7662WS | Owners Manual - Page 7
best results, use a broiler pan and grid. It is designed to drain juices and help avoid spatter and smoke. If you would like to purchase a broiler pan, one may be ordered. Please refer to the cover for contact information. Ask for Part Number 4396923. It is not necessary to preheat the oven before - Maytag MGR7662WS | Owners Manual - Page 8
to run. Self-Cleaning cycle. Failure to follow these instructions can result in burns. Once the cleaning temperature has been Range ■ Remove the broiler pan, grid, cookware and bakeware, all cooking utensils, oven racks and aluminum foil and, on some models, the temperature probe from the oven - Maytag MGR7662WS | Owners Manual - Page 9
. Cooked-on soils should be soaked or scrubbed before going into a dishwasher. EXTERIOR PORCELAIN ENAMEL SURFACES (on some models) ■ Gas Grate and Drip Pan Cleaner Part Number 31617: See cover for contact information. Food spills containing acids, such as vinegar and tomato, should be cleaned as - Maytag MGR7662WS | Owners Manual - Page 10
set to the proper heat level? See "Cooktop Use" section. ■ Is the range level? Level the range. See the Installation Instructions. Oven will not operate ■ Is this the first time the oven has been used? Turn on any one of the surface burner knobs to release air from the gas lines. ■ Is the electronic - Maytag MGR7662WS | Owners Manual - Page 11
Steel Cleaner and Polish (stainless steel models) Order Part Number 31462 All-Purpose Appliance Cleaner Order Part Number 31682 Gas Grate and Drip Pan Cleaner Order Part Number 31617 ACCESSORIES Split-Rack with Removable Insert Order Part Number 4396927 Broiler Pan Order Part Number 4396923 11 - Maytag MGR7662WS | Owners Manual - Page 12
Benton Harbor, MI 49022-2692 In Canada: Maytag Brand Home Appliances Customer eXperience Centre 1901 Minnesota Court Mississauga, Ontario L5N 3A7 Please include a daytime phone number in your correspondence. Please keep this User Instructions and model number information for future reference. 12 - Maytag MGR7662WS | Owners Manual - Page 13
Notes 13 - Maytag MGR7662WS | Owners Manual - Page 14
INSTRUCTIONS D'UTILISATION DE LA CUISINIÈRE À GAZ MERCI d'avoir acheté ce produit de grande qualité. Si vous rencontrez un problème non abordé à la section DÉPANNAGE, veuillez visiter notre site Web à www.maytag ÈRE 15 La bride antibasculement 16 GUIDE DES CARACTÉRISTIQUES 17 UTILISATION DE - Maytag MGR7662WS | Owners Manual - Page 15
entretien doivent être effectués par un installateur qualifié, une agence de service ou le fournisseur de gaz. AVERTISSEMENT : L'odorat ne permet pas local. En cas de détection d'une fuite de gaz, exécuter les instructions "Que faire dans le cas d'une odeur de gaz". Avertissements de la proposition - Maytag MGR7662WS | Owners Manual - Page 16
conditions de service normales, la ériaux tels que du papier d'aluminium. Le non-respect de cette instruction empêche la circulation de l'air dans le four et peut entra aux codes électriques locaux ou en l'absence de codes locaux, selon le Code électrique national (US) ANSI/NFPA 70 ou le Code - Maytag MGR7662WS | Owners Manual - Page 17
ou le section service à la clientèle de notre site Web sur www.maytag.ca pour des instructions plus détaillées. bake broil Precision Cooking System Precise Bake start cancel cook time keep warm delay start options kitchen timer on/off clock hold 3 sec. to lock oven light self clean - Maytag MGR7662WS | Owners Manual - Page 18
(température/ durée) CARACTÉRISTIQUE INSTRUCTIONS Garder au chaud Les aliments doivent être à la température de service avant d'être placés dans le 2. Tourner le bouton à n'importe quel réglage entre HIGH (élevée) et LOW (basse). Risque d'incendie La flamme d'un brûleur ne devrait pas dépasser - Maytag MGR7662WS | Owners Manual - Page 19
Brûleurs de surface scellés Nettoyage : A IMPORTANT : Avant de faire le nettoyage, s'assurer que toutes les commandes sont éteintes et que le four et la table de cuisson sont froids. Ne pas utiliser de nettoyants à four, eau de Javel ou décapants à rouille. 1. Enlever le chapeau de brûleur de - Maytag MGR7662WS | Owners Manual - Page 20
pour la sortir du four. Se servir de directement sur la porte ou sur le fond du four. l'illustration et des tableaux suivants comme guide. Ustensiles de cuisson L'air chaud doit pouvoir circuler autour de l'aliment pour le cuire uniformément. Laisser 2" (5 cm) entre les ustensiles de cuisson et - Maytag MGR7662WS | Owners Manual - Page 21
Position de la grille Grille 5 : Cuisson au four sur 2 grilles. Grille 4 : Utiliser pour la cuisson au gril et le rôtissage. Grille 3 : La plupart des produits de boulangerie sur une tôle à biscuits, à roulés, un moule à muffins, les mets en sauce ou les plats surgelés. Grille 2 : Pour le rôtissage - Maytag MGR7662WS | Owners Manual - Page 22
éristique de touche "Clock" (horloge) dans la section "Guide des caractéristiques". 1. Appuyer sur BAKE (cuisson au four au cours du programme d'autonettoyage. Le non-respect de ces instructions peut causer des brûlures. ■ À l'aide d'un le four peuvent causer une décoloration, une perte de lustre, - Maytag MGR7662WS | Owners Manual - Page 23
que le four et la table de cuisson sont froids. Toujours suivre les instructions figurant sur les étiquettes des produits de nettoyage. Pour plus de renseignements, vous pouvez consulter la section Service à la clientèle de notre site Web à www.maytag.ca. Du savon, de l'eau et un chiffon doux ou une - Maytag MGR7662WS | Owners Manual - Page 24
replacer service. www.maytag.ca Rien ne fonctionne AVERTISSEMENT Risque de choc électrique Brancher sur une prise à 3 alvéoles reliée à la terre. Ne pas enlever la broche de liaison à la terre. Ne pas utiliser un adaptateur. Ne pas utiliser un câble de rallonge. Le non-respect de ces instructions - Maytag MGR7662WS | Owners Manual - Page 25
dimension appropriée? Utiliser un ustensile de cuisson à peu près de la même dimension convertie. Contacter un technicien de service ou voir la page de en marche) dans la section "Guide des caractéristiques". Le programme la cuisinière d'aplomb. Voir les Instructions d'installation. ■ La température - Maytag MGR7662WS | Owners Manual - Page 26
instructions jointes à ou fournies avec le produit, la marque Maytag de Whirlpool Corporation ou Whirlpool Canada LP (ci-après désignées "Maytag codes d'électricité ou de plomberie, ou l'utilisation de pièces consomptibles ou de produits nettoyants non approuvés par Maytag seul le service à domicile - Maytag MGR7662WS | Owners Manual - Page 27
à l'extérieur du Canada et des 50 États des États-Unis, contactez votre marchand Maytag autorisé pour déterminer service, composez le 1-800-807-6777. Si vous avez besoin de plus d'assistance, vous pouvez écrire à Maytag en soumettant toute question ou problème à l'adresse suivante : Maytag Brand Home - Maytag MGR7662WS | Owners Manual - Page 28
®Registered trademark/™ Trademark of Maytag Corporation or its related companies ®Marque déposée/™ Marque de commerce de Maytag Corporation ou de ses compagnies affiliées Used under license by Maytag Limited in Canada Emploi sous licence par Maytag Limited au Canada 12/08 Printed in U.S.A. Imprim
-
 1
1 -
 2
2 -
 3
3 -
 4
4 -
 5
5 -
 6
6 -
 7
7 -
8
-
9
-
10
-
11
-
12
-
13
-
14
-
15
-
16
-
17
-
18
-
19
-
20
-
21
-
22
-
23
-
24
-
25
-
26
-
27
-
28
 |
 |
THANK YOU for purchasing this high-quality product. If you should experience a problem not covered in TROUBLESHOOTING,
please visit our website at
www.maytag.com
for additional information. If you still need assistance, call us at 1-800-688-9900.
In Canada, visit our website at
www.maytag.ca
or call us at 1-800-807-6777 for additional information.
You will need your model and serial number located on the oven frame behind the storage drawer panel.
Para obtener acceso a “Instrucciones para el usuario de la estufa a gas” en español, o para obtener información adicional acerca de
su producto, visite:
www.maytag.com
Tenga listo su número de modelo completo. Puede encontrar su número de modelo y de serie ubicado en el marco del horno,
detrás del panel del cajón de almacenamiento.
GAS RANGE
USER INSTRUCTIONS
Table of Contents
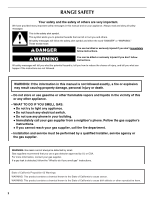
RANGE SAFETY
.......................................................................................
2
The Anti-Tip Bracket
.............................................................................
3
FEATURE GUIDE
.....................................................................................
4
COOKTOP USE
........................................................................................
5
Sealed Surface Burners
........................................................................
5
OVEN USE
................................................................................................
6
Electronic Oven Controls
......................................................................
6
Aluminum Foil
........................................................................................
6
Positioning Racks and Bakeware
.........................................................
7
Oven Vent
..............................................................................................
7
Baking and Roasting
.............................................................................
7
Broiling
..................................................................................................
7
Timed Cooking
......................................................................................
8
RANGE CARE
...........................................................................................
8
Self-Cleaning Cycle
...............................................................................
8
General Cleaning
...................................................................................
9
Oven Light
.............................................................................................
9
TROUBLESHOOTING
............................................................................
10
ACCESSORIES
......................................................................................
11
WARRANTY
............................................................................................
12
W10234649A