Maytag MTUC7000AWW Use & Care Guide
Maytag MTUC7000AWW - 15"Undercounter Trash Compactor Manual
 |
UPC - 883049150666
View all Maytag MTUC7000AWW manuals
Add to My Manuals
Save this manual to your list of manuals |
Maytag MTUC7000AWW manual content summary:
- Maytag MTUC7000AWW | Use & Care Guide - Page 1
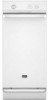
COMPACTOR Use & Care Guide For questions about features, operation/performance, parts, accessories or service, call: 1-800-688-9900 or visit our website at www.maytag.com In Canada, for assistance, installation or service, call: 1-800-807-6777 or visit our website at www.maytag.ca Table of Contents - Maytag MTUC7000AWW | Use & Care Guide - Page 2
Solid (Locked) Cycle 10 Using the Air Filter or Freshener 11 Removing a Filled Bag 11 Installing a New Bag 11 COMPACTOR CARE 12 Changing the Air Filter or Freshener 12 Cleaning 12 TROUBLESHOOTING 14 ASSISTANCE OR SERVICE 15 In the U.S.A 15 In Canada 15 Accessories 15 WARRANTY 16 2 - Maytag MTUC7000AWW | Use & Care Guide - Page 3
can pierce the bag and cause injury. Do not overload trash bag with heavy material such as glass. ■ This compactor is intended for household use only. ■ Use only for intended use as described in this manual. Do not use other than manufacturer's recommended attachments. SAVE THESE INSTRUCTIONS 3 - Maytag MTUC7000AWW | Use & Care Guide - Page 4
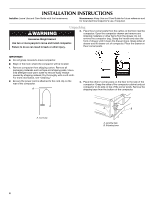
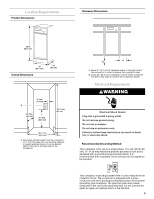
INSTALLATION INSTRUCTIONS Installer: Leave Use and Care Guide with the homeowner. Homeowner: Keep Use and Care Guide for future reference and for local electrical inspector's use, if required. Unpacking WARNING Excessive Weight Hazard Use two or more people to move and install compactor. Failure - Maytag MTUC7000AWW | Use & Care Guide - Page 5
extension cord. Failure to follow these instructions can result in death, fire, or electrical shock. Recommended Grounding Method This compactor is for use on a single phase this appliance be provided. This compactor must be grounded while in use to reduce the risk of electric shock. The compactor - Maytag MTUC7000AWW | Use & Care Guide - Page 6
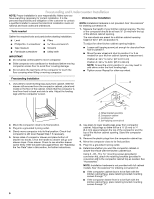
parts before starting installation. ■ Level ■ Pliers 1. Measure the height of your kitchen cabinet opening. The top of the compactor , for further instructions. D A. Wheel bracket assembly B. Compactor cabinet C. Locating models. See "Accessories" for ordering conversion kit. ■ If the compactor - Maytag MTUC7000AWW | Use & Care Guide - Page 7
the mounting screws. Countertop mounting A B 9. Grasp sides of compactor drawer and place bottom of drawer into tracks. Lift at the handle floor, see "Adjusting the Toe Plate" later in this section, for further instructions. Adjusting the Toe Plate If the toe plate rubs the floor covering, the - Maytag MTUC7000AWW | Use & Care Guide - Page 8
Installation 1. Remove the mounting screws attaching the foot pedal to the compactor. Remove foot pedal. A 6. Reinstall the toe guard using the existing screws and ¹⁄₂" washer. Then, reinstall the foot pedal. A B C A B C A. Mounting screws B. Foot pedal 2. Remove mounting screws attaching the - Maytag MTUC7000AWW | Use & Care Guide - Page 9
shown. C C D E F A. Custom panel B. 15" x ¹⁄₂ " quarter-round C. Panel screw locations D. Toe guard E. Washer F. Toe guard screw COMPACTOR USE How Your Compactor Works The compacting ram is the part of the compactor which compresses the trash. The compacting ram does not go to the bottom of the - Maytag MTUC7000AWW | Use & Care Guide - Page 10
1. Press NORMAL (UNLOCKED) on the Compact Control. Turn the Key-Knob to START, and then release it. 2. Place trash in compactor. ■ Wrap or cover wet or messy trash. ■ Do not compact items that may develop offensive odors such as raw meat, fish, grapefruit rinds, disposable diapers, or personal - Maytag MTUC7000AWW | Use & Care Guide - Page 11
compactor. Order replacement compactor bags through your local dealer or by calling the toll-free number on the cover or in the "Assistance or Service too heavy, in the future, compact less trash before emptying the bag. IMPORTANT: Do not push items down into compactor with hands or feet. 1. Pull the - Maytag MTUC7000AWW | Use & Care Guide - Page 12
trash. To order the correct replacement charcoal filters or air fresheners, call the toll-free number listed on the cover or in the "Assistance or Service Before cleaning the compactor, turn the Key-Knob (or KeySwitch) to the OFF & LOCK position and remove it. NOTE: Any services other than those - Maytag MTUC7000AWW | Use & Care Guide - Page 13
rest of the way. Set the drawer down gently. Cleaning Before a Vacation If you will be away for more than a couple of days, remove the compactor bag. Remove the Key-Knob (or Key-Switch) and store it out of children's reach. 4. Vacuum the inside of the cabinet. Liquid spills or wet - Maytag MTUC7000AWW | Use & Care Guide - Page 14
cost of an unnecessary service call. Trash is not compacting ■ Is the drawer less than half-full? Drawer must be more than half full before trash is compacted. ■ Did you press ON before pressing START? Press ON before pressing START (on some models). See "Starting Your Compactor." The drawer won - Maytag MTUC7000AWW | Use & Care Guide - Page 15
calling for assistance or service, please check "Troubleshooting." It may save you the cost of a service call. If you still need help, follow the instructions below. When calling, please know the purchase date and the complete model and serial number of your appliance. This information will help - Maytag MTUC7000AWW | Use & Care Guide - Page 16
appliance is operated and maintained according to instructions attached to or furnished with the product, Maytag brand of Whirlpool Corporation or Whirlpool Canada LP (hereafter "Maytag") will pay for factory specified parts and repair labor to correct defects in materials or workmanship. Service
-
 1
1 -
 2
2 -
 3
3 -
 4
4 -
 5
5 -
 6
6 -
 7
7 -
8
-
9
-
10
-
11
-
12
-
13
-
14
-
15
-
16
 |
 |

COMPACTOR
Use & Care Guide
For questions about features, operation/performance, parts, accessories or service, call:
1-800-688-9900
or visit our website at
www.maytag.com
In Canada, for assistance, installation or service, call:
1-800-807-6777
or visit our website at
www.maytag.ca
Table of Contents
............................................................................................................
2
W10190314A