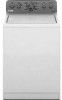
Maytag MTW5800TW Use and Care Guide
Maytag MTW5800TW - 27" Centennial Series Washer Manual
 |
View all Maytag MTW5800TW manuals
Add to My Manuals
Save this manual to your list of manuals |
Maytag MTW5800TW manual content summary:
- Maytag MTW5800TW | Use and Care Guide - Page 1
AUTOMATIC WASHER USE & CARE GUIDE LAVEUSE AUTOMATIQUE GUIDE D'UTILISATION ET D'ENTRETIEN FOR QUESTIONS ABOUT FEATURES, OPERATION/PERFORMANCE, PARTS, ACCESSORIES OR SERVICE CALL: 1.800.688.9900 IN CANADA, CALL: 1.800.807.6777 VISIT OUR WEBSITE AT WWW.MAYTAG.COM IN CANADA, WWW.MAYTAG.CA W10150597A - Maytag MTW5800TW | Use and Care Guide - Page 2
11 Complete Installation ...12 WASHER USE ...13 Starting Your Washer ...13 WASHER CARE...15 Cleaning Your Washer ...15 Water Inlet Hoses...15 Moving and Storage ...15 TROUBLESHOOTING...16 Washer and Components 16 Washer Operation...17 Washer Results...17 ASSISTANCE OR SERVICE...19 In the U.S.A...19 - Maytag MTW5800TW | Use and Care Guide - Page 3
WASHER SAFETY Your safety and the safety of others are very important. We have provided many important safety messages in this manual and if you don't immediately follow instructions. WARNING You can be killed or seriously injured if you don't follow instructions. All safety messages will tell - Maytag MTW5800TW | Use and Care Guide - Page 4
not been used ■ Do not repair or replace any part of the washer or attempt any for 2 weeks or more. HYDROGEN GAS IS servicing unless specifically recommended in this manual or in EXPLOSIVE. If the hot water system has not been published user-repair instructions that you understand and used for - Maytag MTW5800TW | Use and Care Guide - Page 5
20-100 psi (138-690 kPa) for best performance. ■ A level floor with a maximum slope of 1" (2.5 cm) under entire washer. Installing the washer on carpeting is not recommended. ■ A sturdy floor to support the washer weight (washer, water and load) of 315 lbs (143 kgs). Do not store or operate your - Maytag MTW5800TW | Use and Care Guide - Page 6
be purchased separately. See "Tools and Parts." The siphon break must be a minimum of 28" (71 cm) from the bottom of the washer. Additional hoses might be needed. To avoid siphoning, no more than 8" (20.3 cm) of drain hose should be below the top of the wash tub. Secure drain hose with beaded tie - Maytag MTW5800TW | Use and Care Guide - Page 7
pipe. ■ Check with a qualified electrician if you are not sure the washer is properly grounded. ■ Do not have a fuse in the neutral or ground circuit. GROUNDING INSTRUCTIONS For a grounded, cord-connected washer: This washer must be grounded. In the event of a malfunction or breakdown, grounding - Maytag MTW5800TW | Use and Care Guide - Page 8
(90 cm) of its final location. 2. The washer must be in the upright position and not tilted before removing the shipping material. 3. Locate the yellow shipping materials on the rear of the machine, near the bottom. Follow the steps for your particular model, either the one with the straight power - Maytag MTW5800TW | Use and Care Guide - Page 9
damage due to water leakage. Read and follow these instructions. The drain hose is connected to your washer and is stored inside the washer cabinet. Remove drain hose from washer cabinet Gently pull the corrugated drain hose out of the washer from the top of the hose. Continue to pull the hose until - Maytag MTW5800TW | Use and Care Guide - Page 10
to the corrugated drain hose. You may need additional parts. See Floor drain under "Tools and Parts." Connect the Inlet Hoses The washer must be connected to the water faucets using the new inlet hoses. Do not use old hoses. Insert new flat washers (supplied) into each end of the inlet hoses. Firmly - Maytag MTW5800TW | Use and Care Guide - Page 11
. ■ Periodically inspect and replace hoses if bulges, kinks, cuts, wear, or leaks are found. Secure the Drain Hose 1. Remove the shipping material from the power cord. Drape the power cord over the console. 2. Remove any cardboard used to move washer. A B C If the washer faucets and the drain - Maytag MTW5800TW | Use and Care Guide - Page 12
to turn the nuts counterclockwise on the feet tightly against the washer cabinet. IMPORTANT: If the nuts are not tight against the washer cabinet, the washer may vibrate. 4. Tilt the washer back and remove the wood block. Gently lower the washer to the floor. Steps in Final Location 1. Slide the - Maytag MTW5800TW | Use and Care Guide - Page 13
basket or detergent dispenser (on some models). Close the lid. Select any cycle, and then pull the Cycle Control knob out to start the washer. Allow it to complete one whole cycle. Electrical Shock Hazard Plug into a grounded 3 prong outlet. Do not remove ground prong. Do not use an adapter. Do - Maytag MTW5800TW | Use and Care Guide - Page 14
dispenser (on some models) Style 2 Dispenser for Timed Bleach models Style 3: Without liquid chlorine bleach dispenser (on some models) ■ Let the washer fill and begin agitating the load. ■ Add bleach 5 minutes into the wash cycle for best cleaning and so that bleach can be removed in the rinse - Maytag MTW5800TW | Use and Care Guide - Page 15
models): 1. Remove dispenser by grasping top with both hands and squeezing, while pushing upward with thumbs. 2. Rinse dispenser under warm water, then replace it. NOTE: Some models are equipped with a liquid fabric softener dispenser. To avoid damage to the washer or clothing, do not wash clothes - Maytag MTW5800TW | Use and Care Guide - Page 16
the cost of a service call In U.S.A. www.maytag.com/help In Canada www.maytag.ca Washer and Components Noisy ■ Is the sink or drain clogged? Sink and standpipe must be able to handle 17 gal. (64 L) of water per minute. ■ Is the load balanced and the washer level? The wash load should be balanced - Maytag MTW5800TW | Use and Care Guide - Page 17
the problem continues, call an electrician. ■ Is the washer in a normal pause in the cycle? The washer pauses for about 2 minutes during certain cycles. Allow the cycle to continue. Some cycles feature periods of agitation and soak. ■ Is the washer overloaded? Wash smaller loads. ■ Is the lid open - Maytag MTW5800TW | Use and Care Guide - Page 18
properly? Do not pour chlorine bleach directly onto load. Wipe up bleach spills. Undiluted bleach will damage fabrics. Do not place load items on top of the bleach dispenser when loading and unloading the washer (on some models). ■ Did you follow the manufacturer's care label instructions? 18 - Maytag MTW5800TW | Use and Care Guide - Page 19
maintenance procedures. ■ Accessory and repair parts sales. ■ Specialized customer assistance (Spanish speaking, hearing impaired, limited vision, etc.). ■ Referrals to local dealers, repair parts distributors and service companies. Maytag® appliances designated service technicians are trained to - Maytag MTW5800TW | Use and Care Guide - Page 20
it was purchased. ITEMS MAYTAG WILL NOT PAY FOR 1. Service calls to correct the installation of your major appliance, to instruct you how to use your major appliance, to replace or repair house fuses or to correct house wiring or plumbing. 2. Service calls to repair or replace appliance light bulbs - Maytag MTW5800TW | Use and Care Guide - Page 21
: DANGER Risque possible de décès ou de blessure grave si vous ne suivez pas immédiatement les instructions. AVERTISSEMENT Risque possible de décès ou de blessure grave si vous ne suivez pas les instructions. Tous les messages de sécurité vous diront quel est le danger potentiel et vous disent - Maytag MTW5800TW | Use and Care Guide - Page 22
■ Ne pas réparer ou remplacer un composant quelconque de la laveuse, ni entreprendre une opération de service, si ce n'est spécifiquement recommandé dans ce manuel ou dans un manuel d'instructions de réparations destiné à l'utilisateur; il est alors essentiel que la personne concernée comprenne ces - Maytag MTW5800TW | Use and Care Guide - Page 23
informations sur la commande, veuillez consulter les numéros de téléphone sans frais d'interurbain figurant sur la page de couverture du Guide d'utilisation et d'entretien. Si vous avez : Vous devrez acheter : Évier de buanderie ou canalisation d'évacuation rigide plus haut que 96" (2,4 m) Syst - Maytag MTW5800TW | Use and Care Guide - Page 24
de la canalisation d'évacuation. Immobiliser le tuyau de vidange avec l'attache de fixation perlée. 0" 27" (0 cm) (68,6 cm) 0" 1" 25½" (0 cm) (2,5 cm) (64,8 cm comporter des ouvertures d'aération en haut et en bas de dimensions minimales (C). Des portes à jalousies avec ouvertures de passage d' - Maytag MTW5800TW | Use and Care Guide - Page 25
Ne pas utiliser un câble de rallonge. Le non-respect de ces instructions peut causer un décès, un incendie ou un choc électrique. ■ Une pas utiliser un fusible dans le circuit neutre ou de liaison à la terre. INSTRUCTIONS DE LIAISON À LA TERRE Pour une laveuse reliée à la terre et connectée - Maytag MTW5800TW | Use and Care Guide - Page 26
arrière. AVERTISSEMENT Risque du poids excessif Utiliser deux ou plus de personnes pour déplacer et installer la laveuse. Le non-respect de cette instruction peut causer une blessure au dos ou d'autre blessure. REMARQUE : Placer la laveuse sur du carton pour protéger le plancher, avant de la - Maytag MTW5800TW | Use and Care Guide - Page 27
à raccorder correctement le tuyau de vidange pour qu'aucune fuite d'eau ne puisse détériorer le plancher. Lire les instructions ci-dessous et les suivre à la lettre. Le tuyau de vidange est connecté à la laveuse et est remis force l'excédent de tuyau de vidange dans l'arrière de la laveuse. 27 - Maytag MTW5800TW | Use and Care Guide - Page 28
Vidange dans l'évier de buanderie ou dans le tuyau de rejet à l'égout Connexion de la bride de retenue sur le tuyau de vidange ondulé A Raccordement des tuyaux d'arrivée d'eau aux robinets Vérifier que le panier de la laveuse est vide. 1. Connecter le tuyau comportant la mention "chaud" au robinet - Maytag MTW5800TW | Use and Care Guide - Page 29
Raccorder les tuyaux d'arrivée d'eau à la laveuse A B A. Électrovanne d'alimentation-eau froide B. Électrovanne d'alimentation-eau chaude 1. Connecter le tuyau d'eau chaude à l'entrée en bas de l'électrovanne. 2. La connexion du tuyau d'eau chaude en premier facilite le serrage du raccord avec la - Maytag MTW5800TW | Use and Care Guide - Page 30
n'est pas d'aplomb. 1. Soulever l'avant de la laveuse d'environ 4" (10,2 cm) avec un bloc de bois ou un objet semblable. Le bloc doit pouvoir supporter le poids de la laveuse. A 4" (10,2 cm) A. Trous taraudés pour les pieds 2. Visser l'écrou sur chaque pied de nivellement jusqu'à 1" (2,5 cm) de la - Maytag MTW5800TW | Use and Care Guide - Page 31
pas utiliser un adaptateur. Ne pas utiliser un câble de rallonge. Le non-respect de ces instructions peut causer un décès, un incendie ou un choc électrique. Achever l'installation 1. Consulter les sp programme pour mettre la laveuse en marche. Laisser la machine exécuter un programme complet. 31 - Maytag MTW5800TW | Use and Care Guide - Page 32
Ne pas faire sécher des articles qui ont été salis par tout genre d'huile (y compris les huiles de cuisson). Le non-respect de ces instructions peut causer un décès, une explosion ou un incendie. AVERTISSEMENT : Pour réduire le risque d'incendie, de choc électrique ou de blessures corporelles, lire - Maytag MTW5800TW | Use and Care Guide - Page 33
avec le couvercle ouvert. 6. Tourner le sélecteur LOAD SIZE (volume de la charge) ou WATER LEVEL chaude sans danger pour le tissu. Suivre les instructions sur l'étiquette des vêtements. La Commande température minimum d'environ 70ºF (21ºC). Guide de température Température de lavage Tissus - Maytag MTW5800TW | Use and Care Guide - Page 34
enlever la broche de liaison à la terre. Ne pas utiliser un adaptateur. Ne pas utiliser un câble de rallonge. Le non-respect de ces instructions peut causer un décès, un incendie ou un choc électrique. 2. Brancher la laveuse ou reconnecter la source de courant électrique. 3. Faire faire un programme - Maytag MTW5800TW | Use and Care Guide - Page 35
érées ici ou visiter notre site Internet et la FAQ (foire aux questions) pour éviter possiblement le coût d'un appel de service. Aux É.-U., www.maytag.com/help Au Canada, www.maytag.ca La laveuse et ses composants Bruit ■ La charge est-elle équilibrée et la laveuse d'aplomb? La charge de lavage - Maytag MTW5800TW | Use and Care Guide - Page 36
enlever la broche de liaison à la terre. Ne pas utiliser un adaptateur. Ne pas utiliser un câble de rallonge. Le non-respect de ces instructions peut causer un décès, un incendie ou un choc électrique. ■ Le cordon d'alimentation est-il branché dans une prise à 3 alvéoles reliée à la terre? Brancher - Maytag MTW5800TW | Use and Care Guide - Page 37
la charge sur le dessus du distributeur d'eau de Javel lorsque vous chargez et déchargez la laveuse (sur certains modèles). ■ Avez-vous suivi les instructions d'entretien du fabricant indiquées sur l'étiquette? 37 - Maytag MTW5800TW | Use and Care Guide - Page 38
faire économiser le coût d'une visite de service. Si vous avez encore besoin d'aide, suivez les instructions ci-dessous. Lors d'un appel, veuillez conna Internet www.whirlpoolparts.ca. Pour localiser la compagnie de service désignée par Maytag® dans votre région, vous pouvez également consulter les - Maytag MTW5800TW | Use and Care Guide - Page 39
installé dans un endroit inaccessible ou n'est pas installé conformément aux instructions d'installation fournies. 11. Le coût des pièces de rechange et de Maytag autorisé pour déterminer si une autre garantie s'applique. Si vous avez besoin de service, voir d'abord la section "Dépannage" du Guide - Maytag MTW5800TW | Use and Care Guide - Page 40
2007 All rights reserved. Tous droits réservés. MAYTAG and the "M" Symbol are registered trademarks of Maytag Limited in Canada. MAYTAG et le symbole "M" sont des marques déposées de Maytag Limited au Canada. All other marks are trademarks of Maytag Corporation or its related companies. Toutes les
-
 1
1 -
 2
2 -
 3
3 -
 4
4 -
 5
5 -
 6
6 -
 7
7 -
8
-
9
-
10
-
11
-
12
-
13
-
14
-
15
-
16
-
17
-
18
-
19
-
20
-
21
-
22
-
23
-
24
-
25
-
26
-
27
-
28
-
29
-
30
-
31
-
32
-
33
-
34
-
35
-
36
-
37
-
38
-
39
-
40
 |
 |

AUTOMATIC WASHER
USE & CARE GUIDE
LAVEUSE AUTOMATIQUE
GUIDE D’UTILISATION ET D’ENTRETIEN
FOR QUESTIONS ABOUT FEATURES, OPERATION/PERFORMANCE,
PARTS, ACCESSORIES OR SERVICE CALL: 1.800.688.9900
IN CANADA, CALL: 1.800.807.6777
AU CANADA, POUR ASSISTANCE, INSTALLATION OU SERVICE,
COMPOSER LE : 1.800.807.6777
VISIT OUR WEBSITE AT WWW.MAYTAG.COM
IN CANADA, WWW.MAYTAG.CA
OU VISITER NOTRE SITE INTERNET À
WWW.MAYTAG.CA
W10150597A