Memorex MVDP1085 Manual - Page 9
Charging The Battery Pack
 |
UPC - 749720009114
View all Memorex MVDP1085 manuals
Add to My Manuals
Save this manual to your list of manuals |
Page 9 highlights
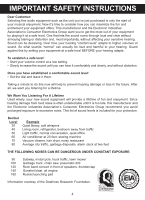
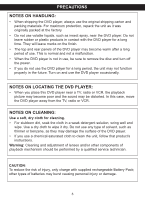
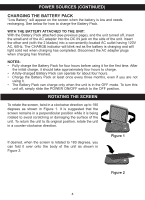
POWER SOURCES (CONTINUED) CHARGING THE BATTERY PACK "Low Battery" will appear on the screen when the battery is low and needs recharging. See below for how to charge the Battery Pack. WITH THE BATTERY ATTACHED TO THE UNIT: With the Battery Pack attached (see previous page), and the unit turned off, insert the small end of the AC adapter into the DC IN jack on the side of the unit. Insert the other end (with the 2 blades) into a conveniently-located AC outlet having 120V AC, 60Hz. The CHARGE indicator will blink red as the battery is charging and will light solid red when charging has completed. Disconnect the AC adapter plugs when charging has finished. NOTES: • Fully charge the Battery Pack for four hours before using it for the first time. After the initial charge, it should take approximately four hours to charge. • A fully-charged Battery Pack can operate for about four hours. • Charge the Battery Pack at least once every three months, even if you are not using it. • The Battery Pack can charge only when the unit is in the OFF mode. To turn this unit off, simply slide the POWER ON/OFF switch to the OFF position. ROTATING THE SCREEN To rotate the screen, twist in a clockwise direction up to 180 degrees as shown in Figure 1. It is suggested that the screen remains in a perpendicular position while it is being rotated to avoid scratching or damaging the surface of the unit. To return the unit to its original position, rotate the unit in a counter-clockwise direction. If desired, when the screen is rotated to 180 degrees, you can fold it over onto the body of the unit as shown in Figure 2. Figure 1 Figure 2 8
-
 1
1 -
2
-
3
-
 4
4 -
 5
5 -
 6
6 -
 7
7 -
 8
8 -
 9
9 -
 10
10 -
 11
11 -
 12
12 -
 13
13 -
 14
14 -
15
-
16
-
17
-
18
-
19
-
20
-
21
-
22
-
23
-
24
-
25
-
26
-
27
-
28
-
29
-
30
-
31
-
32
-
33
-
34
-
35
-
36
-
37
-
38
-
39
-
40
-
41
-
42
-
43
-
44
-
45
-
46
-
47
-
48
-
49
-
50
-
51
-
52
-
53
-
54
-
55
-
56
-
57
-
58
-
59
-
60
-
61
-
62
-
63
-
64
-
65
-
66
-
67
-
68
-
69
-
70
-
71
-
72
-
73
-
74
-
75
-
76
-
77
-
78
-
79
-
80
-
81
-
82
-
83
-
84
-
85
-
86
-
87
-
88
-
89
-
90
-
91
-
92
-
93
-
94
 |
 |