Memorex Mi1111 User's Manual
Memorex Mi1111 - Micro System Manual
 |
UPC - 749720012879
View all Memorex Mi1111 manuals
Add to My Manuals
Save this manual to your list of manuals |
Memorex Mi1111 manual content summary:
- Memorex Mi1111 | User's Manual - Page 1
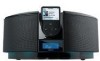
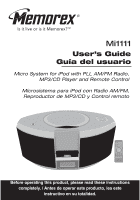
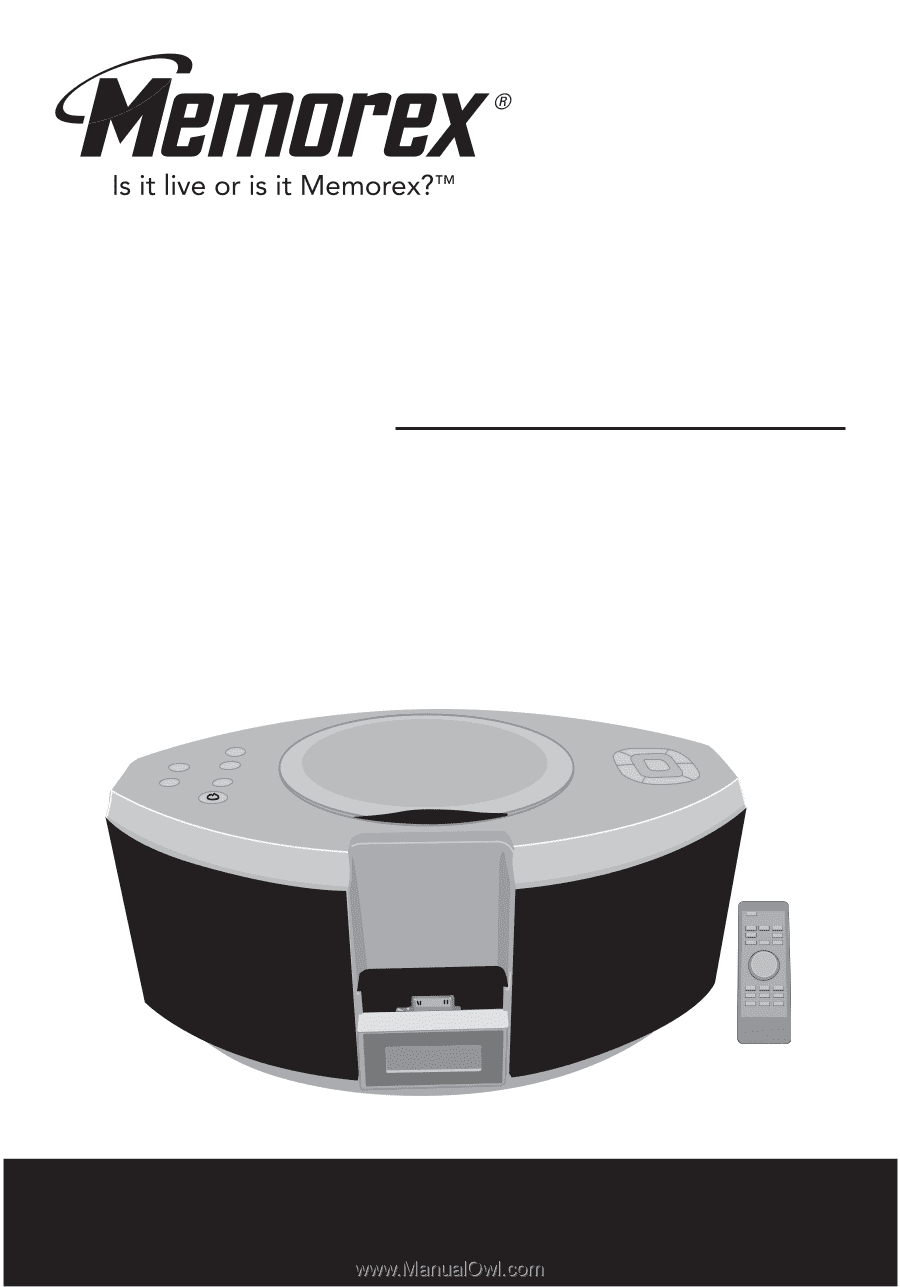
Mi1111 User's Guide Guía del usuario Micro System for iPod with PLL AM/FM Radio, MP3/CD Player and Remote Control Microsistema para iPod con Radio AM/FM, Reproductor de MP3/CD y Control remoto Before operating this product, please read these instructions completely. / Antes de operar este producto, - Memorex Mi1111 | User's Manual - Page 2
COVER (OR BACK). NO USER-SERVICEABLE PARTS INSIDE. REFER SERVICING TO QUALIFIED SERVICE PERSONNEL. (This Caution Marking with Rating Label is located at the the instruction manual. The user could lose the authority to operate this equipment if an unauthorized change or modification is made. iPod is - Memorex Mi1111 | User's Manual - Page 3
connected. • Consult the dealer or an experienced radio/TV technician for help. LASER SAFETY: This unit employs a laser. Only qualified service personnel should attempt to service this device due to possible eye injury. CAUTION: USE OF CONTROLS, ADJUSTMENTS OR PERFORMANCE PROCEDURE HEREIN MAY RESULT - Memorex Mi1111 | User's Manual - Page 4
as a bookcase or rack unless proper ventilation is provided or the manufacturer's instructions have been adhered to. 10. POWER SOURCES This product should be operated wall outlet and disconnect the antenna or cable system. This will prevent damage to the product due to lightning and power-line surges - Memorex Mi1111 | User's Manual - Page 5
part. Unauthorized substitutions may result in fire, electric shock or other hazards. 20. SAFETY CHECK Upon completion of any service or repairs to this product, ask the service instructions. Adjust only those controls that are covered by the operating instructions, as an adjustment of other controls - Memorex Mi1111 | User's Manual - Page 6
your hearing adapts. To establish a safe level: • Start your volume control at a low setting. • Slowly increase the sound until you can hear hair dryer, noisy restaurant Average city traffic, garbage disposals, alarm clock at two feet THE FOLLOWING NOISES CAN BE DANGEROUS UNDER CONSTANT EXPOSURE - Memorex Mi1111 | User's Manual - Page 7
Time Down (-) Button 16. CD Compartment Press to Open Area 17. iPod Dock with Connector, Dock Adapter & Interchangeable Universal Docks 18. FM Wire Antenna (Rear of Unit) 19. Right Speaker 20. AC Power Cord (Rear of Unit) 21. Remote Sensor 22. Display *Consumer Replaceable Part (See page 32 to order - Memorex Mi1111 | User's Manual - Page 8
9. PROG./MEMO./ Clock Set Button 10. FIND/STEREO -MONO Button 11. MUTE Button 12. REPEAT Button 13. SLEEP Button 14. STOP/BAND (I) Button 15. VOLUME + Button 16. Tune/Skip/Time Up (+) Button 17. TREBLE + / - Button 18. BASS + / - Button 19. PRESET/FOLDER + / - Button Remote Control Part No. 0000 - Memorex Mi1111 | User's Manual - Page 9
be reset ("- -:- -" will blink in the display) and you will need to set the clock and radio presets again. REMOTE BATTERY INSTALLATION 1. Remove the Battery Compartment (on the bottom rear of the remote control) by sliding the compartment out. (You can insert a penny, or similar object, into the - Memorex Mi1111 | User's Manual - Page 10
(in Slideshow mode)/videos, and hear the audio, from the iPod on your external TV. NOTES: • Set the TV's TV/VIDEO button or switch to the VIDEO setting. • When connecting this unit, refer to the owner's manual of the TV, as well as this manual. • When connecting this unit to the TV, make sure - Memorex Mi1111 | User's Manual - Page 11
(-) 1 unit or to U2p the (+) 241 2 button to set the hour mode (also known as military time) or 12 hour mode. Press the PROG./ MEMO./Clock Set button 3 and the hours will blink. 3 4 3 21 3 21 Press the Tune/Skip/Time Down (-) 1 or Up (+) 2 button to set the current hour. (If you - Memorex Mi1111 | User's Manual - Page 12
the bottom of the dock gently. NOTES: • CHARGING: When the iPod is inserted into the dock, whether this unit is on or off, the iPod's battery will charge until it is full. • CHANGING THE MODE: You can press the FUNCTION button repeatedly to select between iPod/AUX/TUNER/CD mode as desired. To - Memorex Mi1111 | User's Manual - Page 13
briefly "Hello" and the backlight will light blue. If you are not already in iPod mode, press the FUNCTION button to select iPod mode. You can operate the iPod using its own controls, as per its owner's manual, and the sound will be heard through this unit's speakers. 3 1 4 2 21 To play/pause - Memorex Mi1111 | User's Manual - Page 14
OPERATION (CONTINUED) ADJUSTING THE VOLUME CONTROLS 1 2 1 1 2 To adjust the main volume: Press the VOLUME + and/or button 1 on the remote (shown) or on the main unit to increase and/or decrease the volume. To mute the main volume: Press the MUTE button 2 on the remote;"MUTE" will blink in the - Memorex Mi1111 | User's Manual - Page 15
OPERATION (CONTINUED) USING THE RADIO 1 2 Turn this unit on by pressing the Power button; the mono playback, press the FIND/STEREO-MONO button on the remote. Repeatedly press the Tune/Skip/ Time Down (-) 1 or Up (+) 2 button to manually advance the frequency in the display up or down until the - Memorex Mi1111 | User's Manual - Page 16
OPERATION (CONTINUED) SETTING THE RADIO PRESETS (30 for FM, 10 for AM) 1 2 2 1 Follow the steps on the previous page to tune a station. Press the PROG./MEMO./Clock Set button; "MEM" will appear and "01" (if no presets have ever been set) will blink in the display. Within five seconds, press - Memorex Mi1111 | User's Manual - Page 17
total number of tracks will appear in press the FUNCTION button 2 to the display. select CD mode. See page 13 for how to adjust the volume. NOTE: 3 inch single, standard CDs, CD-R/RWs and MP3 discs can be used with this unit. 3 4 Press the Play/Pause (®p) button to begin playback; the current - Memorex Mi1111 | User's Manual - Page 18
OPERATION (CONTINUED) TO PAUSE A CD 1 During playback, press the Play/Pause (®p) button to pause at all, "NO DISC" will appear in the display. • Playback will stop when you open the CD compartment, but it is not recommended to open the compartment before the STOP/BAND (I) button is pressed. - Memorex Mi1111 | User's Manual - Page 19
OPERATION (CONTINUED) TO BEGIN PLAYBACK FROM A SPECIFIC TRACK 1 21 2 While in Stop mode, you may press When the desired track/file is either the Tune/Skip/Time Down (-) selected, press the Play/Pause 1 or Up (+) 2 button to select a (®p) button. Playback will begin specific track for - Memorex Mi1111 | User's Manual - Page 20
disc, while in the Stop mode, press the RANDOM button on the remote; Random playback will begin automatically. NOTE: To stop and cancel Random the disc, while in the Stop mode, press the INTRO button on the remote; Intro playback will begin automatically. NOTE: To stop and cancel Intro playback, - Memorex Mi1111 | User's Manual - Page 21
3 to program additional tracks up to a maximum 21 of 64 tracks. 2 NOTES: • To clear the memory, while in the Stop mode, press the PROG./MEMO./Clock Set button followed by the STOP/BAND (I) button. • MP3: If an MP3 disc is inserted, you will first select the directory number in Step 2 followed - Memorex Mi1111 | User's Manual - Page 22
(CONTINUED) NOTES ON PROGRAM PLAYBACK • You can review the program by pressing the PROG./MEMO./Clock Set button repeatedly while in the Stop mode. • To add a track to the program memory, while in the Stop mode, simply press the PROG./MEMO./Clock Set button repeatedly until the first empty Program - Memorex Mi1111 | User's Manual - Page 23
files and read only the MP3 files on the CDR. Does the unit support multi-session CDRs? If the MP3 CD is not finalized, you can burn a new group of MP3 files until the CD is full. Does the unit support subdirectories (subfolders)? Yes, the unit can read MP3 files from subfolders. What appears - Memorex Mi1111 | User's Manual - Page 24
for a song by file name as follows: 1 2 1 2 With a MP3 disc inserted, while in the Stop mode, press the FIND/ STEREO-MONO button on the remote; the first file beginning with the letter "A" and its track number will appear in the display and the Find logo (a magnifying glass) will blink. Select - Memorex Mi1111 | User's Manual - Page 25
particular folder for playback as follows: 1 2 1 2 With a MP3 disc inserted, while in the Stop mode, press the FIND/ STEREO-MONO button on the remote twice; the first folder name, the folder number, "ALBUM" and the Find logo (a magnifying glass) will appear in the display. 3 Select the folder - Memorex Mi1111 | User's Manual - Page 26
/albums and tracks on a single session MP3 disc. MULTI SESSION The computer user does not need to finalize the CDR disc as music is burned on the can be downloaded at different times until the whole disc is full. (E) CD-ROM drive Directory 01 Blur01.mp3 Blur02.mp3 Blur03.mp3 Blur04.mp3 Directory 02 - Memorex Mi1111 | User's Manual - Page 27
TIMER ON minute, TIMER OFF hour and TIMER OFF minute. 3 3 21 Press the Tune/Skip/Time Down (-) 1 or Up (+) 2 button to set the desired mode (iPod, CD, Tuner). Then press the TIMER button 3 again to confirm. Repeat to set the desired volume. After the volume is set, the TIMER ON time, TIMER - Memorex Mi1111 | User's Manual - Page 28
SLEEP 1 OPERATION (CONTINUED) With the unit on, press the SLEEP button on the remote; the SLEEP indicator and "90" will appear in the display for approx. five seconds which indicates the unit will turn off after 90 minutes. Repeatedly - Memorex Mi1111 | User's Manual - Page 29
as shown on the next page) to match with your iPod. Insert the corresponding Universal Dock and your iPod into the unit as described on page 11. iPod Type iPod mini Memory 4 to 6GB Univ. Dock No. No. 3 (Part No. 02290761903-0000*) Fourth Generation iPod 20GB/ U2 Special Edition 20GB 40GB No - Memorex Mi1111 | User's Manual - Page 30
First Generation iPod nano 1 to 8GB No. 8 (Part No. 02290761908-0000*) Fifth Generation iPod (w/Video) 30GB 60GB/ 80GB No. 9 (Part No. 02290761909-0000*) No. 10 (Part No. 02290761910-0000*) Second Generation iPod nano 2 to 8GB No. 11 (Part No. 02290761911-0000*) Dock Adapter Part No. 0229 - Memorex Mi1111 | User's Manual - Page 31
TROUBLESHOOTING GUIDE If you experience a problem with this unit, check the chart below before calling for service. SYMPTOM No sound. CAUSE Volume in iPod mode. Press the FUNCTION button to select iPod. CD mode, no or Not in CD mode. Press the FUNCTION poor sound. button to select CD. Disc - Memorex Mi1111 | User's Manual - Page 32
CLEANER • This unit is designed to play only compact discs bearing the identification logo as shown here. Other compact discs may not conform to the CD standard and may not play properly. • Compact discs should be stored in their cases after each use to avoid damage. • Do not expose compact - Memorex Mi1111 | User's Manual - Page 33
(Main Unit AC 120V, 60Hz Power Source (Remote Control) . . . . DC 3V, CR2025, Lithium Battery Speaker 4 ohm x 2 + 4 ohm (subwoofer) Output Power 5W x 2 +15W (subwoofer) RADIO SECTION Frequency Range (FM 87.5-108MHz Frequency Range (AM 520-1710KHz CD SECTION Disc Diameter 4.72" (120mm) Optical - Memorex Mi1111 | User's Manual - Page 34
de descargas eléctricas no abra la cubierta o tapa posterior. Allí no hay partes que el usuario pueda reparar. Lleve su unidad a un Centro de Servicio Autorizado. a menos que estas modificaciones estén expresamente indicadas en el manual de instrucciones. El usuario puede perder el derecho de operar - Memorex Mi1111 | User's Manual - Page 35
que está conectado el receptor. • Consulte al vendedor o a un técnico de radio y televisión con experiencia. MEDIDAS DE SEGURIDAD CON EL RAYO LÁSER: Esta unidad usa evitar daños a los ojos. ADVERTENCIA: El uso de los controles, o el procedimiento de funcionamiento que no sean los especificados aquí, - Memorex Mi1111 | User's Manual - Page 36
referencia en el futuro. Tenga especial cuidado al seguir las advertencias indicadas en la unidad, así como las que aparecen en el manual de instrucciones. 1. Lea el instructivo. Usted deberá leer todo el instructivo de seguridad y funcionamiento antes de operar su equipo. 2. Conserve el instructivo - Memorex Mi1111 | User's Manual - Page 37
. 4. Su equipo no funciona correctamente a pesar de seguir las instrucciones de funcionamiento, como es el ajuste de controles indicados en el manual de funcionamiento. El mal manipuleo de dichos controles puede resultar en un daño mayor a los mismos. 5. Ha dejado caer su unidad y el gabinete se ha - Memorex Mi1111 | User's Manual - Page 38
nivel hasta que escuche el sonido de manera clara y confortable, sin distorsión. Una vez que establece el nivel de audición confortable: • Deje fijo el control de volumen en dicho nivel. Eso le tomará tan solo un minuto, y le ayudará a prevenir la pérdida del oído en el futuro. Nosotros deseamos - Memorex Mi1111 | User's Manual - Page 39
LOS CONTROLES PARTE FRONTAL/SUPERIOR 10 1 11 2 12 3 13 4 14 5 15 6 16 7 17 8 18 19 20 9 21 22 1. Compartimiento del CD 2. Hora Abajo (-) 16. Área para abrir el compartimiento del CD 17. Puerto para iPod con conector, adaptador de puerto y puertos universales intercambiables 18. - Memorex Mi1111 | User's Manual - Page 40
/BANDA (I) 15. Botón de VOLUMEN + 16. Botón de Sintonizar/Brincar/ Hora Arriba (+) 17. Botón de AGUDOS + / 18. Botón de BAJOS + / 19. Botón de PREDEFINIDOS/ CARPETA + / - Control remoto, No. de pieza 0000-Mi11110-5800* *Pieza reemplazable por el consumidor. (Ver página 32 para ordenar.) 7 - Memorex Mi1111 | User's Manual - Page 41
á en el display) y deberá ajustar nuevamente el reloj y los predefinidos de la radio. INSTALACIÓN DE LAS BATERÍAS EN EL CONTROL REMOTO 1. Para quitar el compartimiento de baterías (en la parte posterior e inferior del control remoto) deslícelo hacia afuera. (Puede introducir una moneda de un centavo - Memorex Mi1111 | User's Manual - Page 42
manual. • Cuando conecte esta unidad al televisor, cerciórese de que la energía esté apagada y que ambas unidades estén desconectadas antes de realizar la conexión. • Asegúrese de entrar al menú de Configuraciones de su iPod de ENTRADA DE AUXILIAR en la parte posterior de esta unidad. Para escuchar - Memorex Mi1111 | User's Manual - Page 43
OPERACIÓN CÓMO AJUSTAR O REAJUSTAR LA HORA ACTUAL 1 2 3 21 Con la unidad apagada, presione el botón de PROG./MEMO./ Ajuste de reloj y manténgalo presionado hasta que la hora "12" ó "24" parpadee en el display. Presione el botón de Sintonizar/ Bparirnacacro/Hnfoi2graurAabr 1alajo (-) 1 o - Memorex Mi1111 | User's Manual - Page 44
del adaptador de puerto presionando suavemente la parte inferior del puerto. NOTAS: • CARGA: Cuando el iPod es insertado en el puerto, ya iPod se cargará hasta estar llena. • CAMBIAR EL MODO: Puede presionar repetidamente el botón de FUNCIÓN para seleccionar entre el modo iPod/AUX/SINTONIZADOR/CD - Memorex Mi1111 | User's Manual - Page 45
fondo se iluminará de color azul. 3 1 2 Si todavía no está en modo de iPod, presione el botón de FUNCIÓN para seleccionar el modo de iPod. Usted puede operar el iPod usando los controles de éste, como indica el manual del propietario, y escuchará el sonido a través de las bocinas de esta unidad - Memorex Mi1111 | User's Manual - Page 46
remoto para aumentar o disminuir los agudos. NOTA: El margen es de -6 a +6. 3 Para ajustar los bajos: Presione el botón de BAJOS + o en el control remoto para aumentar o disminuir los bajos. NOTA: • Cuando apaga y enciende nuevamente la unidad, el volumen continuará en el nivel en que lo dej - Memorex Mi1111 | User's Manual - Page 47
OPERACIÓN (CONTINÚA) CÓMO USAR LA RADIO 1 2 Encienda esta unidad presionando el botón de Encendido; el display reproducción estéreo y mono, presione el botón de ENCONTRAR/ESTÉREO-MONO en el control remoto. Presione repetidamente el botón de Sintonizar/Brincar/Hora Abajo (-) 1 o Arriba (+) - Memorex Mi1111 | User's Manual - Page 48
estación quedará guardada en la memoria. Repita lo anterior para programar Predefinidos adicionales en cada banda, según desee. RECUPERAR LOS PREDEFINIDOS DE LA RADIO (30 de FM, 10 de AM) 1 Siga los pasos 1 a 3 en la página anterior para encender la unidad y seleccionar una banda. Presione el - Memorex Mi1111 | User's Manual - Page 49
CON ESTA UNIDAD 12 2 1 Encienda esta unidad presionando el Presione el área para abrir el botón de Encendido 1; el display compartimiento de CD y coloque un CD mostrará brevemente la palabra "Hello" en el eje central, ejerciendo poca presión, 2 [hola] y la luz de fondo se iluminará de con el - Memorex Mi1111 | User's Manual - Page 50
o dañado o si no hay un disco, "NO DISC" [no hay disco] aparecerá en el display. • La reproducción se detendrá cuando abra el compartimiento del CD, pero no se recomienda abrirlo antes presionar el botón de DETENER/BANDA (I). • El reproductor puede tardar entre 10 y 30 segundos en leer un disco MP3 - Memorex Mi1111 | User's Manual - Page 51
OPERACIÓN (CONTINÚA) PARA INICIAR LA REPRODUCCIÓN DE UNA PISTA ESPECÍFICA 1 21 2 Mientras está en modo de Paro, puede Cuando seleccione la pista o presione uno de los botones de Sintonizar/Brincar/Hora Abajo (-) 1 o Arriba (+) 2 para seleccionar una pista específica a reproducir. archivo - Memorex Mi1111 | User's Manual - Page 52
(los primeros 10 segundos) de las pistas o archivos en un disco, mientras está en modo de Paro, presione el botón de INTRO en el control remoto; la reproducción de la introducción empezará automáticamente. NOTA: Para detener y cancelar la reproducción de la introducción, presione el botón de DETENER - Memorex Mi1111 | User's Manual - Page 53
OPERACIÓN (CONTINÚA) PARA PROGRAMAR LA MEMORIA (HASTA 64 PISTAS) Programar es la habilidad de seleccionar previamente el orden en el cual se reproducirá una serie de pistas. 1 2 21 Mientras está en modo de Paro, presione el botón PROG./MEMO./ Ajuste de reloj. "MEM", el número de pista y "P-01" - Memorex Mi1111 | User's Manual - Page 54
OPERACIÓN (CONTINÚA) NOTAS SOBRE CÓMO PROGRAMAR LA REPRODUCCIÓN • Puede revisar el programa presionando repetidamente el botón de PROG./MEMO./Ajuste de reloj mientras está en modo de Paro. • Para agregar una pista a la memoria del programa, mientras está en modo de Paro, simplemente presione el bot - Memorex Mi1111 | User's Manual - Page 55
¿Puedo grabar mis propios discos MP3? Sí, pero necesita un quemador de CD que puede conseguir en su tienda local de computadoras. ¿Dónde puedo encontrar MP3 con otro tipo de archivos en el CDR? Sí, pero su reproductor de CD ignorará aquellos archivos y sólo leerá los archivos MP3 en el CDR. - Memorex Mi1111 | User's Manual - Page 56
de la siguiente manera: 1 2 1 2 Con un disco MP3 adentro y mientras está en modo de Paro, presione el botón de ENCONTRAR/ESTÉREO -MONO en el control remoto; el primer archivo que empiece con la letra "A" y su número de pista aparecerá en el display y el icono de Buscar (una lupa) parpadear - Memorex Mi1111 | User's Manual - Page 57
manera: 1 2 1 2 Con un disco MP3 adentro y mientras está en modo de Paro, presione dos veces el botón de ENCONTRAR/ ESTÉREO-MONO en el control remoto; el primer nombre de carpeta, el número de carpeta,¨"ALBUM" y el icono de Buscar (una lupa) aparecerán en el display. 3 Seleccione la carpeta - Memorex Mi1111 | User's Manual - Page 58
disco CDR cuando se quema la música en el disco. Por ello, puede grabarse la música por separado hasta que el disco completo quede lleno. (E) CD-ROM drive Directory 01 Blur01.mp3 Blur02.mp3 Blur03.mp3 Blur04.mp3 Directory 02 Spice05.mp3 Spice06.mp3 Directory 03 2men07.mp3 burt02.mp3 Skipped - Memorex Mi1111 | User's Manual - Page 59
del TEMPORIZADOR DE APAGADO. 3 3 21 Presione el botón de Sintonizar/Brincar/ Hora Abajo (-) 1 o Arriba (+) 2 para configurar el modo deseado (iPod, CD, Sintonizador). Luego presione nuevamente el botón de TEMPORIZADOR 3 para confirmar. Repita lo anterior para configurar el volumen deseado. Despu - Memorex Mi1111 | User's Manual - Page 60
DORMIR 1 OPERACIÓN (CONTINÚA) Con la unidad encendida, presione el botón de DORMIR en el control remoto; el indicador de SLEEP [dormir] y "90" aparecerán en el display durante unos cinco segundos, lo cual indica que la unidad se apagará después de - Memorex Mi1111 | User's Manual - Page 61
puerto universal está grabado en la parte delantera de éstos, como se muestra en la siguiente página) que corresponde con su iPod. Inserte el puerto universal correspondiente así como su iPod en la unidad como se describe en la página 11. iPod Tipo iPod mini Memoria N° puerto univ. 4 a. 6GB No - Memorex Mi1111 | User's Manual - Page 62
pieza 0229-07619090000*) No. 10 (No. de pieza 0229-07619100000*) Second Generation iPod nano 2 a. 8GB No. 11 (No. de pieza 0229-07619110000*) Adaptador de ¡IMPORTANTE! El número del puerto universal está grabado en la parte posterior de los mismos. Consulte la ilustración a continuación para ver - Memorex Mi1111 | User's Manual - Page 63
sin sonido o sonido deficiente. AM: La unidad no está colocada correctamente. Incorrectamente conectado. No en modo de iPod. No en modo de CD. Disco introducido incorrectamente. Disco sucio o defectuoso. Condensación por humedad en el disco. Gire la unidad hasta obtener la mejor recepción. Revise - Memorex Mi1111 | User's Manual - Page 64
para limpiar el disco compacto. Si es necesario, use un juego de limpieza para CD. • Si el disco compacto brinca o se atora en una sección del se muestra aquí. Es posible que otros discos no cumplan con la norma de CD y no se escuchen bien. • Los discos compactos deben guardarse en sus cajas - Memorex Mi1111 | User's Manual - Page 65
control remoto). . . CD 3V, CR2025, batería de litio Bocina 4 ohmios x 2 + 4 ohmios (ultragrave) Potencia de salida 5W x 2 +15W (ultragrave) SECCIÓN DE RADIO SI ACASO NECESITARA REGRESAR EL PRODUCTO A SU DISTRIBUIDOR O A MEMOREX. PARA OBTENER PIEZAS REEMPLAZABLES POR EL CONSUMIDOR, CONSULTE EL NÚ - Memorex Mi1111 | User's Manual - Page 66
Memcorp, Inc. Weston, FL Printed in / Impreso en Hong Kong Visit our website at / Visite nuestro sitio web en www.memorexelectronics.com 0570-0761901-0000
-
 1
1 -
 2
2 -
 3
3 -
 4
4 -
 5
5 -
 6
6 -
 7
7 -
8
-
9
-
10
-
11
-
12
-
13
-
14
-
15
-
16
-
17
-
18
-
19
-
20
-
21
-
22
-
23
-
24
-
25
-
26
-
27
-
28
-
29
-
30
-
31
-
32
-
33
-
34
-
35
-
36
-
37
-
38
-
39
-
40
-
41
-
42
-
43
-
44
-
45
-
46
-
47
-
48
-
49
-
50
-
51
-
52
-
53
-
54
-
55
-
56
-
57
-
58
-
59
-
60
-
61
-
62
-
63
-
64
-
65
-
66
 |
 |
User’s Guide
Guía del usuario
Micro System for iPod with PLL AM/FM Radio,
MP3/CD Player and Remote Control
Microsistema para iPod con Radio AM/FM,
Reproductor de MP3/CD y Control remoto
Mi1111
Before operating this product, please read these instructions
completely. / Antes de operar este producto, lea este
instructivo en su totalidad.