Miele HR 1135-1 G Operating instructions/Installation instructions
Miele HR 1135-1 G Manual
 |
View all Miele HR 1135-1 G manuals
Add to My Manuals
Save this manual to your list of manuals |
Miele HR 1135-1 G manual content summary:
- Miele HR 1135-1 G | Operating instructions/Installation instructions - Page 1
Operating Instructions 30", 36", 48" Ranges (Gas Cooktop) To prevent accidents and damage to the range, you must read all instructions supplied before installing or using the appliance. en-US, CA M.-Nr. 11 060 760 - Miele HR 1135-1 G | Operating instructions/Installation instructions - Page 2
not been secured. This may lead to fatal injuries. This range must be secured and connected using the anti-tip device according to the installation instructions. If you have moved the range, slide the locking latch onto the anti- tip device until you feel it lock into place. Do not use - Miele HR 1135-1 G | Operating instructions/Installation instructions - Page 3
IMPORTANT SAFETY INSTRUCTIONS WARNING: If the information in this manual is not followed exactly, a fire or explosion may instructions. - If you are unable to reach your gas provider, call the fire department. - Installation and service must be performed by a qualified installer, qualified service - Miele HR 1135-1 G | Operating instructions/Installation instructions - Page 4
IMPORTANT SAFETY INSTRUCTIONS 2 IMPORTANT SAFETY INSTRUCTIONS 6 Guide to the range 16 HR 1124 ...16 Cooktop...16 Control panel ...17 HR 1134-1 ...18 Cooktop...18 Control panel ...19 HR 1135-1 ...20 Cooktop...20 Control panel ...21 HR 1136-1 ...22 Cooktop...22 Control panel ...23 HR 1724 ...24 - Miele HR 1135-1 G | Operating instructions/Installation instructions - Page 5
with stainless steel finish 53 Simmer burner / Power burners 53 Cleaning the grill grate 54 Cleaning the griddle plate 54 Frequently Asked Questions 55 Technical Service 57 Contact in case of fault 57 Warranty ...57 5 - Miele HR 1135-1 G | Operating instructions/Installation instructions - Page 6
the range for the first time. To prevent accidents and damage to the appliance, always observe both the installation instructions and operating instructions. Both documents contain important information about installation, safety, use and maintenance. Miele cannot be held liable for damage occurring - Miele HR 1135-1 G | Operating instructions/Installation instructions - Page 7
IMPORTANT SAFETY INSTRUCTIONS Appropriate use This cooktop is intended for domestic use and use in other similar environments. This cooktop lack physical, sensory or mental abilities, or experience with the appliance should not use it without supervision or instruction by a responsible person. 7 - Miele HR 1135-1 G | Operating instructions/Installation instructions - Page 8
IMPORTANT SAFETY INSTRUCTIONS Safety with children As with any appliance, close supervision is necessary when the cooktop is used by children. Do not leave children unattended: Children should - Miele HR 1135-1 G | Operating instructions/Installation instructions - Page 9
handle or the control panel! Maintenance by the user: Never repair or replace any part of the appliance unless the instructions specifically recommend doing so. Service work may only be performed by a qualified technician. Damage to the cooktop can compromise your safety. Check the cooktop for - Miele HR 1135-1 G | Operating instructions/Installation instructions - Page 10
IMPORTANT SAFETY INSTRUCTIONS Do not use a power strip or extension cord to connect the appliance housing under any circumstances. Any repairs not performed by a Miele authorized service technician will void the warranty. Defective components should be replaced by Miele original parts only - Miele HR 1135-1 G | Operating instructions/Installation instructions - Page 11
IMPORTANT SAFETY INSTRUCTIONS Danger of electric shock. If the cooktop is defective, immediately turn the appliance off and discontinue use. Disconnect it from the electricity and gas supply. Contact Technical Service. If the range is installed behind a cabinet door, do not close the door while - Miele HR 1135-1 G | Operating instructions/Installation instructions - Page 12
IMPORTANT SAFETY INSTRUCTIONS Correct use Do not leave the cooktop unattended when cooking on high power. Spilled food will begin to smoke and cause grease splatter, which can - Miele HR 1135-1 G | Operating instructions/Installation instructions - Page 13
IMPORTANT SAFETY INSTRUCTIONS The cooktop gets hot when in use and remains hot for some time after being turned off. Do not touch the appliance if there is a - Miele HR 1135-1 G | Operating instructions/Installation instructions - Page 14
IMPORTANT SAFETY INSTRUCTIONS Remove all grease splatters and other flammable (food) residues on the cooktop. They are a fire hazard. Install the burner grates in an upright position to - Miele HR 1135-1 G | Operating instructions/Installation instructions - Page 15
IMPORTANT SAFETY INSTRUCTIONS The grates, burner cap, bottom parts of the burner, and any other parts located near the burner flame use a steam cleaner to clean the cooktop. The steam may reach electrical components and cause a short circuit. SAVE THESE INSTRUCTIONS AND REVIEW THEM PERIODICALLY 15 - Miele HR 1135-1 G | Operating instructions/Installation instructions - Page 16
Guide to the range HR 1124 Cooktop a Burner control knob for rear left burner b Burner control knob for front left burner c Burner control knob for front right burner d Burner control knob for rear right burner e Power burner f Grates g Simmer burner 16 - Miele HR 1135-1 G | Operating instructions/Installation instructions - Page 17
Control panel Guide to the range a Burner control knob for rear left burner b Burner control knob for front left burner c Burner control knob for front right burner d Burner control knob for rear right burner e Oven controls 17 - Miele HR 1135-1 G | Operating instructions/Installation instructions - Page 18
Guide to the range HR 1134-1 Cooktop a Burner control knob for rear left burner b Burner control knob for front left burner c Burner control knob for front center burner d Burner control - Miele HR 1135-1 G | Operating instructions/Installation instructions - Page 19
Control panel Guide to the range a Burner control knob for rear left burner b Burner control knob for front left burner c Burner control knob for front center burner d Burner - Miele HR 1135-1 G | Operating instructions/Installation instructions - Page 20
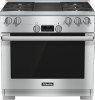
Guide to the range HR 1135-1 Cooktop a Burner control knob for rear left burner b Burner control knob for front left burner c Control knob for grill d Burner control knob for front - Miele HR 1135-1 G | Operating instructions/Installation instructions - Page 21
Control panel Guide to the range a Burner control knob for rear left burner b Burner control knob for front left burner c Control knob for grill d Burner control knob for front right burner e Burner control knob for rear right burner f Oven controls 21 - Miele HR 1135-1 G | Operating instructions/Installation instructions - Page 22
Guide to the range HR 1136-1 Cooktop a Burner control knob for rear left burner b Burner control knob for front left burner c Control knob for griddle plate d Burner control knob for - Miele HR 1135-1 G | Operating instructions/Installation instructions - Page 23
Control panel Guide to the range a Burner control knob for rear left burner b Burner control knob for front left burner c Control knob for griddle plate d Burner control knob for front right burner e Burner control knob for rear right burner f Oven controls 23 - Miele HR 1135-1 G | Operating instructions/Installation instructions - Page 24
Guide to the range HR 1724 Cooktop a Burner control knob for rear left burner b Burner control knob for front left burner c Burner control knob for front right burner d Burner control knob for rear right burner e Power burner f Grates g Simmer burner 24 - Miele HR 1135-1 G | Operating instructions/Installation instructions - Page 25
Control panel Guide to the range a Burner control knob for rear left burner b Burner control knob for front left burner c Burner control knob for front right burner d Burner control knob for rear right burner e Oven controls 25 - Miele HR 1135-1 G | Operating instructions/Installation instructions - Page 26
Guide to the range HR 1924-2 Cooktop a Backlit burner control knob for rear left burner b Backlit burner control knob for front left burner c Backlit burner control knob for front right burner d Backlit burner control knob for rear right burner e Power burner f Grates g Simmer burner 26 - Miele HR 1135-1 G | Operating instructions/Installation instructions - Page 27
Control panel Guide to the range a Backlit burner control knob for rear left burner b Backlit burner control knob for front left burner c Backlit burner control knob for front right burner d Backlit burner control knob for rear right burner e Oven controls 27 - Miele HR 1135-1 G | Operating instructions/Installation instructions - Page 28
Guide to the range HR 1934-2 Cooktop a Burner control knob for rear left burner b Burner control knob for front left burner c Burner control knob for front center burner d Burner control - Miele HR 1135-1 G | Operating instructions/Installation instructions - Page 29
Control panel Guide to the range a Backlit burner control knob for rear left burner b Backlit burner control knob for front left burner c Backlit burner control knob for front - Miele HR 1135-1 G | Operating instructions/Installation instructions - Page 30
Guide to the range HR 1935-2 Cooktop a Burner control knob for rear left burner b Burner control knob for front left burner c Control knob for grill d Burner control knob for front - Miele HR 1135-1 G | Operating instructions/Installation instructions - Page 31
Control panel Guide to the range a Backlit burner control knob for rear left burner b Backlit burner control knob for front left burner c Backlit control knob for grill d Backlit burner control knob for front right burner e Backlit burner control knob for rear right burner f Oven controls 31 - Miele HR 1135-1 G | Operating instructions/Installation instructions - Page 32
Guide to the range HR 1936-2 Cooktop a Burner control knob for rear left burner b Burner control knob for front left burner c Control knob for griddle plate d Burner control knob for - Miele HR 1135-1 G | Operating instructions/Installation instructions - Page 33
Control panel Guide to the range a Backlit burner control knob for rear left burner b Backlit burner control knob for front left burner c Backlit control knob for griddle plate d - Miele HR 1135-1 G | Operating instructions/Installation instructions - Page 34
Guide to the range HR 1954-2 Cooktop a Backlit burner control knob for rear left burner b Backlit burner control knob for front left burner c Backlit burner control knob for rear left - Miele HR 1135-1 G | Operating instructions/Installation instructions - Page 35
Control panel Guide to the range a Backlit burner control knob for rear left burner b Backlit burner control knob for front left burner c Backlit burner control knob for rear - Miele HR 1135-1 G | Operating instructions/Installation instructions - Page 36
Guide to the range HR 1955-2 Cooktop a Backlit burner control knob for rear left burner b Backlit burner control knob for front left burner c Backlit control knob for grill d Backlit burner control - Miele HR 1135-1 G | Operating instructions/Installation instructions - Page 37
Control panel Guide to the range a Backlit burner control knob for rear left burner b Backlit burner control knob for front left burner c Backlit control knob for grill d Backlit - Miele HR 1135-1 G | Operating instructions/Installation instructions - Page 38
Guide to the range HR 1956-2 Cooktop a Backlit burner control knob for rear left burner b Backlit burner control knob for front left burner c Backlit control knob for griddle plate d Backlit - Miele HR 1135-1 G | Operating instructions/Installation instructions - Page 39
Control panel Guide to the range a Backlit burner control knob for rear left burner b Backlit burner control knob for front left burner c Backlit control knob for griddle plate d - Miele HR 1135-1 G | Operating instructions/Installation instructions - Page 40
Control panel Burner knob With the burner knob, you can ignite the burner and regulate the flame. The burners can be variably adjusted between the lowest and highest settings. Depending on the model, the range will be equipped with Backlit burner control knobs. 40 - Miele HR 1135-1 G | Operating instructions/Installation instructions - Page 41
range. Have this information available when contacting Miele Technical Service. Items included with this range The following items are included with this appliance: - Installation instructions for the range - Multiple operating instructions (depending on the range model) for: - Gas Cooktop - Gas - Miele HR 1135-1 G | Operating instructions/Installation instructions - Page 42
Before first use Cleaning the cooktop for the first time Remove any protective foil and stickers. Using a soft sponge, clean all removable burner parts with a solution of warm water and a small amount of liquid dish soap. Dry the parts thoroughly after cleaning and reassemble the burners (see " - Miele HR 1135-1 G | Operating instructions/Installation instructions - Page 43
ignited or the flame goes out, turn off the burner knob. Simmer and power burners In case of a power failure, the flame can be ignited manually. Press in the burner knob and turn it counterclockwise to "High." Light the emerging gas/air mixture with a match. Grill Danger of injury due to - Miele HR 1135-1 G | Operating instructions/Installation instructions - Page 44
of injury. Adjust the flame so that it never extends up the sides of the cookware. Visual characteristics gas flames Yellow flames Contact the Miele Service Department. Yellow tips on outer cones Normal for propane gas Soft blue flames yellow colour is only allowed at the tip of the inner cone - Miele HR 1135-1 G | Operating instructions/Installation instructions - Page 45
Operating the cooktop Simmer/Power burner Knob label Off High Simmer Description Gas supply is off: Burner off Strongest flame setting: Maximum power of upper and lower flame rings Weakest flame setting: Upper flame ring off Minimum power of lower flame ring Grill: Ceramic burner According to - Miele HR 1135-1 G | Operating instructions/Installation instructions - Page 46
Cookware - Select cookware that fits the size of the burner: Large diameter = large burner Small diameter = small burner - Using cookware that is too large can cause the flames to spread out and damage the surrounding countertop or other appliances. Choosing the right cookware size improves - Miele HR 1135-1 G | Operating instructions/Installation instructions - Page 47
- Whenever possible, keep pots and pans covered while cooking. Doing so will prevent unnecessary heat loss. - Wide, shallow cookware heats up faster and is therefore preferable to tall, narrow cookware. - Cook with as little water as possible. - Reduce the power setting once the water has come to a - Miele HR 1135-1 G | Operating instructions/Installation instructions - Page 48
Operating the grill Once you start the Self Clean program, the grill and the griddle will be turned off. During the Self Clean program, the grill and the griddle cannot be turned on. The grill has a ceramic burner that transfers intense heat to food, searing the outside to seal the juices. Full - Miele HR 1135-1 G | Operating instructions/Installation instructions - Page 49
Operating the grill Grilling tips Fire hazard! Do not leave the appliance unattended while cooking! Place the grill into position. Cleaning and care Tip: All parts can be disassembled in the reverse order. You can also remove the frame for cleaning. Turning on the grill Press the control - Miele HR 1135-1 G | Operating instructions/Installation instructions - Page 50
Operation of the griddle Once you start the Self Clean program, the grill and the griddle will be turned off. During the Self Clean program, the grill and the griddle cannot be turned on. The griddle is thermostatically controlled to maintain a consistent temperature. To prevent food from sticking, - Miele HR 1135-1 G | Operating instructions/Installation instructions - Page 51
Tips for frying Before each use, wipe the griddle with a damp cloth to remove dust or other residue. - Pre-heat the griddle plate thoroughly for 8 -10 minutes at the power level that you are going to be using for cooking. - Pat down wet food items with paper towel to prevent splatters during - Miele HR 1135-1 G | Operating instructions/Installation instructions - Page 52
Cleaning and care Risk of burning or scalding due to hot burners. The burners will be hot after use. Turn off the cooktop. Allow the cooktop to cool down before cleaning. Risk of damage due to moisture ingress. The steam from a steam cleaning appliance could reach live electrical components and - Miele HR 1135-1 G | Operating instructions/Installation instructions - Page 53
Cleaning and care Gas cooktop The surfaces of the burner components and grates will slightly lose their luster over time. This is completely normal and does not indicate damage to the material. Clean the cooktop after each use with a soft sponge, warm water and a small amount of liquid dish soap. - Miele HR 1135-1 G | Operating instructions/Installation instructions - Page 54
Cleaning and care Cleaning the grill grate Clean the grill grate after use using hot water and some dishwashing liquid. When the grill grate is strongly soiled, soak it and then remove the soiling with a brush. After that, let the rack dry thoroughly. Cleaning the griddle plate Burn hazard! - Miele HR 1135-1 G | Operating instructions/Installation instructions - Page 55
of the machine, some of which may result from incorrect operation, can be remedied without contacting the Service Department. This guide may help you to find the reason for the fault, and how to correct it. Problem Possible cause and solution The burners do not There may be air in the gas line - Miele HR 1135-1 G | Operating instructions/Installation instructions - Page 56
Frequently Asked Questions Problem The ignitor does not function properly. The Grill and in the building's wiring system was tripped. If necessary, contact a qualified electrician or Customer Service for assistance. There is food debris stuck between the ignitor and the burner cap. Remove the - Miele HR 1135-1 G | Operating instructions/Installation instructions - Page 57
fault which you cannot remedy yourself, please contact your Miele dealer or Miele Technical Service. Warranty For further information, please refer to your warranty booklet. Contact information for Miele Technical Service can be found at the end of this document. Please quote the model and serial - Miele HR 1135-1 G | Operating instructions/Installation instructions - Page 58
- Miele HR 1135-1 G | Operating instructions/Installation instructions - Page 59
9 Independence Way Princeton, NJ 08540 Phone: 800-843-7231 Fax: 609-419-4298 www.mieleusa.com Customer Service & Support Phone: 888-99-MIELE(64353) Fax: 888-586-8056 [email protected] International Headquarters Miele & Cie. KG Carl-Miele-Straße 29 33332 Gütersloh Germany Canada Importer Miele - Miele HR 1135-1 G | Operating instructions/Installation instructions - Page 60
HR 1124, HR 1134-1, HR 1135-1, HR 1136-1, HR 1724, HR 1924-2, HR 1934-2, HR 1935-2, HR 1936-2, HR 1954-2, HR 1955-2, HR 1956-2 en-US, CA M.-Nr. 11 060 760 / 02
-
 1
1 -
 2
2 -
 3
3 -
 4
4 -
 5
5 -
 6
6 -
 7
7 -
8
-
9
-
10
-
11
-
12
-
13
-
14
-
15
-
16
-
17
-
18
-
19
-
20
-
21
-
22
-
23
-
24
-
25
-
26
-
27
-
28
-
29
-
30
-
31
-
32
-
33
-
34
-
35
-
36
-
37
-
38
-
39
-
40
-
41
-
42
-
43
-
44
-
45
-
46
-
47
-
48
-
49
-
50
-
51
-
52
-
53
-
54
-
55
-
56
-
57
-
58
-
59
-
60
 |
 |

Operating Instructions
30", 36", 48" Ranges
(Gas Cooktop)
To prevent accidents and damage to the range, you
must
read all
instructions supplied before installing or using the appliance.
en-US, CA
M.-Nr. 11 060 760