Motorola H201 User Guide
Motorola H201 Manual
 |
View all Motorola H201 manuals
Add to My Manuals
Save this manual to your list of manuals |
Motorola H201 manual content summary:
- Motorola H201 | User Guide - Page 1
User's Guide H201 / H202 / H203 / H204 / H205 DECT 6.0 Digital Cordless Phone with Answering System Warning Use only the adapter and telephone line cord provided in the box. - Motorola H201 | User Guide - Page 2
time includes the pre-recorded voice menu and outgoing announcements. **You must subscribe to your network provider's Caller ID or Call Waiting service for these features to work. Please note that this equipment is not designed for making emergency telephone calls when the power fails. Alternative - Motorola H201 | User Guide - Page 3
failures. Alternative arrangements should be made for access to emergency services. Got everything? • Handset • Base • NiMH rechargeable battery pack • Battery door • Power adapter • Telephone line cord • User's Guide • Quick Start Guide In multihandset packs, you will find one or more additional - Motorola H201 | User Guide - Page 4
1. Getting started 5 1.1 Connecting the base 5 1.2 Installing and charging the handset battery pack 6 1.3 Setting the display language 7 1.4 Setting date and time 7 2. Getting to know your phone 8 3. Using the phone 12 3.1 Making a call 12 3.2 Speed dial calling 12 3.3 Answering a call 12 - Motorola H201 | User Guide - Page 5
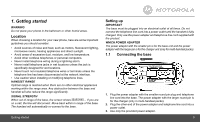
1. Getting started WARNING Do not place your phone in the bathroom or other humid areas. Location When choosing a location for your new phone, here are some important guidelines you should consider: • Avoid sources of noise and heat, such as motors, fluorescent lighting, microwave ovens, heating - Motorola H201 | User Guide - Page 6
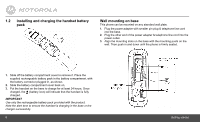
1.2 Installing and charging the handset battery pack Wall mounting on base This phone can be mounted on any standard wall plate. 1. Plug the power adapter with smaller pin plug & telephone line cord into the base. 2. Plug the other end of the power adapter & telephone line cord into the power - Motorola H201 | User Guide - Page 7
controlled by a wall switch. Make sure the wall is capable of supporting the weight of the phone, and use the proper type of anchoring to select DATE & TIME. If you're a subscriber to your network's Caller ID service, date and time is automatically set when a call is received. 2. Repeat to edit - Motorola H201 | User Guide - Page 8
2. Getting to know your phone Overview of your handset front 8 Get acquainted with the following buttons on your handset front and their multi-function tasks. 1 Menu / Select a) In idle mode: Press to access menu list. b) In menu/editing mode: Press to confirm and save the settings. c) During a - Motorola H201 | User Guide - Page 9
c) During ringing: Press to silent the incoming ringer temporarily. d) During a call: Press to end a call. 6 Alphanumeric keypad a) In idle/pre-dial/editing mode/during a call: Press to enter characters/ numbers. Press and hold to activate speed dial. 7 # / Pause / ABC / Format a) In idle/pre-dial/ - Motorola H201 | User Guide - Page 10
. Indicates that a new call has been received. Off after all new calls have been reviewed. Indicates that the ringer volume is off. If a voice mail service is being used, this icon indicates that there is a new voice mail message. The icon is off after all new voice mails have been reviewed - Motorola H201 | User Guide - Page 11
Overview of your handset back Getting to know your phone For handset with base, the following five buttons are used for these tasks with the Answering Machine function. 1. Skip Backward During message playback: a) Press once to replay current message from the beginning. b) Press twice to playback - Motorola H201 | User Guide - Page 12
Overview of the base 1 FIND Press to find/page all registered handsets. Press the button again, or any key on the handset, to turn off page signal. 3. Using the phone 3.1 Making a call 1. Enter the phone number and then press /FLASH or / SPEAKER to dial the phone number. 3.2 Speed dial calling - Motorola H201 | User Guide - Page 13
3.7 Dialing from the redial list 1. Press REDIAL/VOL- and then scroll VOL+ or REDIAL/VOL- to the entry you want to redial. 2. Press /FLASH or /SPEAKER to dial the number from line. 3.8 Dialing from the calls list 1. Press CID and then scroll VOL+ or REDIAL/VOL- to the entry you want to dial. 2. - Motorola H201 | User Guide - Page 14
display PRIVATE. • Information about incoming calls will vary by country and network operator. Some operators may charge a subscription for their Caller ID service. 3.12.1 Calls List The calls list contains details of missed and received calls. Details include the date and time of the call. Entries - Motorola H201 | User Guide - Page 15
3.12.4 Deleting a calls list entry 1. Press CID to enter the calls list. 2. Press VOL+ or REDIAL/VOL- to scroll to the entry you want. 3. Press /MUTE to delete the entry. 3.12.5 Deleting entire calls list 1. Press CID to enter the calls list. 2. Press and hold /MUTE. DELETE ALL CALL LOG ENTRIES? is - Motorola H201 | User Guide - Page 16
3.13 Personal Settings Menu map MAIN MENU DATE & TIME PHONEBOOK SUB MENU DATE TIME VIEW ADD EDIT DELETE DELETE ALL PB CAPACITY SPEED DIAL SETUP HS RINGER TONE RINGER VOLUME KEY TONE LOW BATT TONE OUT RANGE TONE HANDSET NAME LANGUAGE LCD CONTRAST REGISTRATION SETUP BS DIAL MODE FLASH TIME AREA - Motorola H201 | User Guide - Page 17
1. Press MENU. 2. Press VOL+ or REDIAL/VOL- to scroll through the menu. 3. Press MENU to open a sub-menu or validate an option. Press /BACK to go back to the previous menu level or cancel an action. If you do not press any button on the handset for 30 seconds, the display will automatically return - Motorola H201 | User Guide - Page 18
NOTE If pulse mode is selected, press TONE/* to switch from pulse to tone dialing temporarily when dialing out. After the call is ended, the dial mode will change back to pulse. 3.16 Setting the flash time The default flash time is 600MS. It is unlikely that you should need to change this setting - Motorola H201 | User Guide - Page 19
3.21 Using your answering machine The answering machine records unanswered calls when it is activated. 3.21.1 Playing messages Through the handset: 1. Press /MUTE from idle mode. New messages will be played followed by any older messages. 2. During message playback, press the keys below to perform - Motorola H201 | User Guide - Page 20
3. Press MENU and then VOL+ or REDIAL/VOL- to select the rings to answer. (4 options are available: TOLL SAVER, 3, 4, or 5 RINGS). NOTE If Toll Saver setting is selected, the answering machine will pick up after two rings if there are new messages, and after four rings if there are no messages. 4. - Motorola H201 | User Guide - Page 21
2. Press MENU to listen to the caller through the handset earpiece, the handset displays CALL SCREENING. 3. Press /SPEAKER to listen via the handset loudspeaker. 4. Press /MUTE to stop screening and leave the answering machine to record the message. 5. Press /FLASH to talk to the caller and stop - Motorola H201 | User Guide - Page 22
subscription with your network operator. • If you subscribe to high-speed internet service (Digital Subscriber Line - DSL) through your telephone lines, you must install noise and caller ID problems caused by DSL interference. Please contact your DSL service provider for more information about DSL filters. - Motorola H201 | User Guide - Page 23
properly... 1. Read this User's Guide. 2. Visit our website: www.motorola.com 3. Contact Customer Service in the US and Canada at 1-888-331-3383. To order a replacement battery pack contact customer service or visit our website. Important safety instructions Follow these safety precautions when - Motorola H201 | User Guide - Page 24
repair work is required, contact the customer service helpline found in this User's Guide. 8. Do not overload wall outlets and extension product. 6. Adjust only those controls that are covered by the operating instructions. Improper adjustment of other controls may result in damage and will often - Motorola H201 | User Guide - Page 25
to be recycled. Refer to the battery label for battery type. Contact your local recycling center for proper disposal methods. SAVE THESE INSTRUCTIONS Consumer Products and Accessories purchased in the United States or Canada What Does this Warranty Cover? Subject to the exclusions and limitations - Motorola H201 | User Guide - Page 26
WARRANTY OR IN CONTRACT OR TORT (INCLUDING NEGLIGENCE OR STRICT PRODUCT LIABILITY) OR OTHERWISE FOR DAMAGES OR CLAIMS IN EXCESS OF THE PURCHASE PRICE OF THE PRODUCT OR ACCESSORY, OR FOR ANY INDIRECT, INCIDENTAL, SPECIAL OR CONSEQUENTIAL DAMAGES OF ANY KIND, OR LOSS OF REVENUE, SAVINGS OR PROFITS, - Motorola H201 | User Guide - Page 27
use with the Products or Accessories is excluded from coverage. How to Obtain Warranty Service or Other Information? To obtain service or information, please call: US and Canada: 1-888-331-3383 You will receive instructions on how to ship the Products or Accessories, the shipment of which shall be - Motorola H201 | User Guide - Page 28
also compliant. An RJ11 jack should normally be used for connecting to a single line and an RJ14 jack for two lines. See Installation Instructions in the User's Guide. The Ringer Equivalence Number (REN) is used to determine how many devices you may connect to your telephone line and still have them - Motorola H201 | User Guide - Page 29
problem has been corrected. Repairs to this telephone equipment can only be made by the manufacturer or its authorized agents. For repair procedures, follow the instructions discontinue your telephone service. The telephone company is required to notify you before interrupting service. If advance - Motorola H201 | User Guide - Page 30
Technical Specifications RF frequency band Channels Operating temperature Telephone base voltage (AV voltage, 60Hz) Telephone base voltage (Adapter output) Handset voltage Charge voltage (Adapter output) 1921.536 MHz - 1928.448 MHz 5 5ºC to 45ºC 96 - 130 Vms 6V DC, 400mA 2.4V 550mAh Ni-MH battery - Motorola H201 | User Guide - Page 31
. and are used under license from Motorola, Inc. MOTOROLA and the Stylized M Logo are registered in the US Patent & Trademark Office. All other product or service names are the property of their respective owners. © Motorola, Inc. 2009. All rights reserved. Version 1.0 Printed in China
-
 1
1 -
 2
2 -
 3
3 -
 4
4 -
 5
5 -
 6
6 -
 7
7 -
8
-
9
-
10
-
11
-
12
-
13
-
14
-
15
-
16
-
17
-
18
-
19
-
20
-
21
-
22
-
23
-
24
-
25
-
26
-
27
-
28
-
29
-
30
-
31
 |
 |

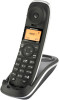
User°s Guide
H201 / H202 / H203 / H204 / H205
DECT 6.0 Digital Cordless Phone with
Answering System
Warning
Use only the adapter and telephone line cord provided
in the box.