Motorola vervecam action pack User Guide
Motorola vervecam action pack Manual
 |
View all Motorola vervecam action pack manuals
Add to My Manuals
Save this manual to your list of manuals |
Motorola vervecam action pack manual content summary:
- Motorola vervecam action pack | User Guide - Page 1
en VERVE CAM VERVE CAM+ User Guide We aim to provide you with the best user experience. Please check out the latest software and user manual update from our website: www.verve.life - Motorola vervecam action pack | User Guide - Page 2
1. Here's what you can do The MOTOROLA VerveCam Ultra Portable Lifestyle Video Camera is packed with the following features: • Video recording in 2.5K at 30 fps and 135° field of view • Share videos in real time via Youtube live stream • Free Hubble Connect for VerveCam app with photo/video editing - Motorola vervecam action pack | User Guide - Page 3
2. Box Contents VerveCam • 1 x Camera • 1 x Micro USB cable • 1 x Quick Start Guide VerveCam+ • 1 x Camera • 1 x Micro USB cable • 1 x Quick Start Guide • 1 x Waterproof Case • 1 x Clip Mount • 1 x Bumper & Lanyard • 1 x Universal Tripod Mount Additional accessories for other home or outdoor - Motorola vervecam action pack | User Guide - Page 4
Card is not included.) 6. Power / Mode Button 7. Mode Indicators - White (Photo / Video / Streaming) 8. Shutter / Select Button 9. Lanyard Hole 10. Locking Holes 11. micro-USB socket * supports microSD cards up to 32GB. 3 Your Camera at a Glance en - Motorola vervecam action pack | User Guide - Page 5
is compliant with all relevant electromagnetic field standards and is, when handled as described in the User's Guide, safe to use. Therefore, always read the instructions in this User's Guide carefully before using the product. • Avoid letting the USB port come into contact with liquid substances - Motorola vervecam action pack | User Guide - Page 6
5. Charge the Battery Battery life is about 1.5 hours when not connected to Wi-Fi, and 1 hour when connected to Wi-Fi. Connect the power adapter to an electrical outlet and insert the plug into the micro-USB socket on the underside of the Camera. Only use the power adapter (5V 1A) with the micro- - Motorola vervecam action pack | User Guide - Page 7
6. Power On & Off the Camera To power ON the Camera, hold down the POWER / MODE button 0 for 3 seconds. The LED indicator lights up in blue. To power OFF the Camera, hold down the POWER / MODE button 0 for 3 seconds. You will hear a voice prompt indicating that the Camera is powering off before the - Motorola vervecam action pack | User Guide - Page 8
7. Standby Mode When the Camera is not connected to the power supply or not connected to Hubble Connect for VerveCam app for more than 3 minutes, it will enter standby mode. The LED indicator flashes in blue once every 3 seconds. Press any button on the Camera to exit standby mode. 7 Standby Mode - Motorola vervecam action pack | User Guide - Page 9
iOS 8.3 (or higher) or Android™ 4.3 (or higher) Not supported on iPad and Android tablets. Wi-Fi® requirements: At least 2Mbps the App Store® or Google PlayTM. 2. Open the App. 3. Follow the in-app instructions to connect the Camera with your smartphone. 4. The Camera ID is printed on the back - Motorola vervecam action pack | User Guide - Page 10
9. Insert microSD Card (not included) Your Camera supports microSD cards with storage capacities of up to 32GB. Remove waterproof cover 1. Remove the waterproof cover, then insert a microSD card with the gold-plated side - Motorola vervecam action pack | User Guide - Page 11
10. Transfer files from the Camera to your Computer Power on the Camera and make sure that the Camera is disconnected from Hubble Connect for VerveCam App. To disconnect the Camera from the App, you can close the App or turn off the Camera and turn it on again. Connect the Camera to your computer's - Motorola vervecam action pack | User Guide - Page 12
11. Basic Operation of your Camera 11.1 Take a picture using the Camera 1. Hold down the POWER / MODE button 0 for 3 seconds to power ON the Camera. The LED indicator lights up in blue. 2. Press the POWER / MODE button 0 to switch to photo mode. Photo mode indicator lights up in white. 3. Press the - Motorola vervecam action pack | User Guide - Page 13
11.2 Record video using the Camera 1. Hold down the POWER / MODE button 0 for 3 seconds to power ON the Camera. The LED indicator lights up in blue. 2. Press the POWER / MODE button 0 to switch to video mode. Video mode indicator lights up in white. 3. Press the SHUTTER/SELECT button to start - Motorola vervecam action pack | User Guide - Page 14
12. Take Photos (via Hubble Connect for VerveCam app) Note: The App will remember the last used mode and will go to that mode automatically when connected. Photos will be stored on the Camera's memory card. 1. Run Hubble Connect for VerveCam app on your smartphone. 2. Go to the viewfinder screen - Motorola vervecam action pack | User Guide - Page 15
Timer OFF 2 Seconds 5 Seconds 10 Seconds Auto Daylight White Balance Cloudy Fluorescent Underwater Shade Tungsten en Take Photos (via Hubble Connect for VerveCam app) 14 - Motorola vervecam action pack | User Guide - Page 16
13. Record Videos (via Hubble Connect for VerveCam app) Note: The App will remember the last used mode and will go to that mode automatically when connected. Videos will be stored on the Camera's memory card. 1. Run Hubble Connect for VerveCam app on your smartphone. 2. Go to the viewfinder screen - Motorola vervecam action pack | User Guide - Page 17
Auto Daylight White Balance Cloudy Fluorescent Underwater Shade Tungsten WDR OFF ON Wide Dynamic Range gives the camera the ability to view Dark areas of the given image as well as extremely lighted portions of the image, or areas of high contrast. en Record Videos (via Hubble Connect for - Motorola vervecam action pack | User Guide - Page 18
14. Take Time Lapse Video (via Hubble Connect for VerveCam app) Note: The App will remember the last used mode and will go to that mode automatically when connected. Time lapse photography is a way of filming something in which many photographs are taken over a long period of time and are shown - Motorola vervecam action pack | User Guide - Page 19
14.3 Record Time Lapse Video 1. Run Hubble Connect for VerveCam app on your smartphone. 2. In the viewfinder screen, tap to select Time Lapse mode on the bottom panel. 3. Tap again to start time lapse video recording. You will hear a beep sound. The blue LED indicator and the white video mode - Motorola vervecam action pack | User Guide - Page 20
15. Loop Recording (via Hubble Connect for VerveCam app) Note: The App will remember the last used mode and will go to that mode automatically when connected. Loop recording function allows you to record and save video files in 5, 10, 20, 30 or 60 minutes looping intervals. As long as the Camera has - Motorola vervecam action pack | User Guide - Page 21
15.3 Start Loop Recording 1. Run Hubble Connect for VerveCam app on your smartphone. 2. In the viewfinder screen, tap to select Loop Recording mode on the bottom panel. 3. Tap again to start loop recording. You will hear a beep sound. The blue LED indicator and the white video mode indicator flash - Motorola vervecam action pack | User Guide - Page 22
a large amount of mobile data that is chargeable by your mobile service operator. 4. Tap to select your wireless network and enter the password Google Account. If you do not have a Google Account, follow the in-app instructions to create an account. 6. Wait for the setup to complete. It may take - Motorola vervecam action pack | User Guide - Page 23
17. View, Edit, Share, Download & Delete Photos and Videos 17.1 View Photos 1. Run Hubble Connect for VerveCam app on your smartphone. 2. Go to Camera Roll mode . 3. Tap on a photo to view it in full. 17.2 Edit Photo 1. Run Hubble Connect for VerveCam app on your smartphone. 2. Go to Camera Roll - Motorola vervecam action pack | User Guide - Page 24
17.3 View Videos 1. Run Hubble Connect for VerveCam app on your smartphone. 2. Go to Camera Roll mode . 3. Tap on a video to view it in full and tap to playback the video. 17.4 Trim Videos 1. Run Hubble Connect for VerveCam app on your smartphone. 2. Go to Camera Roll mode . 3. Select a video. 4. - Motorola vervecam action pack | User Guide - Page 25
17.7 Delete Photos & Videos 1. Run Hubble Connect for VerveCam app on your smartphone. 2. Go to Camera Roll mode . 3. Select a photo or video. 4. Tap . en View, Edit, Share, Download & Delete Photos and Videos 24 - Motorola vervecam action pack | User Guide - Page 26
18. General Settings 1. Run Hubble Connect for VerveCam app on your smartphone. 2. On the home screen, tap to access the following settings: Application • Turn Viewfinder Grid On or Off Settings • Check App Information Camera Settings • Disconnect/Forget Camera • Format SD Card • Check memory - Motorola vervecam action pack | User Guide - Page 27
19. Reset the Camera In the event that you experience a device issue or you've forgotten the password you've set, you can do a factory reset of your Camera using the Reset button (located next to the microSD card slot). To restore the camera to its factory default settings, hold down the Reset - Motorola vervecam action pack | User Guide - Page 28
air firmware upgrade capability. Firmware updates will be sent to the Camera via Hubble Connect for VerveCam app. Please follow the app instructions for upgrade. Go to Settings, select Camera Settings > Camera Information > Update Firmware. Note: Firmware upgrades will not be performed automatically - Motorola vervecam action pack | User Guide - Page 29
21. Camera Accessories The following accessories are included with your VERVE CAM+. Bumper & Lanyard Clip Mount Waterproof Case Universal Tripod Mount en Camera Accessories 28 - Motorola vervecam action pack | User Guide - Page 30
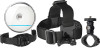
22. Optional Accessories ing MTaoteerniahlsance your use of the Camera, we provide the ndering following optional accessories, which can be purchased separately: Suction Mount Home Mount Stand Remote Control Bike Mount Helmet Mount Head Mount 29 Optional Accessories en - Motorola vervecam action pack | User Guide - Page 31
with normal household waste. Take this product to a collection point for the recycling of electrical and electronic equipment. The symbol on the product, user's guide and/or box indicates this. Some of the product materials can be reused if you take them to a recycling point. By reusing some parts - Motorola vervecam action pack | User Guide - Page 32
802.11 b/g/n Image sensor Colour 4MP sensor, OV4689 2688 x 1520, CMOS Lens f = 2.3mm, F = 2.4 LED 3 colours Battery Built-in 640mAh Memory Card Slot Micro SD card (support up to 32GB SDHC) Internal memory 1Gb DDR3, 256Mb SPI Flash 31 Technical Specifications en - Motorola vervecam action pack | User Guide - Page 33
& more If your product is not working properly.... 1. Read this User's Guide or the Quick Start Guide. 2. Visit our website: www.verve.life/contact 3. Contact Customer Service at US and Canada 1-888-331-3383 E-mail: [email protected] Consumer Products and Accessories Limited Warranty Thank you for - Motorola vervecam action pack | User Guide - Page 34
Who is covered? This Warranty extends only to the first consumer purchaser, and is not transferable. What will BINATONE do? BINATONE or its authorized distributor at its option and within a commercially reasonable time, will at no charge repair or replace any Products or Accessories that does not - Motorola vervecam action pack | User Guide - Page 35
branded or certified Products or Accessories or other peripheral equipment are excluded from coverage. Unauthorised Service or Modification. Defects or damages resulting from service, testing, adjustment, installation, maintenance, alteration, or modification in any way by someone other than - Motorola vervecam action pack | User Guide - Page 36
Service or Other Information? To obtain service or information, please call: US and Canada 1-888-331-3383 E-mail: [email protected] You will receive instructions serial number of the Product; (d) a written description of the problem; and, most importantly; (e) your address and telephone number. - Motorola vervecam action pack | User Guide - Page 37
installation. This equipment generates, uses and can radiate radio frequency energy and, if not installed and used in accordance with the instructions, may cause harmful interference to radio communications. However, there is no guarantee that interference will not occur in a particular installation - Motorola vervecam action pack | User Guide - Page 38
certified power level, the actual SAR level of the device while operating can be well below the maximum value. This is because the device is designed to operate at multiple power levels so as to use only the poser required to reach the network. In general, the closer you are to a wireless base - Motorola vervecam action pack | User Guide - Page 39
Holdings, LLC. and are used under license. Apple logo is a trademark of Apple Inc., registered in the U.S. and other countries. App Store is a service mark of Apple Inc. Google Play and Android are trademarks of Google Inc. All other trademarks are the property of their respective owners. © 2017
-
 1
1 -
 2
2 -
 3
3 -
 4
4 -
 5
5 -
 6
6 -
 7
7 -
8
-
9
-
10
-
11
-
12
-
13
-
14
-
15
-
16
-
17
-
18
-
19
-
20
-
21
-
22
-
23
-
24
-
25
-
26
-
27
-
28
-
29
-
30
-
31
-
32
-
33
-
34
-
35
-
36
-
37
-
38
-
39
 |
 |

en
VERVE
CAM
VERVE
CAM+
User Guide
We aim to provide you with the best user
experience. Please check out the latest
software and user manual update from our
website:
www.verve.life