NEC DTH-4R-2 Owners Guide
NEC DTH-4R-2 - CORDLESS Lite II BLAC Manual
 |
UPC - 961613043085
View all NEC DTH-4R-2 manuals
Add to My Manuals
Save this manual to your list of manuals |
NEC DTH-4R-2 manual content summary:
- NEC DTH-4R-2 | Owners Guide - Page 1
Dterm ® Cordless II DTR-4R-( ) (BK) OWNER'S GUIDE INT-1017 (DTERM) Document Revision 3 - NEC DTH-4R-2 | Owners Guide - Page 2
, Inc. and shall not be reproduced without prior written approval from NEC Unified Solutions, Inc. Dterm is a registered trademark of NEC Corporation. Electra Elite is a registered trademark of NEC America, Inc. AutoStandby and AutoTalk are trademarks of Uniden America Corporation. Copyright - NEC DTH-4R-2 | Owners Guide - Page 3
2 Battery Safety 1-2 Section 3 Important Safety Instructions 1-3 Section 4 Important Electrical Considerations 1-5 Range 1-5 Telephone Line Problems 1-5 Radio Interference 1-6 More than One Cordless Telephone 1-6 FCC RF Compliance 1-6 Chapter 2 About the Dterm Cordless II Section - NEC DTH-4R-2 | Owners Guide - Page 4
Batteries 3-14 Charging the Handset Battery Pack 3-14 Battery Hot Swap 3-14 Charging Spare Battery Packs 3-15 Section 9 Low Battery Indicator 3-16 Standby Mode 3-16 Talk Mode 3-17 Section 10 Cleaning the Battery Charge Contacts 3-18 Section 11 Antenna 3-18 Chapter 4 Dterm Cordless II - NEC DTH-4R-2 | Owners Guide - Page 5
No Service 4-8 Section 4 Section 5 Answering a Call 4-9 Making a Call Using the Dterm Cordless II 4-10 Section 6 Dedicated Feature Operations 4-10 Placing a Call on Hold 4-11 Muting a Call 4-11 Transferring Calls 4-11 Setting up a Conference Call 4-12 Dterm ™ Cordless II Owner's Guide - NEC DTH-4R-2 | Owners Guide - Page 6
Document Revision 3 NEC Unified Solutions, Inc. Chapter 5 Optional Equipment Installation Section 1 Optional Accessories and Replacement Parts 5-1 Section 2 Installing the Optional Headset 5-2 Chapter 6 Troubleshooting iv Table of Contents - NEC DTH-4R-2 | Owners Guide - Page 7
3-10 Figure 3-11 Figure 3-12 Figure 3-13 Figure 3-14 Items Included with the Dterm Cordless II 2-1 Handset Controls and Functions 2-3 Base Unit Controls and Functions 2-4 Connecting Telephone Cords to Relief 3-11 Placing the Charging Unit on the Wall 3-11 Dterm ™ Cordless II Owner's Guide v - NEC DTH-4R-2 | Owners Guide - Page 8
NEC Battery Charge Contacts 3-18 Raising the Base Unit Antenna 3-18 Handset Controls 4-1 Handset Control Functions 4-2 Cordless and Desk Buttons 4-5 LCD Display Indicators 4-7 No Service Conditions 4-8 Optional Accessories and Replacement Parts 5-1 Installing the Headset 5-2 Troubleshooting - NEC DTH-4R-2 | Owners Guide - Page 9
and Safety Information Chapter 1 SECTION 1 SPECIFICATIONS The Dterm Cordless II complies with FCC and IC parts 15 and 68. in. H Approximately 15.4 oz. Handset Receive/Transmit Frequency 902 MHz ~ 928 MHz Power Requirements Nickel-Cadmium Battery Pack Dterm ™ Cordless II Owner's Guide 1 - 1 - NEC DTH-4R-2 | Owners Guide - Page 10
these instructions. This equipment contains a rechargeable nickel-cadmium battery. Do not short-circuit the battery. Do not charge the rechargeable nickel-cadmium battery used in this equipment in any charger other than the one designed to charge this battery as specified in this manual. Using - NEC DTH-4R-2 | Owners Guide - Page 11
NEC Unified Solutions, Inc. Document Revision 3 Charge the battery pack provided with or identified for use with this product only in accordance with the instructions and limitations specified in the instruction manual the risk of fire or electrical shock. Dterm ™ Cordless II Owner's Guide 1 - 3 - NEC DTH-4R-2 | Owners Guide - Page 12
from the wall outlet and refer servicing to qualified service personnel under the following conditions: battery, read and follow these instructions. • Use only the appropriate type and size battery pack specified in the manual. • Exercise care in handling the battery in order not to short the battery - NEC DTH-4R-2 | Owners Guide - Page 13
service. If you are having trouble with your telephone service, you must first disconnect your telephone to determine if it is the cause of your problem. If you determine that it is the cause, you must leave it disconnected until the trouble has been corrected. Dterm ™ Cordless II Owner's Guide - NEC DTH-4R-2 | Owners Guide - Page 14
Revision 3 NEC Unified Solutions, Inc. Radio Interference Radio interference may occasionally cause buzzing and humming in your cordless handset, distracting, check around your office to see what appliances may be causing the problem. In addition, we recommend that the base not be plugged into a - NEC DTH-4R-2 | Owners Guide - Page 15
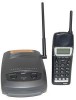
, read this manual thoroughly. The Dterm Cordless II includes the following items: Base Unit Handset Telephone Cord 2 AC Adapters Rechargeable Battery Belt Clip Charging Unit Wall Plate Adapter Figure 2-1 Items Included with the Dterm Cordless II Dterm ™ Cordless II Owner's Guide 2 - 1 - NEC DTH-4R-2 | Owners Guide - Page 16
Alarm Out of Range Protection Low Battery Protection System Wall Mountable Separate Base Unit Wall Mountable Separate Charging Unit Easy Installation Compact Handset Design Use with an NEC Digital Multiline Telephone Desk/Cordless Softkey Switch The Dterm Cordless II can be used in conjunction with - NEC DTH-4R-2 | Owners Guide - Page 17
9. Headset Jack 10. Conference (CONF) Key 11. Transfer (TRANSFER) Key 12. Redial (REDIAL) or Desk/Cordless Softkey Switch Key 13. Channel (CHAN) Key 14. F3 15. F4 16. Ringer/Volume (R/VOL) Key 17. Mute (MUTE) Key Figure 2-2 Handset Controls and Functions Dterm ™ Cordless II Owner's Guide 2 - 3 - NEC DTH-4R-2 | Owners Guide - Page 18
Document Revision 3 NEC Unified Solutions, Inc. 18. Cordless 19. Desk 20. Power Figure 2-3 Base Unit Controls and Functions 2 - 4 About the Dterm Cordless II - NEC DTH-4R-2 | Owners Guide - Page 19
, monitor and other telephone. SECTION 3 CONNECTING THE TELEPHONE CORDS When connecting the telephone cords, observe the following precautions. Never install telephone wiring during a lightning storm. Dterm ™ Cordless II Owner's Guide 3 - 1 - NEC DTH-4R-2 | Owners Guide - Page 20
Figure 3-1 Connecting Telephone Cords to the Telephone Jack 2. Connect a qualified NEC digital Multiline Terminal to the Dterm Cordless II. Line "OUT" Electra Elite or Dterm Series E Multiline Telephone Figure 3-2 Connecting the Dterm Cordless II to the Multiline Terminal 3 - 2 Installing the - NEC DTH-4R-2 | Owners Guide - Page 21
, try reversing the plug. Refer to Figure 3-4 Polarized Plug. If you cannot plug the AC adapter into the outlet, the outlet may need to be replaced. Dterm ™ Cordless II Owner's Guide 3 - 3 - NEC DTH-4R-2 | Owners Guide - Page 22
Document Revision 3 NEC Unified Solutions, Inc. Route the power cord where it will not create a trip hazard, or where it could become chafed and create a into the notches at the top of the base unit. Rotate the wall mount stand down and snap it into place. 3 - 4 Installing the Dterm Cordless II - NEC DTH-4R-2 | Owners Guide - Page 23
NEC Unified Solutions, Inc. Document Revision 3 Figure 3-5 Attaching the Wall Mount Stand to the Base Unit 2. Plug the AC adapter into inside the molded channel of the wall mount stand. Figure 3-6 Placing the AC Adapter Cord Inside the Wall Mount Stand Dterm ™ Cordless II Owner's Guide 3 - 5 - NEC DTH-4R-2 | Owners Guide - Page 24
locally supplied) in the LINE jack on the base unit. Plug one end of the NEC digital multiline telephone into the PHONE jack. Place the telephone cords inside the molded channels on the bottom of the wall Do not use an outlet controlled by a wall switch. 3 - 6 Installing the Dterm Cordless II - NEC DTH-4R-2 | Owners Guide - Page 25
NEC Unified Solutions, Inc. Document Revision hazard when inserting screws into the wall. Make sure the wall material is capable of supporting the weight of the base unit. Use #10 screws with anchoring devices suitable for heads for mounting the telephone. Dterm ™ Cordless II Owner's Guide 3 - 7 - NEC DTH-4R-2 | Owners Guide - Page 26
Document Revision 3 NEC Unified Solutions, Inc. Figure 3-9 Inserting Screws into the Wall for Professional or Electra Elite multiline telephone into the PHONE jack. Place the telephone cords inside the molded channels on the bottom of the wall mount stand. 3 - 8 Installing the Dterm Cordless II - NEC DTH-4R-2 | Owners Guide - Page 27
NEC Unified Solutions, Inc. Document Revision 3 Figure 3-10 Placing the Telephone Cords into Inside the Wall Mount Stand 5. Place the Attaching the Wall Mount Unit to the Wall 6. Plug the other end of the short telephone cord into a telephone wall jack. Dterm ™ Cordless II Owner's Guide 3 - 9 - NEC DTH-4R-2 | Owners Guide - Page 28
Document Revision 3 NEC Unified Solutions, Inc. 7. Plug the AC when inserting screws into the wall. Make sure the wall material is capable of supporting the weight of the charging unit. Use #10 screws with anchoring devices suitable for around the strain relief. Installing the Dterm Cordless II - NEC DTH-4R-2 | Owners Guide - Page 29
NEC Unified Solutions, Inc. Document Revision 3 Figure 3-13 Wrapping the AC Adapter Cord Around the Strain Relief 3. Place the charging Plug the AC adapter into a standard 120 Vac wall outlet. Refer to Figure 3-14 Placing the Charging Unit on the Wall. Dterm ™ Cordless II Owner's Guide 3 - 11 - NEC DTH-4R-2 | Owners Guide - Page 30
Document Revision 3 NEC Unified Solutions, Inc. SECTION 6 ATTACHING AND REMOVING THE BELT CLIP A belt clip can be used to attach the handset to a belt or toward the belt clip blade and slide the clip up at the same time. 3 - 12 Figure 3-16 Removing the Belt Clip Installing the Dterm Cordless II - NEC DTH-4R-2 | Owners Guide - Page 31
the latch and sliding the cover down and off of the handset. Figure 3-17 Removing the Battery Cover 2. Slide the battery pack down into the handset. It may be necessary to remove the old battery at this time. Figure 3-18 Replacing the Battery Pack Dterm ™ Cordless II Owner's Guide 3 - 13 - NEC DTH-4R-2 | Owners Guide - Page 32
battery can be hot swapped while a conversation is taking place. The battery must be changed within 30 seconds otherwise, connection will be lost. Refer to Section 7 Installing the Handset Battery Pack on page 3-13 for instructions for changing batteries. 3 - 14 Installing the Dterm Cordless II - NEC DTH-4R-2 | Owners Guide - Page 33
check that the AC adapter is plugged in and that the battery pack is making contact with the charging contracts on the charging unit. Charging is complete when the CHARGE 2 LED goes off. Charge the battery pack without interruption for five to eight hours. Dterm ™ Cordless II Owner's Guide 3 - 15 - NEC DTH-4R-2 | Owners Guide - Page 34
standby mode and talk mode. Standby Mode The handset display turns on the battery low icon. All LEDs are turned off and LCD messages are cleared. All keys are disabled. A battery low alert tone will be emitted every 15 seconds and lasts for three minutes. 3 - 16 Installing the Dterm Cordless II - NEC DTH-4R-2 | Owners Guide - Page 35
every three seconds Handset beeps every 15 seconds for 15 minutes Action: Complete the call as quickly as possible Cannot make a call Replace the battery pack within 30 seconds to continue a call Replace the battery pack before making another call Dterm ™ Cordless II Owner's Guide 3 - 17 - NEC DTH-4R-2 | Owners Guide - Page 36
Document Revision 3 NEC Unified Solutions, Inc. SECTION 10 CLEANING THE BATTERY CHARGE CONTACTS To maintain a not use liquids or solvents. Figure 3-22 Cleaning Battery Charge Contacts SECTION 11 ANTENNA Before using the Dterm Cordless II, raise the antenna to the vertical position as - NEC DTH-4R-2 | Owners Guide - Page 37
Handset Chapter 4 SECTION 1 HANDSET CONTROLS The operations of the Dterm Cordless II are performed using the handset. The HOLD, CONF (conference), an explanation of the handset controls. Handset Controls Dterm ™ Cordless II Owner's Guide Volume Controls Figure 4-1 Handset Controls 4 - 1 - NEC DTH-4R-2 | Owners Guide - Page 38
3 NEC Unified Cordless Softkey Switch REDIAL Press REDIAL to dial the number that was previously dialed or to perform desk/cordless softkey switching. Desk/Cordless softkey switching must be programmed on the REDIAL key. At system default, the redial function is available. 4 - 2 Dterm Cordless II - NEC DTH-4R-2 | Owners Guide - Page 39
NEC Unified Solutions, Inc. Document Revision 3 Table 4-1 Handset Control Functions (Continued) Condition Action Ringer Select (Standby Mode) R/VOL Press upward to turn the volume/ringer on, slide the lever downward to turn the volume/ringer off. OFF Dterm ™ Cordless II Owner's Guide 4 - 3 - NEC DTH-4R-2 | Owners Guide - Page 40
Document Revision 3 NEC Unified Solutions, Inc. SECTION 2 SETTING UP AND PROGRAMMING THE DTR-4R-1 Programming Mode 1. Press and (FNC), or recall. When assigned, these keys operate the same as on an NEC multiline telephone. When initially installed, function keys (F1~F4) default to line keys - NEC DTH-4R-2 | Owners Guide - Page 41
Cordless to select the Dterm Cordless II. - OR - Press Desk to select the Multiline Telephone. (Refer to Figure 4-2 Cordless and Desk Buttons.) The Dterm display indicates DESK TEL when the multiline telephone is connected. Figure 4-2 Cordless and Desk Buttons Dterm ™ Cordless II Owner's Guide - NEC DTH-4R-2 | Owners Guide - Page 42
softkey switching: 1. Ensure the base unit is in desk mode. 2. Remove the battery pack. Refer to Chapter 3 Installing the Dterm Cordless II, Section 7 Installing the Handset Battery Pack on page 3-13. 3. Simultaneously press and hold the and # keys on the handset. 4. While continuing to hold - NEC DTH-4R-2 | Owners Guide - Page 43
LCD Display Indicators Condition Indicator LCD Display Line OK TALK Icon N/A No Connection to Base Unit Error Tone NO SERVICE Channel Busy Error Tone SYSTEM BUSY Line in Use Error Tone LINE IN USE No Line Selected TALK Icon NO LINE SELECTED Dterm ™ Cordless II Owner's Guide 4 - 7 - NEC DTH-4R-2 | Owners Guide - Page 44
No Service Conditions During a Call In Standby Mode Warning Tone Condition Cannot make or answer calls (telephone may ring intermittently). Action Move back in range within Move back within range. 20 seconds. Check power to the base Check power to the base unit. unit. 4 - 8 Dterm Cordless II - NEC DTH-4R-2 | Owners Guide - Page 45
the handset back in the charging unit. AutoStandby automatically hangs up the phone. -OR- If the handset is away from the charging unit, to answer calls with the TALK key. Contact an authorized NEC Dealer for programming this feature. If two or more calls Dterm ™ Cordless II Owner's Guide 4 - 9 - NEC DTH-4R-2 | Owners Guide - Page 46
Document Revision 3 NEC Unified Solutions, Inc. SECTION 5 MAKING A CALL USING THE Dterm CORDLESS II Several advanced features for making calls are available depending on how the deskset is programmed. Refer to Section 6 Dedicated Feature Operations. This section describes normal - NEC DTH-4R-2 | Owners Guide - Page 47
NEC Unified Solutions, Inc. Document Revision 3 Placing a Call on Hold 1. Press HOLD on the handset during the call. The LED associated with destination. 2. Wait for the party to answer, then press the TALK key to hang up. The two parties can now converse. Dterm ™ Cordless II Owner's Guide 4 - 11 - NEC DTH-4R-2 | Owners Guide - Page 48
Document Revision 3 NEC Unified Solutions, Inc. Setting up a Conference Call This feature allows the user to set up a 3-party conference (the user and two other parities). To set up the conference: hangs up, the conference only includes the remaining parties. 4 - 12 Dterm Cordless II Handset - NEC DTH-4R-2 | Owners Guide - Page 49
replacement parts can be obtained by contacting your NEC representative. Adapter for Base Unit Telephone Cord Belt Clip 800 mAh Battery Charger and AC Adapter Base Unit Wall Mount Headset Leather Case Figure 5-1 Optional Accessories and Replacement Parts Dterm ™ Cordless II Owner's Guide - NEC DTH-4R-2 | Owners Guide - Page 50
Document Revision 3 NEC Unified Solutions, Inc. SECTION 2 INSTALLING THE OPTIONAL HEADSET The optional headset provides a handsfree option for the Dterm Cordless II. With the headset installed, the user can use the belt clip the carry the handset and conduct a conversation using the headset. To - NEC DTH-4R-2 | Owners Guide - Page 51
If the Dterm Cordless II is not performing to your expectations, try these simple steps. If this does not resolve the problems, contact the NEC representative. Do not attempt to service this unit yourself. All service must be done by qualified service personnel. Table 6-1 Troubleshooting Problem - NEC DTH-4R-2 | Owners Guide - Page 52
Document Revision 3 NEC Unified Solutions, Inc. Table 6-1 Troubleshooting (Continued) Problem Suggestion Conversation is interrupted frequently. Warning tone and NO SERVICE message Handset does not ring • Make sure the base unit antenna is fully vertical. • Move closer to the base unit. • - NEC DTH-4R-2 | Owners Guide - Page 53
6-1 handset 3-13 low indication 2-2, 3-16, 3-17 nickel-cadmium 1-1, 1-2, 6-1, 6-2 rechargeable 2-1 recycling 1-3 safety considerations 1-2 Dterm ™ Cordless II Owner's Guide spare 2-2, 6-1 spare battery 3-15 belt clip 2-1, 5-1 buttons refer to keypad buttons 2-3 C calls answering 4-9 channel 4-2 key - NEC DTH-4R-2 | Owners Guide - Page 54
transmit frequency 1-1 using 4-7 volume 2-2 weight 1-1 ii NEC Unified Solutions, Inc. headset 5-1 installing 5-2 jack 2-2, 2-3 hold key 2-3, 4-2 I indications acquiring link 4-7 batt low 3-17 battery low 3-16 low volume 4-8 no service 4-8 installation precautions 3-1 installing direct wall mounting - NEC DTH-4R-2 | Owners Guide - Page 55
key 4-3 radio interference 1-6 range 1-5 recycling 1-3 redial key 2-3, 4-2, 4-6 ringer Dterm ™ Cordless II Owner's Guide Document Revision 3 selection 4-3 volume control 2-2 S safety battery 1-2 electrical 1-5 general instructions 1-3 silent alarm 2-2 single access key 2-2 site location 3-1 softkey - NEC DTH-4R-2 | Owners Guide - Page 56
radio interference 1-6 range 1-5, 2-2 rechargeable battery 2-1 wall plate adapter 2-1 temperature specifications 1-1 transfer key 2-3, 4-2 troubleshooting 6-1 charge light 1 6-1 charge light 2 6-1 handset 6-2 interrupted conversation 6-2 no service 6-2 warning tone 6-2 NEC Unified Solutions, Inc - NEC DTH-4R-2 | Owners Guide - Page 57
Dterm ™ Cordless II DTR-4R-( ) (BK) OWNER'S GUIDE NEC Unified Solutions, Inc. Document Revision 3
-
 1
1 -
 2
2 -
 3
3 -
 4
4 -
 5
5 -
 6
6 -
 7
7 -
8
-
9
-
10
-
11
-
12
-
13
-
14
-
15
-
16
-
17
-
18
-
19
-
20
-
21
-
22
-
23
-
24
-
25
-
26
-
27
-
28
-
29
-
30
-
31
-
32
-
33
-
34
-
35
-
36
-
37
-
38
-
39
-
40
-
41
-
42
-
43
-
44
-
45
-
46
-
47
-
48
-
49
-
50
-
51
-
52
-
53
-
54
-
55
-
56
-
57
 |
 |

O
WNER
’
S
G
UIDE
INT-1017
(DTERM)
Document Revision 3
D
term
Cordless II
®
DTR-4R-(
) (BK)