NEC NP-M311X Quick Setup Guide
NEC NP-M311X Manual
 |
View all NEC NP-M311X manuals
Add to My Manuals
Save this manual to your list of manuals |
NEC NP-M311X manual content summary:
- NEC NP-M311X | Quick Setup Guide - Page 1
M361X/M311X/M271X/ M311W/M271W Quick Setup Guide Connect your computer to the projector. Schließen Sie ihren Computer an den Projektor an. Connecter l'ordinateur au projecteur. Collegate il vostro computer al proiettore. Conectar el ordenador al proyector. Conecte - NEC NP-M311X | Quick Setup Guide - Page 2
. Deslize a tampa da lente para a esquerda para expor a lente. Skjut linsskyddet till vänster för att avtäcka linsen Turn on the projector. Schalten Sie den Projektor ein. Allumer le projecteur. Accensione del proiettore. Encienda el proyector. Ligue o projetor. Slå på strömmen till projektorn - NEC NP-M311X | Quick Setup Guide - Page 3
: Tryck på AUTO ADJ.-tangenten för att optimera en RGB-bild automatiskt. AUTO ADJ. 팁: AUTO ADJ RGB Fn F1 F12 (→ page 23, 104, 124 of the User's Manual) - NEC NP-M311X | Quick Setup Guide - Page 4
Regolate il piedino d'inclinazione Ajuste de las patas de inclinación Ajuste o pé de inclinação Justera lutningen med foten Page 19 of the User's Manual) 3 Rear foot Hinterer Fuß Pied arrière Piedino posteriore Pata posterior Pé traseiro Bakre fot 뒷발 Up Nach oben Haut Su Arriba Para cima - NEC NP-M311X | Quick Setup Guide - Page 5
Keystone Correction function is turned on at the time of shipment. You can also use the ▲ or ▼ button to perform Keystone correction manually with no menu displayed. Die automatische Trapezkorrektur ist bei der Lieferung aktiviert. Sie können die Trapezkorrektur bei ausgeblendetem Menü auch mit den - NEC NP-M311X | Quick Setup Guide - Page 6
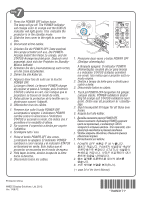
projector is in the standby mode. 2. Slide the lens cover to the right to cover the lens. 3. Disconnect all the cables. 1. Drücken Sie die POWER-OFF-Taste zweimal. Die Lampe STATUS 2 3 (→ page 24 of the User's Manual) Printed in China ©NEC Display Solutions, Ltd. 2012 Ver. 1/08/12 *7N8N3171*
-
 1
1 -
 2
2 -
 3
3 -
 4
4 -
 5
5 -
 6
6
 |
 |

M361X/M311X/M271X/
M311W/M271W
Quick Setup Guide
M361X/M311X/M271X/
M311W/M271W
Quick Setup Guide
Connect the supplied power cord.
Schließen Sie das mitgelieferte Netzkabel an.
Connecter le câble d’alimentation fourni.
Collegate il cavo d’alimentazione in dotazione.
Conecte el cable de alimentación suministrado.
Conecte o cabo de alimentação fornecido.
Anslut den medlevererade nätkabeln.
Подсоедините силовой кабель, входящий в комплект поставки.
전원 케이블을 연결하십시오.
Connect your computer to the projector.
Schließen Sie ihren Computer an den Projektor an.
Connecter l’ordinateur au projecteur.
Collegate il vostro computer al proiettore.
Conectar el ordenador al proyector.
Conecte seu computador ao projetor.
Anslut din dator till projektorn.
Подключите компьютер к проектору.
컴퓨터를 프로젝터에 연결하십시오.
COMPUTER 1 IN
Supplied computer cable (VGA)
Computer-Kabel (VGA) (im Lieferumfang enthalten)
Câble d’ordinateur fourni (VGA)
Cavo per computer (VGA) in dotazione
Cable de ordenador suministrado (VGA)
Cabo de computador (VGA) fornecido
Medföljande datorkabel (VGA)
Прилагаемый компьютерный кабель (VGA)
제공된 컴퓨터 케이블(VGA)