NEC NP1150 NP1150/2150/3150/3151W user's manual - Page 131
Setting ID to the Projector [CONTROL ID], Using the Remote Control to change IDs
 |
UPC - 805736019568
View all NEC NP1150 manuals
Add to My Manuals
Save this manual to your list of manuals |
Page 131 highlights
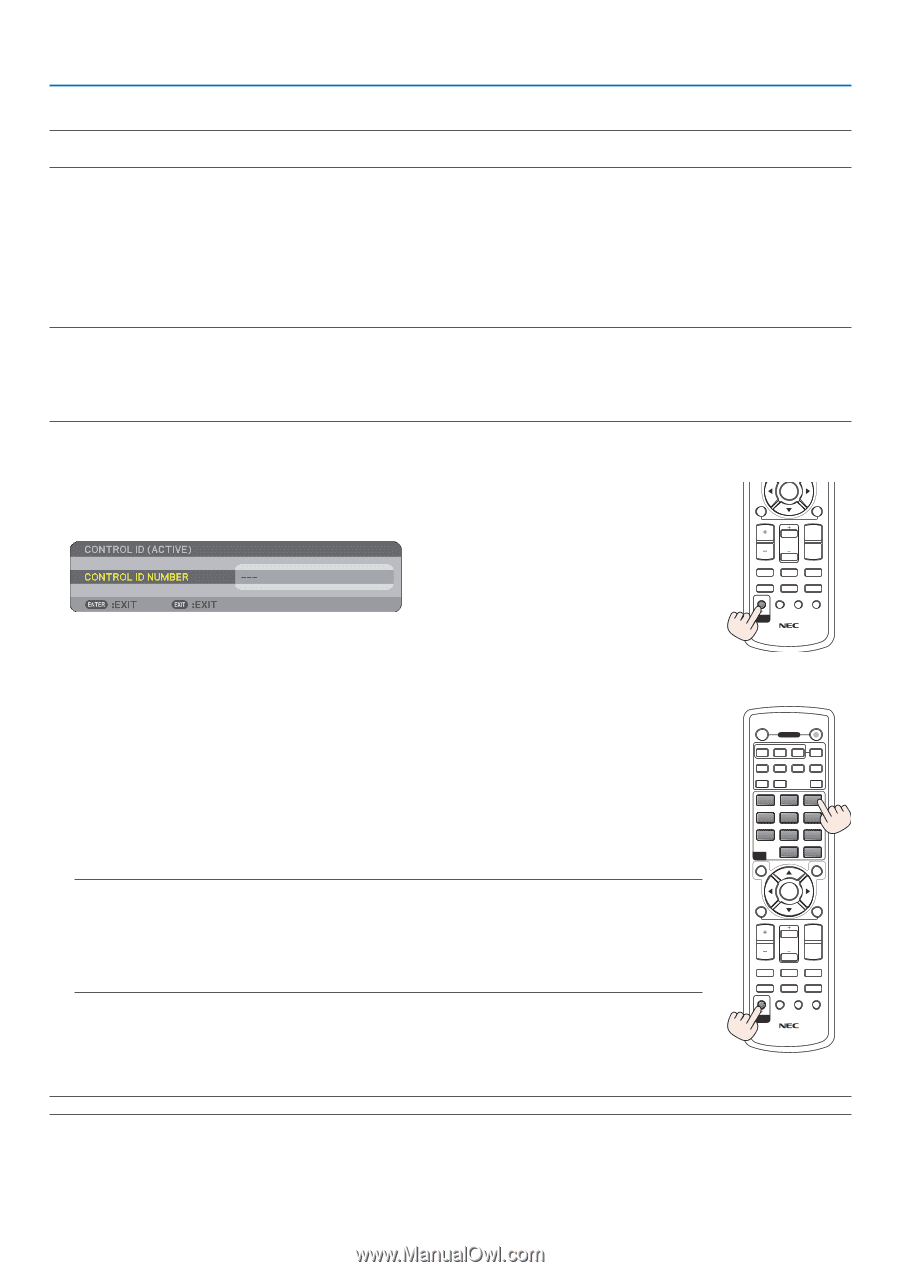
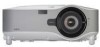
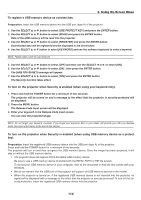
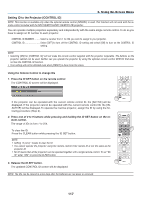
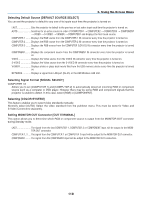
6. Using On-Screen Menu Setting ID to the Projector [CONTROL ID] NOTE: This function is available only when the optional remote control (NP02RC) is used. This function will not work with the remote control included with the NP3150/NP2150/NP1150/NP3151W projector. You can operate multiple projectors separately and independently with the same single remote control. To do so,you have to assign an ID number to each projector. CONTROL ID NUMBER.......... Select a number from 1 to 254 you wish to assign to your projector. CONTROL ID Select [OFF] to turn off the CONTROL ID setting and select [ON] to turn on the CONTROL ID setting. OFF ON NOTE: POWER COMPUTER AUTO ADJ. • Selecting [ON] for [CONTROL ID] will not make the remote control supplied with the projector inoperable. The b1 ut2ton3s on the VIDEO S-VIDEO COMPONENT HDMI projector cabinet can be used. Neither can you operate the projector by using the optional remote control NP01RC VIEWER NETWORK thatPIP does not has the CONTROL ID function. • Your setting will not be affected even when [RESET] is done from the menu. 1 2 3 4 5 6 7 8 9 Using the Remote Control to change IDs ID MENU 0 CLEAR EXIT 1. Press the ID SET button on the remote control. The CONTROL ID screen will be displayed. L-CLICK ENTER R-CLICK VOLUME MAGNIFY PAGE UP DOWN PICTURE LAMP MODE ASPECT AV-MUTE 3D REFORM FREEZE FOCUS ID SET LENS SHIFT /ZOOM HELP ID If the projector can be operated with the current remote control ID, the [ACTIVE] will be displayed. If the projector cannot be operated with the current remote control ID, the [INACTIVE] will be displayed. To operate the inactive projector, assign the ID by using the following procedure (Step 2). 2. Press one of 0 to 9 buttons while pressing and holding the ID SET button on the remote control. The range of IDs is from 1 to 254. To clear the ID: Press the CLEAR button while pressing the ID SET button. NOTE: • Setting "0 (zero)" means to clear the ID. • You cannot operate the projector using the remote control if the remote ID is not the same as the projector ID. • No ID means that all the projectors can be operated together with a single remote control. To set "No ID" enter "000" or press the CLEAR button. 3. Release the ID SET button. The updated CONTROL ID screen will be displayed. OFF ON POWER COMPUTER 1 2 3 AUTO ADJ. VIDEO S-VIDEO COMPONENT HDMI VIEWER NETWORK PIP 1 4 7 ID MENU 2 3 5 6 8 9 0 CLEAR EXIT L-CLICK ENTER R-CLICK VOLUME MAGNIFY PAGE UP DOWN PICTURE LAMP MODE ASPECT AV-MUTE 3D REFORM FREEZE FOCUS ID SET LENS SHIFT /ZOOM HELP ID NOTE: The IDs can be cleared in a few days after the batteries are run down or removed. 117
-
 1
1 -
2
-
3
-
4
-
5
-
6
-
7
-
8
-
9
-
10
-
11
-
12
-
13
-
14
-
15
-
16
-
17
-
18
-
19
-
20
-
21
-
22
-
23
-
24
-
25
-
26
-
27
-
28
-
29
-
30
-
31
-
32
-
33
-
34
-
35
-
36
-
37
-
38
-
39
-
40
-
41
-
42
-
43
-
44
-
45
-
46
-
47
-
48
-
49
-
50
-
51
-
52
-
53
-
54
-
55
-
56
-
57
-
58
-
59
-
60
-
61
-
62
-
63
-
64
-
65
-
66
-
67
-
68
-
69
-
70
-
71
-
72
-
73
-
74
-
75
-
76
-
77
-
78
-
79
-
80
-
81
-
82
-
83
-
84
-
85
-
86
-
87
-
88
-
89
-
90
-
91
-
92
-
93
-
94
-
95
-
96
-
97
-
98
-
99
-
100
-
101
-
102
-
103
-
104
-
105
-
106
-
107
-
108
-
109
-
110
-
111
-
112
-
113
-
114
-
115
-
116
-
117
-
118
-
119
-
120
-
121
-
122
-
123
-
124
-
125
-
 126
126 -
 127
127 -
 128
128 -
 129
129 -
 130
130 -
 131
131 -
 132
132 -
 133
133 -
 134
134 -
 135
135 -
 136
136 -
137
-
138
-
139
-
140
-
141
-
142
-
143
-
144
-
145
-
146
-
147
-
148
-
149
-
150
-
151
-
152
-
153
-
154
-
155
-
156
-
157
-
158
-
159
-
160
-
161
-
162
-
163
-
164
-
165
-
166
-
167
-
168
-
169
-
170
-
171
-
172
 |
 |