NEC NP1150 NP1150/2150/3150/3151W user's manual - Page 147
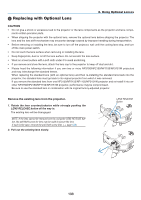
(3) Replacing with Optional Lens, Remove the existing lens from the projector., CAUTION
 |
UPC - 805736019568
View all NEC NP1150 manuals
Add to My Manuals
Save this manual to your list of manuals |
Page 147 highlights
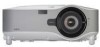
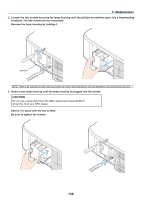
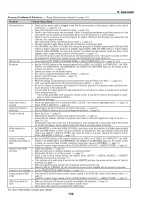
Replacing with Optional Lens 8. Using Optional Lenses CAUTION • Do not give a shock or excessive load to the projector or the lens components as the projector and lens compo- nents contain precision parts. • When shipping the projector with the optional lens, remove the optional lens before shipping the projector. The lens and the lens shift mechanism may encounter damage caused by improper handling during transportation. • Before removing or installing the lens, be sure to turn off the projector, wait until the cooling fans stop, and turn off the main power switch. • Do not touch the lens surface when removing or installing the lens. • Keep fingerprints, dust or oil off the lens surface. Do not scratch the lens surface. • Work on a level surface with a soft cloth under it to avoid scratching. • If you remove and store the lens, attach the lens cap to the projector to keep off dust and dirt. • Please heed the following information if you own two or more NP3150/NP2150/NP1150/NP3151W projectors and may interchange the standard lenses. When replacing the standard lens (with an optional lens) and then re-installing the standard lens back into the projector, the standard lens must go back to its original projector from which it was removed. If you remove the standard lens from one NP3150/NP2150/NP1150/NP3151W projector and re-install it into another NP3150/NP2150/NP1150/NP3151W projector, performance may be compromised. Be sure to use the standard lens in combination with its original factory-adjusted projector. Remove the existing lens from the projector. 1. Rotate the lens counterclockwise while strongly pushing the LENS RELEASE button all the way in. The existing lens will be disengaged. NOTE: If the lens cannot be removed even by using the LENS RELEASE button, the anti-theft screw for lens may be used to secure the lens. If such is the case, remove the anti-theft screw first. (→ page 134) 2. Pull out the existing lens slowly. LEFT RIGHT DOWN UP POWSETRATLAUSMPPC CARD LENS RELEASE Button ON/STAND BY SOURCE AUTO ADJUST SELECT 3D REFORM SELECT DOWN UP LEFT RIGHT 133
-
 1
1 -
2
-
3
-
4
-
5
-
6
-
7
-
8
-
9
-
10
-
11
-
12
-
13
-
14
-
15
-
16
-
17
-
18
-
19
-
20
-
21
-
22
-
23
-
24
-
25
-
26
-
27
-
28
-
29
-
30
-
31
-
32
-
33
-
34
-
35
-
36
-
37
-
38
-
39
-
40
-
41
-
42
-
43
-
44
-
45
-
46
-
47
-
48
-
49
-
50
-
51
-
52
-
53
-
54
-
55
-
56
-
57
-
58
-
59
-
60
-
61
-
62
-
63
-
64
-
65
-
66
-
67
-
68
-
69
-
70
-
71
-
72
-
73
-
74
-
75
-
76
-
77
-
78
-
79
-
80
-
81
-
82
-
83
-
84
-
85
-
86
-
87
-
88
-
89
-
90
-
91
-
92
-
93
-
94
-
95
-
96
-
97
-
98
-
99
-
100
-
101
-
102
-
103
-
104
-
105
-
106
-
107
-
108
-
109
-
110
-
111
-
112
-
113
-
114
-
115
-
116
-
117
-
118
-
119
-
120
-
121
-
122
-
123
-
124
-
125
-
126
-
127
-
128
-
129
-
130
-
131
-
132
-
133
-
134
-
135
-
136
-
137
-
138
-
139
-
140
-
141
-
 142
142 -
 143
143 -
 144
144 -
 145
145 -
 146
146 -
 147
147 -
 148
148 -
 149
149 -
 150
150 -
 151
151 -
 152
152 -
153
-
154
-
155
-
156
-
157
-
158
-
159
-
160
-
161
-
162
-
163
-
164
-
165
-
166
-
167
-
168
-
169
-
170
-
171
-
172
 |
 |