NEC NP1150 NP1150/2150/3150/3151W user's manual - Page 165
(8) Removing and Attaching the USB Wireless LAN Unit
 |
UPC - 805736019568
View all NEC NP1150 manuals
Add to My Manuals
Save this manual to your list of manuals |
Page 165 highlights
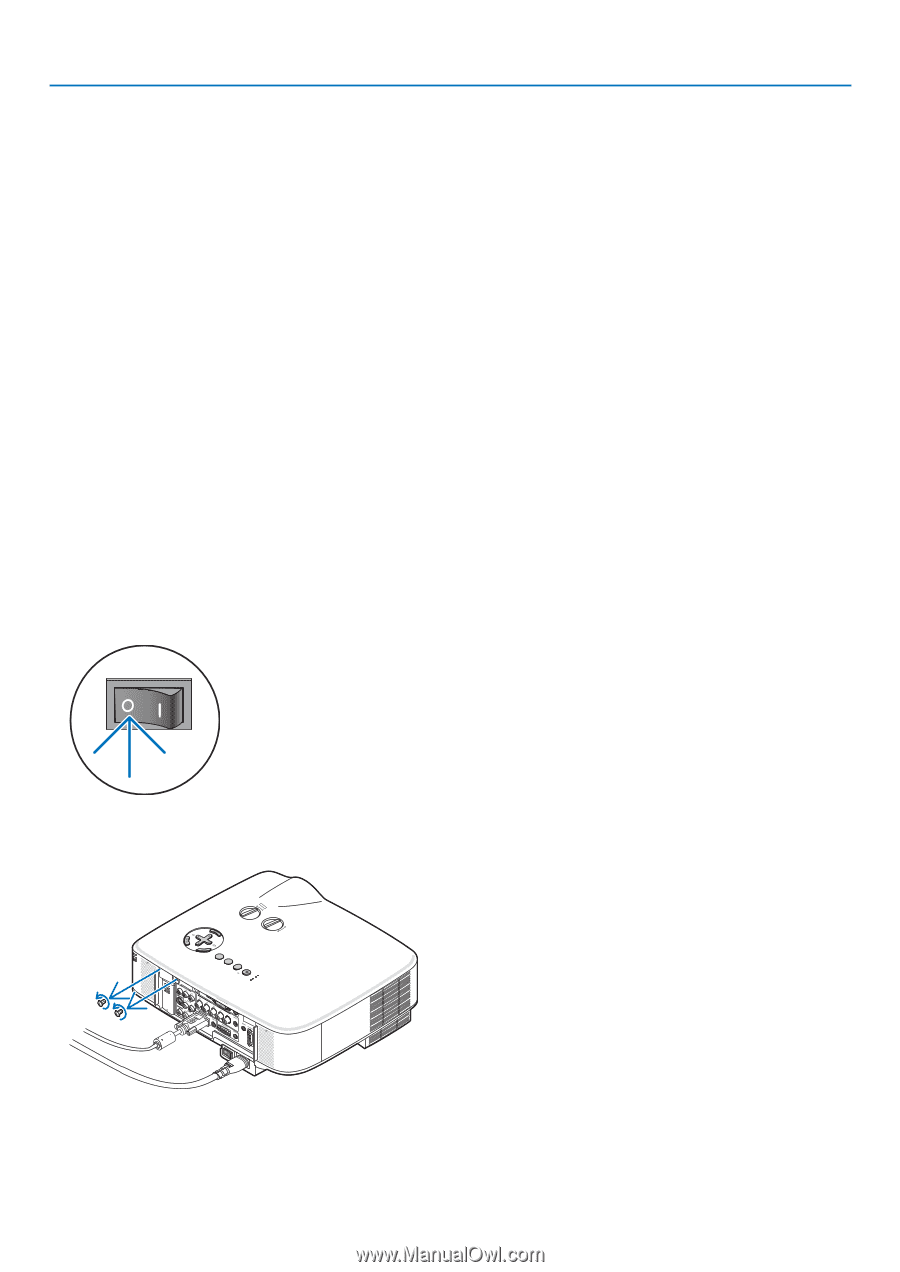
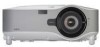
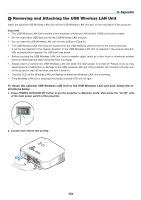
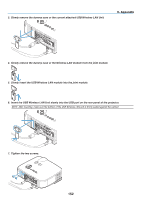
9. Appendix 8 Removing and Attaching the USB Wireless LAN Unit Insert the optional USB Wireless LAN Unit into the USB Wireless LAN Unit port on the rear panel of the projector. Important • The USB Wireless LAN Unit consists of two modules: a Wireless LAN module (USB) and a joint module. • Do not insert other USB devices into the USB Wireless LAN unit port. • Do not insert the USB Wireless LAN unit into the USB port (Type A). • The USB Wireless LAN Unit must be inserted into the USB Wireless LAN Unit port in the correct direction. It cannot be inserted in the reverse direction. If the USB Wireless LAN Unit is inserted in the reverse direction with excessive force applied, the USB port may break. • Before touching the USB Wireless LAN Unit, touch a metallic object (such as a door knob or aluminum window frame) to discharge the static electricity from your body. • Always insert or remove the USB Wireless LAN unit when the main power is turned off. Failure to do so may cause projector malfunction or damage to the USB wireless LAN unit. If the projector will not work correctly, turn off the projector, wait 30 seconds, and turn it back on. • The blue LED on the Wireless LAN Unit flashes to show that Wireless LAN Unit is working. • If the Wireless LAN Unit is attached incorrectly, the blue LED will not light. To attach the optional USB Wireless LAN Unit to the USB Wireless LAN unit port, follow the instructions below. 1. Press POWER ON/STAND BY button to set the projector to Stand-by mode, then press the "O (off)" side of the main power switch of the projector. 2. Loosen and remove two screws. SELECT LEFT LENS SHIFT RIGHT DOWN UP 3D REFORM AUTO ADJUST SOURCE ON/STAND BY POWSETRATLUASMUPSB WIRELESS WIRELESS 151
-
 1
1 -
2
-
3
-
4
-
5
-
6
-
7
-
8
-
9
-
10
-
11
-
12
-
13
-
14
-
15
-
16
-
17
-
18
-
19
-
20
-
21
-
22
-
23
-
24
-
25
-
26
-
27
-
28
-
29
-
30
-
31
-
32
-
33
-
34
-
35
-
36
-
37
-
38
-
39
-
40
-
41
-
42
-
43
-
44
-
45
-
46
-
47
-
48
-
49
-
50
-
51
-
52
-
53
-
54
-
55
-
56
-
57
-
58
-
59
-
60
-
61
-
62
-
63
-
64
-
65
-
66
-
67
-
68
-
69
-
70
-
71
-
72
-
73
-
74
-
75
-
76
-
77
-
78
-
79
-
80
-
81
-
82
-
83
-
84
-
85
-
86
-
87
-
88
-
89
-
90
-
91
-
92
-
93
-
94
-
95
-
96
-
97
-
98
-
99
-
100
-
101
-
102
-
103
-
104
-
105
-
106
-
107
-
108
-
109
-
110
-
111
-
112
-
113
-
114
-
115
-
116
-
117
-
118
-
119
-
120
-
121
-
122
-
123
-
124
-
125
-
126
-
127
-
128
-
129
-
130
-
131
-
132
-
133
-
134
-
135
-
136
-
137
-
138
-
139
-
140
-
141
-
142
-
143
-
144
-
145
-
146
-
147
-
148
-
149
-
150
-
151
-
152
-
153
-
154
-
155
-
156
-
157
-
158
-
159
-
 160
160 -
 161
161 -
 162
162 -
 163
163 -
 164
164 -
 165
165 -
 166
166 -
 167
167 -
 168
168 -
 169
169 -
 170
170 -
171
-
172
 |
 |