NEC NP1150 NP1150/2150/3150/3151W user's manual - Page 30
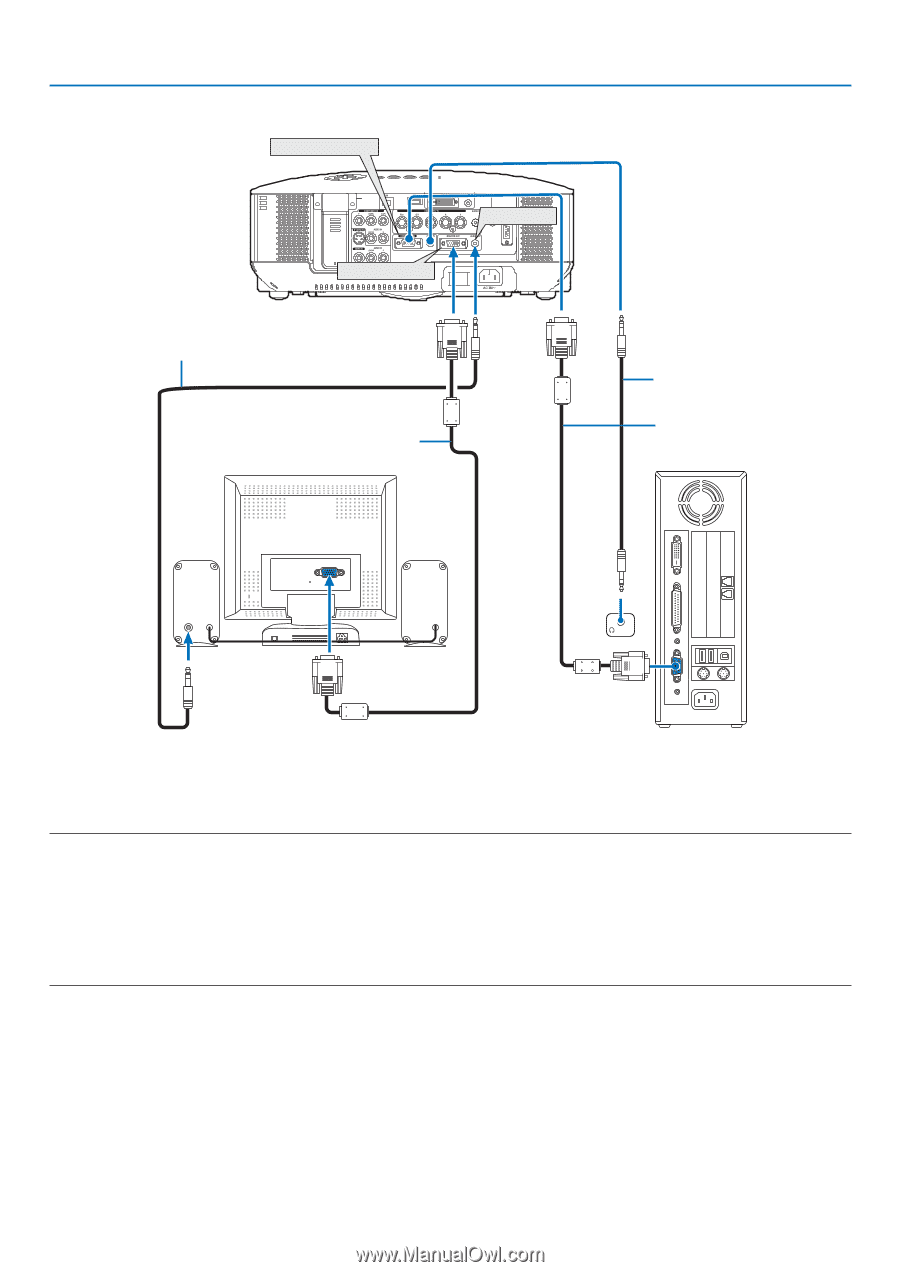
Connecting an External Monitor, You can connect a separate
 |
UPC - 805736019568
View all NEC NP1150 manuals
Add to My Manuals
Save this manual to your list of manuals |
Page 30 highlights
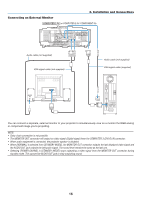
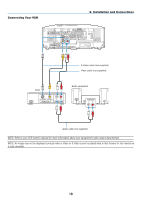
2. Installation and Connections Connecting an External Monitor COMPUTER 1 IN (or COMPUTER 2 IN / COMPONENT IN) USB(LAN) AUDIO OUT MONITOR OUT WIRELESS WIRELESS Audio cable (not supplied) VGA signal cable (not supplied) Audio cable (not supplied) VGA signal cable (supplied) AUDIO IN phONE You can connect a separate, external monitor to your projector to simultaneously view on a monitor the RGB analog or component image you're projecting. NOTE: • Daisy chain connection is not possible. • The MONITOR OUT connector will output no video signal (Digital signal) from the COMPUTER 3 (DVI-D) IN connector. • When audio equipment is connected, the projector speaker is disabled. • When [NORMAL] is selected from [STANDBY MODE], the MONITOR OUT connector outputs the last displayed video signal and the AUDIO OUT jack outputs the last audio signal. The sound level remains the same as the last one. • Selecting [POWER-SAVING] in [STANDBY MODE] stops outputting a video signal from the MONITOR OUT connector during standby mode. This causes the AUDIO OUT jack to stop outputting sound. 16
-
 1
1 -
2
-
3
-
4
-
5
-
6
-
7
-
8
-
9
-
10
-
11
-
12
-
13
-
14
-
15
-
16
-
17
-
18
-
19
-
20
-
21
-
22
-
23
-
24
-
 25
25 -
 26
26 -
 27
27 -
 28
28 -
 29
29 -
 30
30 -
 31
31 -
 32
32 -
 33
33 -
 34
34 -
 35
35 -
36
-
37
-
38
-
39
-
40
-
41
-
42
-
43
-
44
-
45
-
46
-
47
-
48
-
49
-
50
-
51
-
52
-
53
-
54
-
55
-
56
-
57
-
58
-
59
-
60
-
61
-
62
-
63
-
64
-
65
-
66
-
67
-
68
-
69
-
70
-
71
-
72
-
73
-
74
-
75
-
76
-
77
-
78
-
79
-
80
-
81
-
82
-
83
-
84
-
85
-
86
-
87
-
88
-
89
-
90
-
91
-
92
-
93
-
94
-
95
-
96
-
97
-
98
-
99
-
100
-
101
-
102
-
103
-
104
-
105
-
106
-
107
-
108
-
109
-
110
-
111
-
112
-
113
-
114
-
115
-
116
-
117
-
118
-
119
-
120
-
121
-
122
-
123
-
124
-
125
-
126
-
127
-
128
-
129
-
130
-
131
-
132
-
133
-
134
-
135
-
136
-
137
-
138
-
139
-
140
-
141
-
142
-
143
-
144
-
145
-
146
-
147
-
148
-
149
-
150
-
151
-
152
-
153
-
154
-
155
-
156
-
157
-
158
-
159
-
160
-
161
-
162
-
163
-
164
-
165
-
166
-
167
-
168
-
169
-
170
-
171
-
172
 |
 |