NEC NP1150 NP1150/2150/3150/3151W user's manual - Page 45
For information on [CORNERSTONE]
 |
UPC - 805736019568
View all NEC NP1150 manuals
Add to My Manuals
Save this manual to your list of manuals |
Page 45 highlights
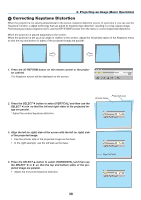
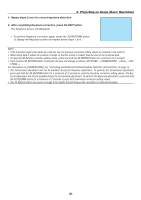
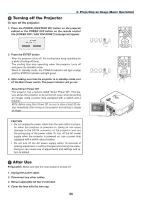
5. Repeat steps 2 and 4 to correct keystone distortion. 3. Projecting an Image (Basic Operation) 6. After completing Keystone correction, press the EXIT button. The Keystone screen will disappear. • To perform Keystone correction again, press the 3D REFORM button to display the Keystone screen and repeat above steps 1 to 6. NOTE: • If the projection angle is the same as in the last use, the previous correction setting values are retained in the memory. • When doing Step 2, adjust the position of image so that the screen is smaller than the area of the projected area. • To reset the 3D Reform correction setting values, press and hold the 3D REFORM button for a minimum of 2 seconds. • Each time the 3D REFORM button is pressed, the item will change as follows: Keystone → Cornerstone → None → Key- stone → ... For information on [Cornerstone], see "Correcting Horizontal and Vertical Keystone Distortion (Cornerstone)" on page 40. • The Cornerstone adjustment will not be available during the Keystone adjustment. To perform the Cornerstone adjustment, press and hold the 3D REFORM button for a minimum of 2 seconds to reset the Keystone correction setting values. The Keystone adjustment will not be available during the Cornerstone adjustment. To perform the Keystone adjustment, press and hold the 3D REFORM button for a minimum of 2 seconds to reset the Cornerstone correction setting values. • The 3D Reform feature can cause an image to be slightly blurred because the correction is made electronically. 31
-
 1
1 -
2
-
3
-
4
-
5
-
6
-
7
-
8
-
9
-
10
-
11
-
12
-
13
-
14
-
15
-
16
-
17
-
18
-
19
-
20
-
21
-
22
-
23
-
24
-
25
-
26
-
27
-
28
-
29
-
30
-
31
-
32
-
33
-
34
-
35
-
36
-
37
-
38
-
39
-
 40
40 -
 41
41 -
 42
42 -
 43
43 -
 44
44 -
 45
45 -
 46
46 -
 47
47 -
 48
48 -
 49
49 -
 50
50 -
51
-
52
-
53
-
54
-
55
-
56
-
57
-
58
-
59
-
60
-
61
-
62
-
63
-
64
-
65
-
66
-
67
-
68
-
69
-
70
-
71
-
72
-
73
-
74
-
75
-
76
-
77
-
78
-
79
-
80
-
81
-
82
-
83
-
84
-
85
-
86
-
87
-
88
-
89
-
90
-
91
-
92
-
93
-
94
-
95
-
96
-
97
-
98
-
99
-
100
-
101
-
102
-
103
-
104
-
105
-
106
-
107
-
108
-
109
-
110
-
111
-
112
-
113
-
114
-
115
-
116
-
117
-
118
-
119
-
120
-
121
-
122
-
123
-
124
-
125
-
126
-
127
-
128
-
129
-
130
-
131
-
132
-
133
-
134
-
135
-
136
-
137
-
138
-
139
-
140
-
141
-
142
-
143
-
144
-
145
-
146
-
147
-
148
-
149
-
150
-
151
-
152
-
153
-
154
-
155
-
156
-
157
-
158
-
159
-
160
-
161
-
162
-
163
-
164
-
165
-
166
-
167
-
168
-
169
-
170
-
171
-
172
 |
 |