NEC NP1150 NP1150/2150/3150/3151W user's manual - Page 51
(6) Using a USB Mouse, Operate the Menus using the USB mouse, Convenient Features
 |
UPC - 805736019568
View all NEC NP1150 manuals
Add to My Manuals
Save this manual to your list of manuals |
Page 51 highlights
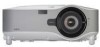
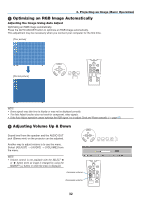
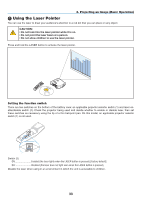
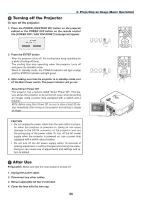
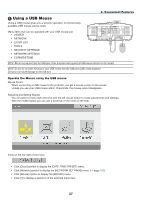
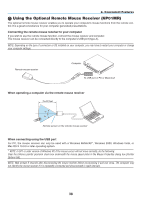
4. Convenient Features Using a USB Mouse Using a USB mouse gives you a smooth operation. A commercially available USB mouse can be used. USB USB(LAN) WIRELESS WIRELESS Menu items that can be operated with your USB mouse are: • VIEWER • NETWORK • ENTRY LIST • TOOLS • SECURITY SETTINGS • NETWORK SETTINGS • CORNERSTONE NOTE: We do not warrant that the USB port of the projector will support all USB mouse devices in the market. NOTE: Do not try to insert the plug of your USB mouse into the LAN port (LAN) of the projector. Doing so can cause damage to the LAN port. Operate the Menus using the USB mouse Mouse Cursor When connecting a USB mouse to the projector, you get a mouse cursor on the screen. Unless you use your USB mouse within 10 seconds, the mouse cursor disappears. Adjusting and Setting Display You can select a menu item and click with the left mouse button to make adjustments and settings. With the middle button you can use a scroll bar in the menu or the help. Icons on the top right of the menu • Click [Clock] symbol to display the [DATE, TIME PRESET] menu. • Click [Network] symbol to display the [NETWORK SETTINGS] menu. (→ page 102) • Click [Mouse] symbol to display the [MOUSE] menu. • Click [?] to display a selection of the selected menu item. 37
-
 1
1 -
2
-
3
-
4
-
5
-
6
-
7
-
8
-
9
-
10
-
11
-
12
-
13
-
14
-
15
-
16
-
17
-
18
-
19
-
20
-
21
-
22
-
23
-
24
-
25
-
26
-
27
-
28
-
29
-
30
-
31
-
32
-
33
-
34
-
35
-
36
-
37
-
38
-
39
-
40
-
41
-
42
-
43
-
44
-
45
-
 46
46 -
 47
47 -
 48
48 -
 49
49 -
 50
50 -
 51
51 -
 52
52 -
 53
53 -
 54
54 -
 55
55 -
 56
56 -
57
-
58
-
59
-
60
-
61
-
62
-
63
-
64
-
65
-
66
-
67
-
68
-
69
-
70
-
71
-
72
-
73
-
74
-
75
-
76
-
77
-
78
-
79
-
80
-
81
-
82
-
83
-
84
-
85
-
86
-
87
-
88
-
89
-
90
-
91
-
92
-
93
-
94
-
95
-
96
-
97
-
98
-
99
-
100
-
101
-
102
-
103
-
104
-
105
-
106
-
107
-
108
-
109
-
110
-
111
-
112
-
113
-
114
-
115
-
116
-
117
-
118
-
119
-
120
-
121
-
122
-
123
-
124
-
125
-
126
-
127
-
128
-
129
-
130
-
131
-
132
-
133
-
134
-
135
-
136
-
137
-
138
-
139
-
140
-
141
-
142
-
143
-
144
-
145
-
146
-
147
-
148
-
149
-
150
-
151
-
152
-
153
-
154
-
155
-
156
-
157
-
158
-
159
-
160
-
161
-
162
-
163
-
164
-
165
-
166
-
167
-
168
-
169
-
170
-
171
-
172
 |
 |