NEC NP1150 NP1150/2150/3150/3151W user's manual - Page 80
(3) Operating the Viewer Function from the Projector (playback), Projecting slides (Viewer)
 |
UPC - 805736019568
View all NEC NP1150 manuals
Add to My Manuals
Save this manual to your list of manuals |
Page 80 highlights
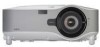
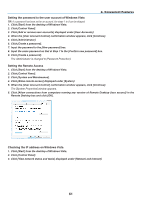
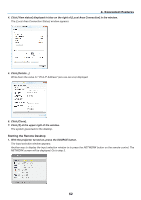
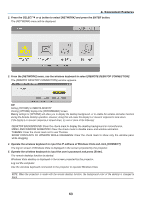
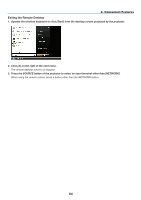
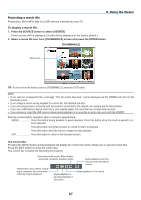
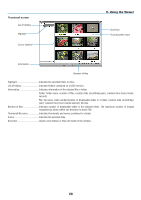
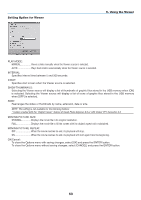
5. Using the Viewer Operating the Viewer Function from the Projector (playback) This section describes the operation for showing slides created or movie files. Projecting slides (Viewer) Preparation: Store JPEG or BMP files (JPEG, BMP, non-interlaced GIF or non-interlaced PNG files) in a USB memory inserted into your PC. To start the Viewer, press the SOURCE button on the cabinet to select [VIEWER]. (→ page 25) Viewer screen will be displayed. (A slide will be displayed at the factory default.) • You can use the VIEWER button on the remote control to select [VIEWER]. Operating Viewer Menu 1. Insert a USB memory into the USB port of the projector. The USB indicator lights. 2. Press the VIEWER button on the remote control or select the [Viewer] from the source list. An image stored in the USB memory will be displayed. NOTE: When [SHOW THUMBNAILS] is turned on in the OPTIONS menu, the thumbnail screen will be displayed. (→ page 69) NOTE: Pressing the EXIT button during slide playback will display the thumbnail screen. Slide and Thumbnail When VIEWER is selected, one of the two screens is displayed. One is a slide and the other is a thumbnail screen. [SLIDE] [THUMBNAILS] TIP: To switch from [SLIDE] to [THUMBNAILS], press the EXIT button. The Control Bar Pressing the MENU button during slide playback will display the control bar which allows you to operate a slideshow. Press the EXIT button to close the control bar. The control bar contains the following icon buttons: Advances to the next image. Returns to the previous image. Plays back slides. Stops Auto Play while you are playing back slides. Selects the currently displayed image for your background logo. Quits slide playback and then returns to the thumb- nail screen. Rotates the image 90 degrees counterclockwise. Rotates the image 90 degrees clockwise. 66
-
 1
1 -
2
-
3
-
4
-
5
-
6
-
7
-
8
-
9
-
10
-
11
-
12
-
13
-
14
-
15
-
16
-
17
-
18
-
19
-
20
-
21
-
22
-
23
-
24
-
25
-
26
-
27
-
28
-
29
-
30
-
31
-
32
-
33
-
34
-
35
-
36
-
37
-
38
-
39
-
40
-
41
-
42
-
43
-
44
-
45
-
46
-
47
-
48
-
49
-
50
-
51
-
52
-
53
-
54
-
55
-
56
-
57
-
58
-
59
-
60
-
61
-
62
-
63
-
64
-
65
-
66
-
67
-
68
-
69
-
70
-
71
-
72
-
73
-
74
-
 75
75 -
 76
76 -
 77
77 -
 78
78 -
 79
79 -
 80
80 -
 81
81 -
 82
82 -
 83
83 -
 84
84 -
 85
85 -
86
-
87
-
88
-
89
-
90
-
91
-
92
-
93
-
94
-
95
-
96
-
97
-
98
-
99
-
100
-
101
-
102
-
103
-
104
-
105
-
106
-
107
-
108
-
109
-
110
-
111
-
112
-
113
-
114
-
115
-
116
-
117
-
118
-
119
-
120
-
121
-
122
-
123
-
124
-
125
-
126
-
127
-
128
-
129
-
130
-
131
-
132
-
133
-
134
-
135
-
136
-
137
-
138
-
139
-
140
-
141
-
142
-
143
-
144
-
145
-
146
-
147
-
148
-
149
-
150
-
151
-
152
-
153
-
154
-
155
-
156
-
157
-
158
-
159
-
160
-
161
-
162
-
163
-
164
-
165
-
166
-
167
-
168
-
169
-
170
-
171
-
172
 |
 |