NEC PX-61XM1A 61MP1 - Page 39
Resetting to the default values
 |
View all NEC PX-61XM1A manuals
Add to My Manuals
Save this manual to your list of manuals |
Page 39 highlights
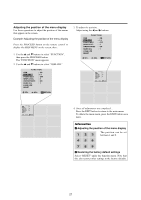
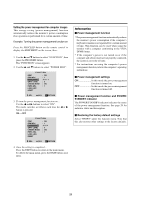
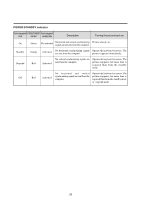
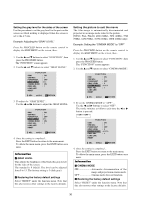
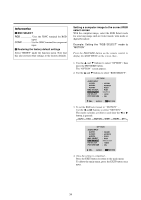
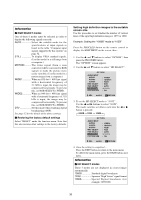
Information Ⅵ PLE AUTO The brightness of the screen is adjusted automatically to suit the picture quality. LOCK The brightness level is set to minimum. Ⅵ ORBITER ON The picture moves around the screen intermittently. OFF Orbiter mode does not function. Ⅵ INVERSE ON The picture is displayed alternately between positive image and negative image. OFF Inverse mode does not function. WT The entire screen turns white. Ⅵ Restoring the factory default settings Select "RESET" from the function menu. Note that this also restores other settings to the factory defaults. * Only the PLE and ORBITER can be adjusted when a RGB signal is connected. Resetting to the default values Use these operations to restore all the picture adjustments, audio settings, to the factory default values. Refer to page 18 for items to be reset. Press the PROCEED button on the remote control to display the MAIN MENU on the screen, then... 1. Use the L and M buttons to select "FUNCTION", then press the PROCEED button. The "FUNCTION" screen appears. 2. Use the L and M buttons to select "RESET", then press the PROCEED button. FUNCTION OSM OSM ADJ. POWER MGT GRAY LEVEL CINEMA MODE RGB3 ADJ. LONG LIFE RESET : ON :1 : OFF :3 : ON :1 SEL. PROCEED OK EXIT RETURN The "RESET" screen appears. 3. Use the L and M buttons to select "RESET", then press the PROCEED button. RESET RETURN RESET PROCEED OK EXIT RETURN RESET SETTING NOW When the "SETTING NOW" screen disappears, the screen will be restored to the previous "RESET" mode, then all the settings are restored to the default values. 4. Once the setting is completed ... Press the EXIT button. To delete the main menu, press the EXIT button once more. 32
-
 1
1 -
2
-
3
-
4
-
5
-
6
-
7
-
8
-
9
-
10
-
11
-
12
-
13
-
14
-
15
-
16
-
17
-
18
-
19
-
20
-
21
-
22
-
23
-
24
-
25
-
26
-
27
-
28
-
29
-
30
-
31
-
32
-
33
-
 34
34 -
 35
35 -
 36
36 -
 37
37 -
 38
38 -
 39
39 -
 40
40 -
 41
41 -
 42
42 -
 43
43 -
 44
44 -
45
-
46
-
47
-
48
-
49
-
50
-
51
-
52
-
53
-
54
-
55
-
56
-
57
-
58
-
59
-
60
-
61
-
62
-
63
-
64
 |
 |