NEC X462UN MultiSync LCD5710-2-AV : WMK-3257 accessory guide
NEC X462UN Manual
 |
UPC - 805736034400
View all NEC X462UN manuals
Add to My Manuals
Save this manual to your list of manuals |
NEC X462UN manual content summary:
- NEC X462UN | MultiSync LCD5710-2-AV : WMK-3257 accessory guide - Page 1
Installation and Assembly - Flat Screen Wall Mount for NEC models: NEC DISPLAY SOLUTIONS OF AMERICA, INC. ASPV32, ASPV40, E321, E421, E461, LCD3210, LCD3215, LCD4020, LCD4215, LCD4615, LCD4620, LCD5220, LCD5710, M40, M46, P401, P461, P521, P551, S401, S461, - NEC X462UN | MultiSync LCD5710-2-AV : WMK-3257 accessory guide - Page 2
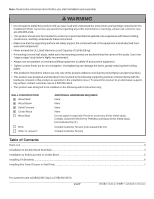
in this product as specified in the installation sheet. To mount this product to an alternative supporting surface, contact customer care at 1 800 865-2112. • This product was designed to be installed on the following wall construction only; WALL CONSTRUCTION x Wood Stud x Wood Beam x Solid - NEC X462UN | MultiSync LCD5710-2-AV : WMK-3257 accessory guide - Page 3
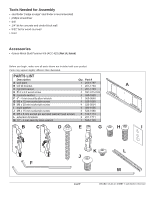
Assembly • stud finder ("edge to edge" stud finder is recommended) • phillips screwdriver • drill • 1/4" bit for concrete and cinder block wall • 5/32" bit for wood stud wall • level Accessories • 4 piece Metal Stud Fastener Kit (ACC 415) (Not UL listed) Before you begin, make sure all parts shown - NEC X462UN | MultiSync LCD5710-2-AV : WMK-3257 accessory guide - Page 4
recommended. • Hardware provided is for attachment of mount through standard thickness drywall or plaster into wood studs. Installers are responsible to provide hardware for other types of mounting situations (not evaluated by UL). Wall plate (A) can be mounted to two studs that are 16" apart. Use - NEC X462UN | MultiSync LCD5710-2-AV : WMK-3257 accessory guide - Page 5
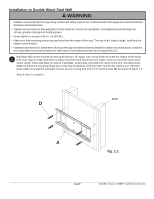
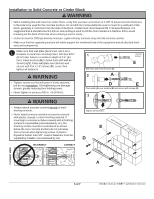
Solid Concrete or Cinder Block WARNING • When installing this wall mount on cinder block, verify that you have a minimum of 1-3/8" of actual concrete thickness in the hole to be used for the concrete anchors. Do not drill into mortar joints! Be sure to mount in a solid part of the block, generally - NEC X462UN | MultiSync LCD5710-2-AV : WMK-3257 accessory guide - Page 6
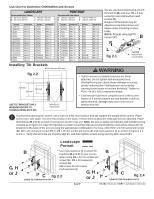
below center mounting location holes. B NOTE: Repeat using right tilt bracket (C). K L fig 2.1 CENTER MOUNTING LOCATIONS Installing Tilt Brackets the screen, set a cloth on a flat, level surface that will support the weight of the screen. Place screen face side down. If screen has knobs on - NEC X462UN | MultiSync LCD5710-2-AV : WMK-3257 accessory guide - Page 7
not tighten screws with excessive force. Overtightening can cause damage to mount. Tighten screws to 40 in. • lb (4.5 N.M.) maximum wall plate as shown in cross section. Removing Screen: To remove screen from mount, loosen safety screws, swing screen away from mount, and lift screen off of mount
-
 1
1 -
 2
2 -
 3
3 -
 4
4 -
 5
5 -
 6
6 -
 7
7
 |
 |

ISSUED: 03-26-10
SHEET #: 125-9106-3
08-04-10
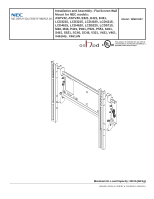
Maximum UL Load Capacity: 150 Ib (68 Kg)
±²³´µ¶·¸¹º»´·¼¹½¾¶¼±·´¼¿´ºÀ²Á¶³ºÂ´¶±³Ã
Model:
WMK3257
Installation and Assembly - Flat Screen Wall
Mount for NEC models:
ASPV32, ASPV40, E321, E421, E461,
LCD3210, LCD3215, LCD4020, LCD4215,
LCD4615, LCD4620, LCD5220, LCD5710,
M40, M46, P401, P461, P521, P551, S401,
S461, S521, SC40, SC46, V321, V421, V461,
X461HB, X461UN
±
This product is intended for use with UL
Listed products and must be installed by a
qualified professional installer.