Naxa NE-922A NE-922A English Manual
Naxa NE-922A Manual
 |
View all Naxa NE-922A manuals
Add to My Manuals
Save this manual to your list of manuals |
Naxa NE-922A manual content summary:
- Naxa NE-922A | NE-922A English Manual - Page 1
problems. 1.The emitter indicator becomes dim. 2.The receiver reception is poor. 3.The volume becomes weak and the sound is distorted. N E-922A Wireless Headphone User Manual Parts Package includes: • Emitter • Receiver (Headphone) • Instruction Manual • Audio cable • Y adaptor cable • AC Adaptor
-
 1
1
 |
 |
Wireless
Headphone
N
E
-922A
User
Manual
Technical
Specifications
Emitter
Frequency:
86
±
0.5MFIz
Modulation
mode:
FM
Emission
distance:
30m
(with
no
interference)
Reception
from
any
audio
and
visual
equipment
with
audio
out
socket,
such
as
TV
set,
audio
device,
DVD/VCD
player,
multimedia
MP3,
walldnan,
etc.
Power
supply:
2
x
AAA
batteries
or
4.5V
DC
Receiver
Frequency
range:
84-108MHz
Reception
Mode:
FM
Distortion:
2%
Power
Supply:
2
x
AAA
batteries
Notes
9
To
achieve
best
reception
spread
out
emitter
audio
cable
of
the
emitter(the
emitter
audio
cable
can
also
be
used
as
antenna).
•
If
the
sound
is
distorted
or
too
strong,
adjust
the
volume
of
the
signal
source
(TV
set,
VCD
player,
DVD
player,
PC,
MP3,
walkman
etc.)
to
a
lower
level,
and
reception
performance
may
be
improve.
•
Put
TV
on
mute
or
quite
mode
so
you
can
listen
to
TV
without
disturbing
any
one.
•
Replace
the
batteries
if
you
are
having
the
following
problems.
1.The
emitter
indicator
becomes
dim.
2.The
receiver
reception
is
poor.
3.The
volume
becomes
weak
and
the
sound
is
distorted.
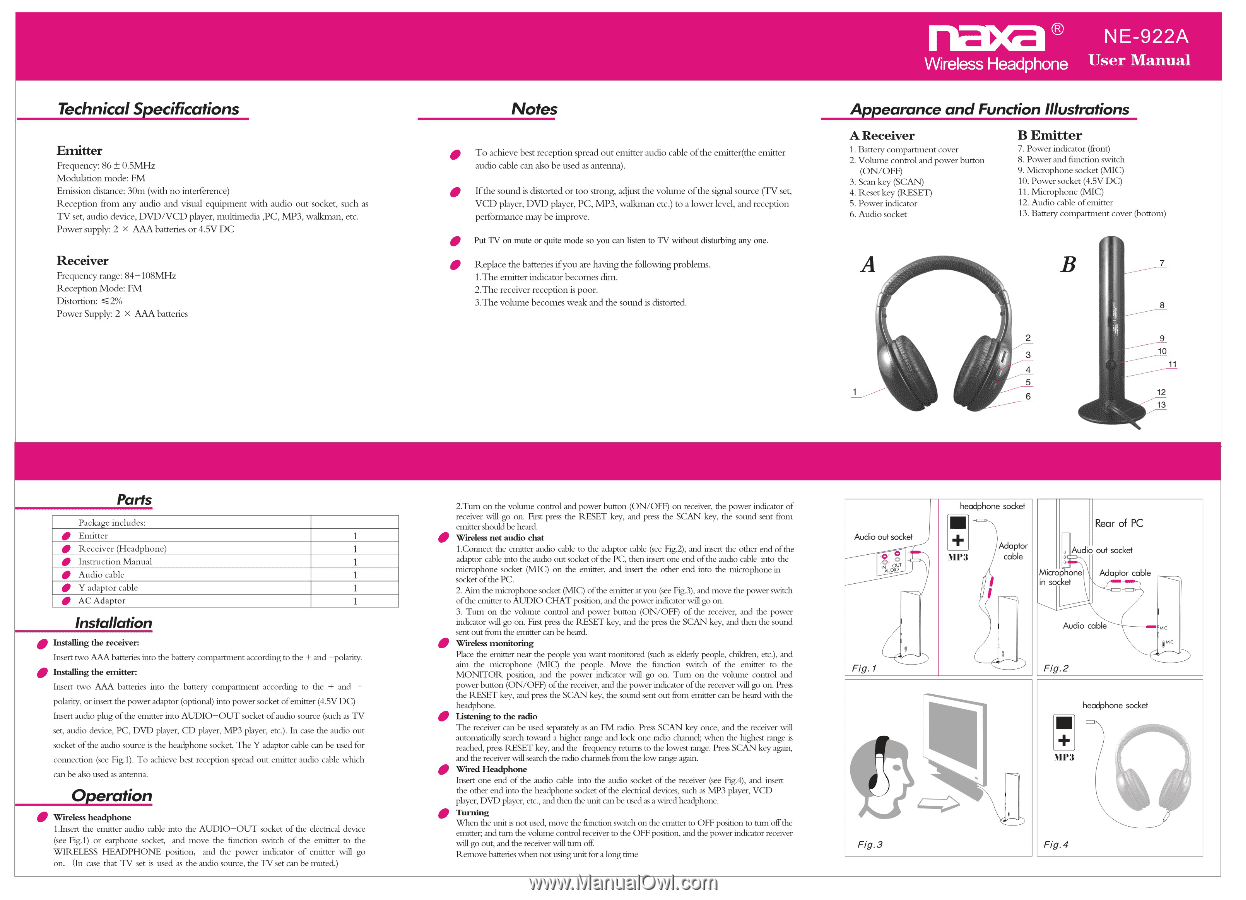
Appearance
and
Function
Illustrations
A
Receiver
1.
Battery
compartment
cover
2.
Volume
control
and
power
button
(ON/OFF)
3.
Scan
key
(SCAN)
4.
Reset
key
(RESET)
5.
Power
indicator
6.
Audio
socket
B
Emitter
7.
Power
indicator
(front)
8.
Power
and
function
switch
9.
Microphone
socket
(MIC)
10.
Power
socket
(4.5V
DC)
11.
Microphone
(MIC)
12.
Audio
cable
of
emitter
13.
Battery
compartment
cover
(bottom)
•
{1
3
10
11
4
5
12
13
Parts
Package
includes:
•
Emitter
•
Receiver
(Headphone)
•
Instruction
Manual
•
Audio
cable
•
Y
adaptor
cable
•
AC
Adaptor
Installation
Installing
the
receiver:
Insert
two
AAA
batteries
into
the
battery
compartment
according
to
the
+
and
—polarity.
•
Installing
the
emitter:
Insert
two
AAA
batteries
into
the
battery
compartment
according
to
the
+
and
—
polarity,
or
insert
the
power
adaptor
(optional)
into
power
socket
of
emitter
(4.5V
DC)
Insert
audio
plug
of
the
emitter
into
AUDIO
—OUT
socket
of
audio
source
(such
as
TV
set,
audio
device,
PC,
DVD
player,
CD
player,
MP3
player,
etc.).
In
case
the
audio
out
socket
of
the
audio
source
is
the
headphone
socket,
The
Y
adaptor
cable
can
be
used
for
connection
(see
Fig.1).
To
achieve
best
reception
spread
out
emitter
audio
cable
which
can
be
also
used
as
antenna.
Operation
•
Wireless
headphone
1.Insert
the
emitter
audio
cable
into
the
AUDIO
—OUT
socket
of
the
electrical
device
(see
Fig.1)
or
earphone
socket,
and
move
the
function
switch
of
the
emitter
to
the
WIRELESS
HEADPHONE
position,
and
the
power
indicator
of
emitter
will
go
on.
(In
case
that
TV
set
is
used
as
the
audio
source,
the
TV
set
can
be
muted.)
2.Tum
on
the
volume
control
and
power
button
(ON/OFF)
on
receiver,
the
power
indicator
of
receiver
will
go
on.
First
press
the
RESET
key,
and
press
the
SCAN
key,
the
sound
sent
from
emitter
should
be
heard_
Wireless
net
audio
chat
1.Connect
the
emitter
audio
cable
to
the
adaptor
cable
(see
Fig.2),
and
insert
the
other
end
of
the
adaptor
cable
into
the
audio
out
socket
of
the
PC,
then
insert
one
end
of
the
audio
cable
into
the
microphone
socket
(MIC)
on
the
emitter,
and
insert
the
other
end
into
the
microphone
in
socket
of
the
PC.
2.
Aim
the
microphone
socket
(IVIIC)
of
the
emitter
at
you
(see
Fig.3),
and
move
the
power
switch
of
the
emitter
to
AUDIO
CHAT
position,
and
the
power
indicator
will
go
on.
3.
Tum
on
the
volume
control
and
power
button
(ON/OFF)
of
the
receiver,
and
the
power
indicator
will
go
on.
First
press
the
RESET
key,
and
the
press
the
SCAN
key,
and
then
the
sound
sent
out
fr
om
the
emitter
can
be
heard.
Wireless
monitoring
Place
the
emitter
near
the
people
you
want
monitored
(such
as
elderly
people,
children,
etc.),
and
aim
the
microphone
(MIC)
the
people.
Move
the
function
switch
of
the
emitter
to
the
MONITOR
position,
and
the
power
indicator
will
go
on.
Turn
on
the
volume
control
and
power
button
(ON/OFF)
of
the
receiver,
and
the
power
indicator
of
the
receiver
will
go
on
Press
the
RESET
key,
and
press
the
SCAN
key,
the
sound
sent
out
from
emitter
can
be
heard
with
the
headphone.
•
listening
to
the
radio
The
receiver
can
be
used
separately
as
an
FM
radio.
Press
SCAN
key
once,
and
the
receiver
will
automatically
search
toward
a
higher
range
and
lock
one
radio
channel;
when
the
highest
range
is
reached,
press
RESET
key,
and
the
fr
equency
returns
to
the
lowest
range.
Press
SCAN
key
again,
and
the
receiver
will
search
the
radio
channels
from
the
low
range
again.
•
Wired
Headphone
Insert
one
end
of
the
audio
cable
into
the
audio
socket
of
the
receiver
(see
Fig.4),
and
insert
the
other
end
into
the
headphone
socket
of
the
electrical
devices,
such
as
MP3
player,
VCD
player,
DVD
player,
etc.,
and
then
the
unit
can
be
used
as
a
wired
headphone.
TLrning
When
the
unit
is
not
used,
move
the
function
switch
on
the
emitter
to
OFF
position
to
turn
off
the
emitter,
and
tam
the
volume
control
receiver
to
the
OFF
position,
and
the
power
indicator
receiver
will
go
out,
and
the
receiver
will
turn
off.
Remove
batteries
when
not
using
unit
for
a
long
time
•
Audio
our
socket
o
Fig.
I
headphone
socket
MP3
Adaptor
cable
Fig.3
Audio
Microp
one
in
socket
Rear
of
PC
out
socket
Adaptor
cable
Audio
cable
Fig.2
IC
headphone
socket
U
MP3
Fig.4