Netgear DGN2200 DGN2200 User Manual - Page 80
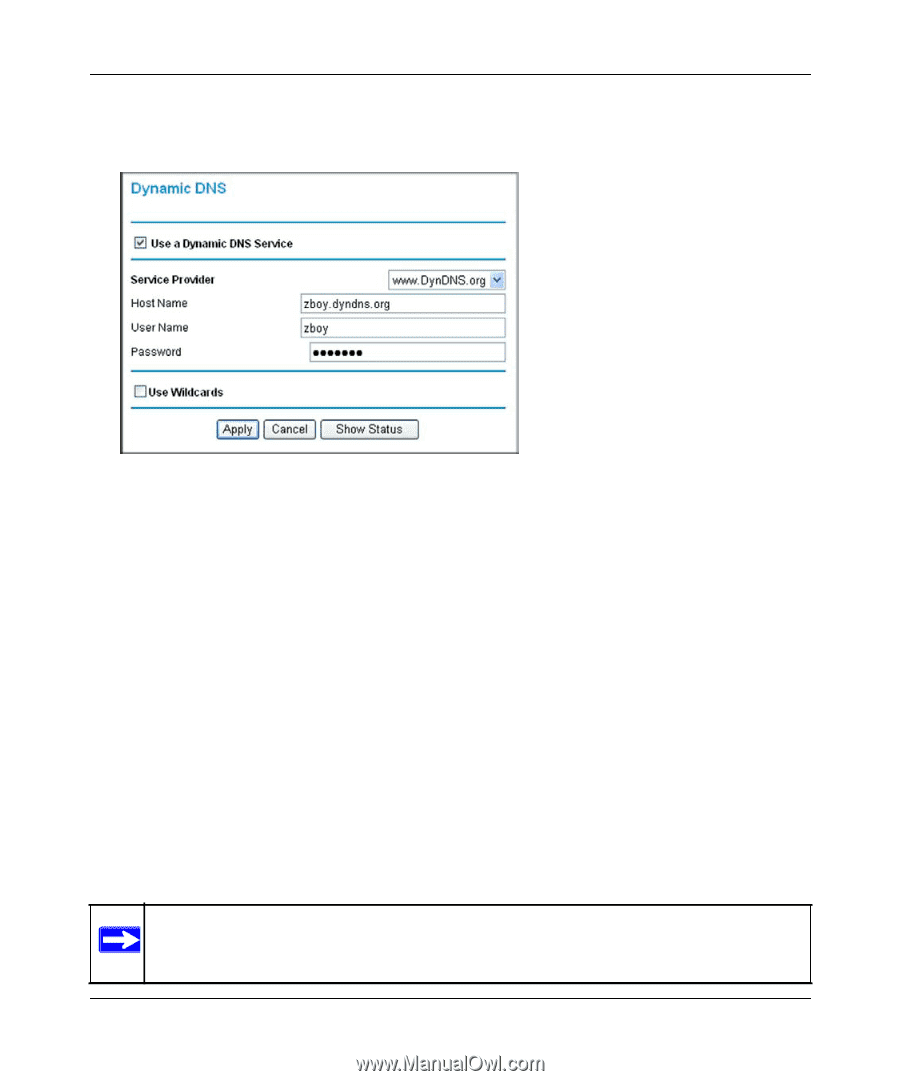
Service Provider, Use a dynamic DNS Service, Use Wildcards, Apply, To con Dynamic DNS
 |
UPC - 606449067279
View all Netgear DGN2200 manuals
Add to My Manuals
Save this manual to your list of manuals |
Page 80 highlights
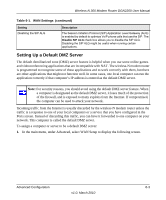
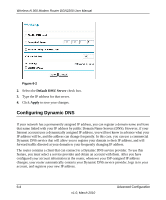
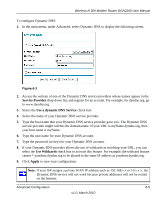
Wireless-N 300 Modem Router DGN2200 User Manual To configure Dynamic DNS: 1. In the main menu, under Advanced, select Dynamic DNS to display the following screen. Figure 6-3 2. Access the website of one of the Dynamic DNS service providers whose names appear in the Service Provider drop-down list, and register for an account. For example, for dyndns.org, go to www.dyndns.org. 3. Select the Use a dynamic DNS Service check box. 4. Select the name of your Dynamic DNS service provider. 5. Type the host name that your Dynamic DNS service provider gave you. The Dynamic DNS service provider might call this the domain name. If your URL is myName.dyndns.org, then your host name is myName. 6. Type the user name for your Dynamic DNS account. 7. Type the password (or key) for your Dynamic DNS account. 8. If your Dynamic DNS provider allows the use of wildcards in resolving your URL, you can select the Use Wildcards check box to activate this feature. For example, the wildcard feature causes *.yourhost.dyndns.org to be aliased to the same IP address as yourhost.dyndns.org. 9. Click Apply to save your configuration. Note: If your ISP assigns a private WAN IP address such as 192.168.x.x or 10.x.x.x, the Dynamic DNS service will not work because private addresses will not be routed on the Internet. Advanced Configuration 6-5 v1.0, March 2010
-
 1
1 -
2
-
3
-
4
-
5
-
6
-
7
-
8
-
9
-
10
-
11
-
12
-
13
-
14
-
15
-
16
-
17
-
18
-
19
-
20
-
21
-
22
-
23
-
24
-
25
-
26
-
27
-
28
-
29
-
30
-
31
-
32
-
33
-
34
-
35
-
36
-
37
-
38
-
39
-
40
-
41
-
42
-
43
-
44
-
45
-
46
-
47
-
48
-
49
-
50
-
51
-
52
-
53
-
54
-
55
-
56
-
57
-
58
-
59
-
60
-
61
-
62
-
63
-
64
-
65
-
66
-
67
-
68
-
69
-
70
-
71
-
72
-
73
-
74
-
 75
75 -
 76
76 -
 77
77 -
 78
78 -
 79
79 -
 80
80 -
 81
81 -
 82
82 -
 83
83 -
 84
84 -
 85
85 -
86
-
87
-
88
-
89
-
90
-
91
-
92
-
93
-
94
-
95
-
96
-
97
-
98
-
99
-
100
-
101
-
102
-
103
-
104
-
105
-
106
-
107
-
108
-
109
-
110
-
111
-
112
-
113
-
114
-
115
-
116
-
117
-
118
-
119
-
120
-
121
-
122
-
123
-
124
 |
 |