Netgear DGN2200v1 DG series - Configuration with ProSafe Client
Netgear DGN2200v1 Manual
 |
View all Netgear DGN2200v1 manuals
Add to My Manuals
Save this manual to your list of manuals |
Netgear DGN2200v1 manual content summary:
- Netgear DGN2200v1 | DG series - Configuration with ProSafe Client - Page 1
VPNGL05 (Version 5.04) Hardware: Netgear DSL router with VPN support, PC with Windows XP, Vista or 7. Introduction: This document will guide you on how to create a VPN policy for any of the home DSL gateways that support VPN, as well as how to configure the VPN Pro-Safe VPN client in order to allow - Netgear DGN2200v1 | DG series - Configuration with ProSafe Client - Page 2
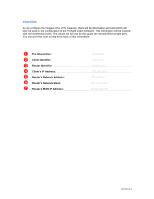
➋ Client Identifier _____client.com _ ➌ Router Identifier _____router.com _ ➍ Client's IP Address _ __192.168.100.1 _ ➎ Router's Network Address: _ _____ ___192.168.0.0 _ ➏ Router's Network Mask: _ __ _______ 255.255.255.0 _ ❼ Router's WAN IP Address 86.41.176.179 _ Version - Netgear DGN2200v1 | DG series - Configuration with ProSafe Client - Page 3
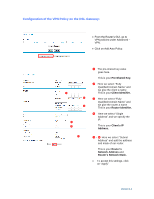
we give the router a name This is your Router Identifier. ➍ Here we select "Single Address" and we specify the IP. This is your Client's IP Address. ➎ - ➏ Here we select "Subnet Address" and add the address and mask of our router. This is your Router's Network Address and Router's Network Mask. To - Netgear DGN2200v1 | DG series - Configuration with ProSafe Client - Page 4
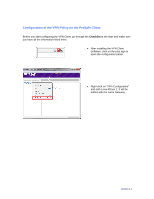
the Checklist at the start and make sure you have all the information listed there. After installing the VPN Client Software, click on the plus sign to open the configuration panel. Right click on "VPN Configuration" and add a new Phase 1. It will be added with the name Gateway. Version 1.1 - Netgear DGN2200v1 | DG series - Configuration with ProSafe Client - Page 5
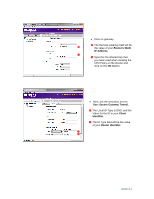
Click on gateway. ❼ The Remote Gateway field will be ❼ the value of your Router's WAN IP Address. ➊ ➊ Input the Pre-Shared Key that you have used when creating the VPN Policy on the Router and click on the OK Button. Next, tick the checkbox next to Use: Secure Gateway Tunnel. ➋ The Local - Netgear DGN2200v1 | DG series - Configuration with ProSafe Client - Page 6
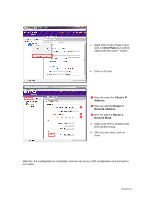
New Phase 2. It will be added with the name "Tunnel". Click on Tunnel. ➍ Here we enter the Client's IP Address. ➍ ➎ Here we add the Router's Network Address. ➎ ➏ Here we add the Router's ➏ Network Mask. Make sure PFS is enabled with DH2 (1020) Group. After you are done, click on Save - Netgear DGN2200v1 | DG series - Configuration with ProSafe Client - Page 7
the VPN Tunnel we configured, do the following: Go to Tools and click on Connection Panel. Double click on the tunnel we created. The tray notice box should tell us we are connected. The Connection Panel should show a green button indicating we are connected. Now we should be able to access
-
 1
1 -
 2
2 -
 3
3 -
 4
4 -
 5
5 -
 6
6 -
 7
7
 |
 |

Version 1.1
VPN Configuration of ProSafe Client and Netgear DG Router
Prerequisites:
Software:
VPNGL02 or VPNGL05 (Version 5.04)
Hardware:
Netgear DSL router with VPN support, PC with Windows XP, Vista or 7.
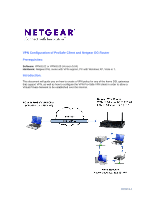
Introduction:
This document will guide you on how to create a VPN policy for any of the home DSL gateways
that support VPN, as well as how to configure the VPN Pro-Safe VPN client in order to allow a
Virtual Private Network to be established over the internet.