Netgear RND44751G Hardware Manual
Netgear RND44751G - ReadyNAS NV+ NAS Server Manual
 |
UPC - 606449055924
View all Netgear RND44751G manuals
Add to My Manuals
Save this manual to your list of manuals |
Netgear RND44751G manual content summary:
- Netgear RND44751G | Hardware Manual - Page 1
ReadyNAS Duo v2 and NV+ v2 Hardware Manual 350 East Plumeria Drive San Jose, CA 95134 USA September 2011 202-10895-03 - Netgear RND44751G | Hardware Manual - Page 2
system, or translated into any language in any form or by any means without the written permission of NETGEAR, Inc. Technical Support Thank you for choosing NETGEAR NETGEAR, Inc. All rights reserved. Statement of Conditions To improve internal design, operational function, and/or reliability, NETGEAR - Netgear RND44751G | Hardware Manual - Page 3
Shutdown 15 Boot Menu 16 Chapter 3 ReadyNAS NV+ v2 Front and Side Panels 19 Drive Bays 20 Rear Panel 22 Status Information 23 System Shutdown 23 Boot Menu 24 Chapter 4 Disks Previously Formatted Disks 27 Adding a Disk 28 Failed Disk Notification 29 Replacing a Disk 30 Appendix A Defaults - Netgear RND44751G | Hardware Manual - Page 4
ReadyNAS Duo v2 and NV+ v2 Appendix B Compliance Notification Index 4 - Netgear RND44751G | Hardware Manual - Page 5
1. Getting Started 1 Congratulations on your purchase of a NETGEAR ReadyNAS® storage system. This ReadyNAS Duo v2 and NV+ v2 Hardware Manual describes the physical features of the Duo v2 and NV+ v2 storage systems. This chapter contains the following sections: • Additional Documentation • Setup - Netgear RND44751G | Hardware Manual - Page 6
Duo v2 or NV+ v2 storage system, see the ReadyNAS RAIDiator 5.3 for Home Software Manual, which is available at http://www.readynas.com/documentation. NETGEAR maintains a community website that supports ReadyNAS products. Visit http://readynas.com for reviews, tutorials, a comparison chart, software - Netgear RND44751G | Hardware Manual - Page 7
Vista, XP, 2000, Mac OS, UNIX, or Linux operating system • Microsoft Internet Explorer 7.0+, Apple Safari, 2.0+, Mozilla Firefox 2.0+, Opera 9.5+, or Google Chrome 10+ browser • Hard disk drive or drives from the NETGEAR Hardware Compatibility List; see http://www.readynas.com/hard_disk_hcl. Getting - Netgear RND44751G | Hardware Manual - Page 8
NV+ v2 Diskless Units If you purchased a ReadyNAS storage system without a pre-installed hard disk drive or drives, you for first use: 1. Obtain at least one hard disk drive that appears on the NETGEAR Hardware Compatibility List. See http://www.readynas.com/hard_disk_hcl. If you are using a - Netgear RND44751G | Hardware Manual - Page 9
tests and formats the disk, installs the operating system, and creates a volume. This process can take up to 30 minutes; you can follow the progress in RAIDar. For more information about RAIDar, see the ReadyNAS RAIDiator 5.3 for Home Software Manual - Netgear RND44751G | Hardware Manual - Page 10
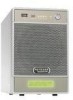
2. ReadyNAS Duo v2 2 This chapter provides an overview of the physical features of the ReadyNAS Duo v2 and includes the following sections: • Front and Side Panels • Drive Bays • Rear Panel • Status Information • System Shutdown • Boot Menu 10 - Netgear RND44751G | Hardware Manual - Page 11
ReadyNAS Duo v2 and NV+ v2 Front and Side Panels The following figure shows the front and side panels of ReadyNAS Duo v2. 1 2 3 8 45 6 7 Figure 1. ReadyNAS Duo v2 front and side panels 1. Power button and LED 2. Disk activity LED 3. Exhaust vent 4. USB 2.0 port 5. Backup button 6. USB and backup - Netgear RND44751G | Hardware Manual - Page 12
ReadyNAS Duo v2 and NV+ v2 Drive Bays The following figure shows the drive bays of ReadyNAS Duo v2. 1 2 3 4 5 Figure 2. ReadyNAS Duo v2 drive bay 1. Drive bay door 2. Disk tray handle 3. Recessed drive tray locking mechanism 4. Drive tray release latch 5. Drive bays ReadyNAS Duo v2 12 - Netgear RND44751G | Hardware Manual - Page 13
ReadyNAS Duo v2 and NV+ v2 The following figure shows a ReadyNAS Duo v2 disk tray. 2 1 3 4 5 Figure 3. ReadyNAS Duo v2 disk tray 1. Hard drive 2. Disk tray 3. Disk tray handle 4. Recessed disk tray locking mechanism 5. Disk tray release latch ReadyNAS Duo v2 13 - Netgear RND44751G | Hardware Manual - Page 14
ReadyNAS Duo v2 and NV+ v2 Rear Panel The following figure shows the rear panel of ReadyNAS Duo v2. 1 2 34 56 Figure 4. ReadyNAS Duo v2 rear panel 1. Exhaust fan 2. Kensington lock 3. Reset button 4. USB 3.0 ports 5. 1-gigabit Ethernet port with LED status indicators 6. Power adapter socket - Netgear RND44751G | Hardware Manual - Page 15
of your unit by reviewing the indicators listed states: • On. Power is on and the disk is operating normally. • Blinking. The disk was removed, failed, Green off, amber off. No connection System Shutdown You can shut down your unit Manual, which is available at http://www.readynas.com/ - Netgear RND44751G | Hardware Manual - Page 16
the boot menu to restart or troubleshoot your ReadyNAS unit. Your unit support boot mode only when instructed to do so by a NETGEAR Technical Support representative. • Skip volume check. After a system crash, the system tries to scan and fix the volume using a file system check. If several problems - Netgear RND44751G | Hardware Manual - Page 17
Tech support USB and backup status LED illuminates. Skip volume check Power LED and disk 1 LED illuminate. Memory test Legend: • On: • Off: 6. Press and release Reset button to confirm your boot menu selection. The system boots in the selected boot mode. ReadyNAS Duo v2 17 - Netgear RND44751G | Hardware Manual - Page 18
3. ReadyNAS NV+ v2 3 This chapter provides an overview of the physical features of the ReadyNAS NV+ v2 and includes the following sections: • Front and Side Panels • Drive Bays • Rear Panel • Status Information • System Shutdown • Boot Menu 18 - Netgear RND44751G | Hardware Manual - Page 19
ReadyNAS Duo v2 and NV+ v2 Front and Side Panels The following figure shows the front and side panels of ReadyNAS NV+ v2. 23 4 56 1 7 8 Figure 5. ReadyNAS NV+ v2 front and side panels 1. Exhaust vents 2. USB 2.0 port 3. Backup button and backup LED 4. Disk LEDs 5. Disk activity LED 6. Power - Netgear RND44751G | Hardware Manual - Page 20
ReadyNAS Duo v2 and NV+ v2 Drive Bays The following figure shows the drive bays of ReadyNAS NV+ v2. 2 3 4 1 5 Figure 6. ReadyNAS NV+ v2 drive bay 1. Drive bay door 2. Disk tray handle 3. Recessed drive tray locking mechanism 4. Drive tray release latch 5. Drive bays ReadyNAS NV+ v2 20 - Netgear RND44751G | Hardware Manual - Page 21
ReadyNAS Duo v2 and NV+ v2 The following figure shows a ReadyNAS NV+ v2 disk tray. 2 1 3 4 5 Figure 7. ReadyNAS NV+ v2 disk tray 1. Hard drive 2. Disk tray 3. Disk tray handle 4. Recessed disk tray locking mechanism 5. Disk tray release latch ReadyNAS NV+ v2 21 - Netgear RND44751G | Hardware Manual - Page 22
ReadyNAS Duo v2 and NV+ v2 Rear Panel The following figure shows the rear panel of ReadyNAS NV+ v2. 1 23 4 5 6 7 Figure 8. ReadyNAS NV+ v2 rear panel 1. Reset button 2. USB 3.0 ports 3. Power cable socket 4. 1-gigabit Ethernet port with LED status indicators 5. Exhaust fan 6. Cable clip 7. - Netgear RND44751G | Hardware Manual - Page 23
of your unit by reviewing the indicators listed in states: • On. Power is on and the disk is operating normally. • Blinking. The disk was removed, failed, Green off, amber off. No connection System Shutdown You can shut down your unit Manual, which is available at http://www.readynas.com/ - Netgear RND44751G | Hardware Manual - Page 24
the boot menu to restart or troubleshoot your ReadyNAS unit. Your unit support boot mode only when instructed to do so by a NETGEAR Technical Support representative. • Skip volume check. After a system crash, the system tries to scan and fix the volume using a file system check. If several problems - Netgear RND44751G | Hardware Manual - Page 25
mode option. 6. When the status display screen shows the boot mode you need, press and release Reset button to confirm your boot menu selection. The system boots in the selected boot mode. ReadyNAS NV+ v2 25 - Netgear RND44751G | Hardware Manual - Page 26
NETGEAR Technical Support will not provide assistance. For a list of supported disks, see theNETGEAR Hardware Compatibility List at http://www.readynas.com/hard_disk_hcl. For information about configuring disks on your ReadyNAS storage system, see the ReadyNAS RAIDiator 5.3 for Home Software Manual - Netgear RND44751G | Hardware Manual - Page 27
for a Duo v1, an NV+ v1, or a Windows operating system, RAIDar displays a "Corrupt Root" error message. ReadyNAS unit is operating with With the unit running, insert the disk in an empty must appear on the NETGEAR Hardware Compatibility List, which is available at http://www.readynas.com/hard_disk_hcl. - Netgear RND44751G | Hardware Manual - Page 28
ReadyNAS Duo v2 and NV+ v2 Adding a Disk You can add a hard disk to an empty disk bay. You do not need to shut down your unit before adding a disk. If you are adding a previously formatted disk to your Duo v2, NV+ v2, see the precautions in Previously Formatted Disks on page 27. To add a disk: 1. - Netgear RND44751G | Hardware Manual - Page 29
a diskless unit, see the ReadyNAS RAIDiator 5.3 for Home Software Manual, which is available at http://www.readynas.com/documentation, for In addition, the ReadyNAS Dashboard provides information about the failed disk. NETGEAR recommends replacing a failed disk with the same disk model. Use - Netgear RND44751G | Hardware Manual - Page 30
NV+ v2 Replacing a Disk In the case of a failed disk, the unit provides email alerts and status messages about the need to replace a disk. ReadyNAS supports hot-swap bays, so you do not need to power down your unit when replacing a disk. If you are replacing a disk with a previously formatted disk - Netgear RND44751G | Hardware Manual - Page 31
ReadyNAS Duo v2 and NV+ v2 2. Pull out the disk tray and replace the disk. 1 2 3 1. Hard drive 2. Empty disk tray 3. Assembled disk tray Make sure that the hard disk connectors face the interior of the disk bay. 3. Slide the disk tray back into the unit and press the handle to secure the disk. - Netgear RND44751G | Hardware Manual - Page 32
A A. Defaults and Technical Specifications This appendix includes the following sections: • Factory Default Settings • Duo v2 Technical Specifications • NV+ v2 Technical Specifications 32 - Netgear RND44751G | Hardware Manual - Page 33
admin Admin login password (case-sensitive) netgear1 Management System configuration ReadyNAS Dashboard web-based configuration and status monitoring Discovery MAC address See sticker on unit MTU size 1500 Ethernet port Auto Sense 10/100/1000BASE-T, RJ-45 LAN IP address DHCP - Netgear RND44751G | Hardware Manual - Page 34
ReadyNAS Duo v2 and NV+ v2 Duo v2 Technical Specifications The ReadyNAS Duo v2 storage system meets the following technical specifications: General: • 2-bay storage • Marvell single-core processor • 256MB DDR3 • One 1-gigabit Ethernet port • One USB 2.0 port (front) • Two USB 3.0 ports ( - Netgear RND44751G | Hardware Manual - Page 35
ReadyNAS Duo v2 and NV+ v2 NV+ v2 Technical Specifications The ReadyNAS NV+ v2 storage system meets the following technical specifications: General: • 4-bay storage • Marvell single-core processor • 256MB DDR3 • One 1-gigabit Ethernet port • One USB 2.0 port (front) • Two USB 3.0 ports ( - Netgear RND44751G | Hardware Manual - Page 36
TO THEIR INSTRUCTIONS. 3. system. • Always disconnect power from the system when removing or installing main system components, such as the main board or memory modules. When disconnecting power, first power down the system with the operating system manual for details about your - Netgear RND44751G | Hardware Manual - Page 37
to the manufacturer's instructions. DANGER: Installing the -in fuses: Only trained service technicians can replace the self Contact Technical Support for details and support. Electrostatic Discharge do not touch its components, peripheral chips, memory modules, or contacts. • When handling chips or - Netgear RND44751G | Hardware Manual - Page 38
or Country. Therefore, all options described in this user's guide may not be available in your version of the product. FCC Requirements for Operation in the United States FCC Information to User This product does not contain any user serviceable components and is to be used with approved antennas - Netgear RND44751G | Hardware Manual - Page 39
under our sole responsibility that the NETGEAR ReadyNAS Duo v2 and NV+ v2 comply with Part 15 of FCC Rules. Operation is subject to the following two interference that may cause undesired operation. FCC Radio Frequency Interference Warnings & Instructions This equipment has been tested and - Netgear RND44751G | Hardware Manual - Page 40
ReadyNAS Duo v2 and NV+ v2 European Union The NETGEAR ReadyNAS Duo v2 and NV+ v2 comply with essential requirements of EU EMC Directive 2004/108/EC and Low Voltage Directive 2006/95/EC as supported by applying the following test methods and standards: • EN55022: 2006 / A1: 2007 • EN55024: 1998 / A1: - Netgear RND44751G | Hardware Manual - Page 41
36 boot menu Duo v2 16 NV+ v2 24 C compliance 38 D Declaration Of Conformity 39 disk adding 28 failure 29 previously formatted 27 replacing 30 supported 26 disk tray Duo v2 13 NV+ v2 21 diskless units 8, 27 drive bay Duo v2 12 NV+ v2 20 E electrical safety 36 electrostatic discharge - Netgear RND44751G | Hardware Manual - Page 42
Duo v2 15 NV+ v2 23 status, system Duo v2 15 NV+ v2 23 supported disks 26 system requirements 7 system shutdown 15, 23 Duo v2 15 NV+ v2 23 system status Duo v2 15 NV+ v2 23 T technical specifications Duo v2 34 NV+ v2 35 technical support 2 trademarks 2 troubleshooting with boot menu Duo v2 16 NV+ v2
-
 1
1 -
 2
2 -
 3
3 -
 4
4 -
 5
5 -
 6
6 -
 7
7 -
8
-
9
-
10
-
11
-
12
-
13
-
14
-
15
-
16
-
17
-
18
-
19
-
20
-
21
-
22
-
23
-
24
-
25
-
26
-
27
-
28
-
29
-
30
-
31
-
32
-
33
-
34
-
35
-
36
-
37
-
38
-
39
-
40
-
41
-
42
 |
 |

350 East Plumeria Drive
San Jose, CA 95134
USA
September 2011
202-10895-03
ReadyNAS Duo v2 and
NV+ v2 Hardware Manual