Netgear WE102 Installation Guide
Netgear WE102 - Wireless Access Point Manual
 |
View all Netgear WE102 manuals
Add to My Manuals
Save this manual to your list of manuals |
Netgear WE102 manual content summary:
- Netgear WE102 | Installation Guide - Page 1
WE102.QCard.R1 1/24/01 5:02 PM Page 1 Wireless11X Home Network Ethernet to Wireless Bridge Installation Guide MODEL WE 102 NETGEAR, Inc. 4500 Great America Parkway Santa Clara, CA 95054 USA Phone: 1-888-NETGEAR www.NETGEAR.com Support Information See Support Information Card for phone numbers. - Netgear WE102 | Installation Guide - Page 2
document without notice. NETGEAR does not assume any liability that may occur due to the use or application of the product(s) or circuit layout(s) described herein. Certificate of the Manufacturer/Importer It is hereby certified that the Model WE102 Home Network Ethernet to Wireless Bridge has been
-
 1
1 -
 2
2
 |
 |
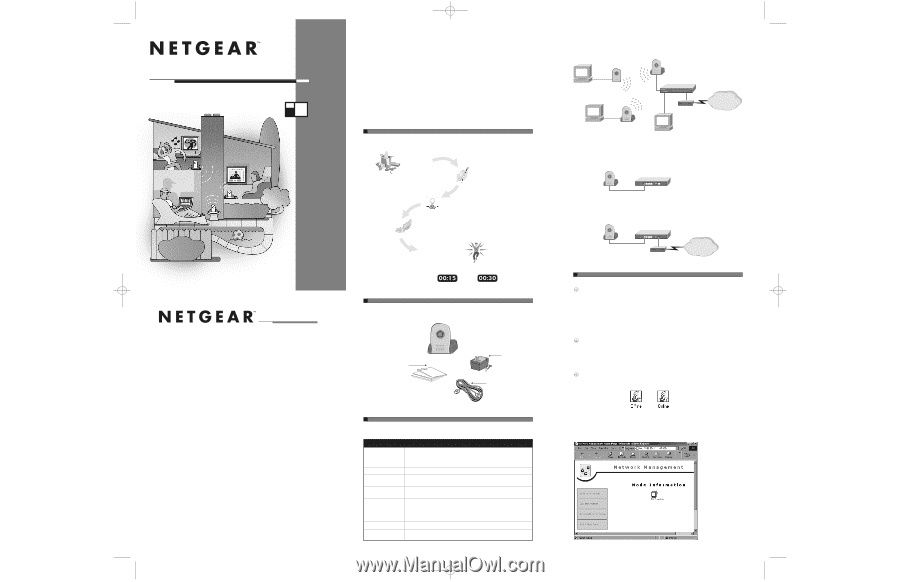
Typical Network Setup
Connect the Ethernet Device to the WE102 Bridge
Connect the Ethernet port of the WE102Bridge to any Ethernet device, such as a hub, switch, or router.
After the connection has been made and power has been applied to both devices, make sure that the
Link LED is active.
Share Your Cable or DSL Modem
You can connect the WE102Bridge directly to a cable or DSL modem. Combined with a RT314Router,
this will allow you to share your Internet connection with multiple PCs in your home.
3.TEST YOUR NETWORK CONNECTION [BAR HEADING]
Authenticate the WE102 Bridge into the Wireless Network
Note:
“Authenticate means” to verify that the network operating system has successfully sent
a message.
The following instructions apply to a PC installed with a WA301 PCI Network Card or a WA101USB
Adapter.This installation assumes that the WA301 or the WA101 has been properly installed into your
system. For instructions on the correct installation of these two products, please refer back to the
WA301 or WA101 installation guide.
If there is more than one WA301 or WA101 installed on different systems,please ensure that the PCs
with WA301 and WA101 are fully connected, wirelessly, before authenticating the WE102 Bridge into
your Wireless
11X
network.
Note:
In a Wireless
11X
network, one PC must be designated as the master station.The master
station is used to manage the overall network.This master PC must be operational before
installing the WE102 Bridge.
This procedure can be conducted on either a wireless master PC or a wireless client PC. On the lower
right-hand corner (SysTray area) of the Windows 98 or Window 95 desktop of your PC,there should be
one of the two wireless connection icons shown below.
Note:
The SysTray (System Tray) resides on one end of the taskbar in the Microsoft Windows
desktop.It displays interface icons for memory-resident applications that execute in the back-
ground continuously, such as the clock, speaker volume, and virus detection.
The icon on the left indicates that there is
more than
one system with a WA301 or WA101 installed.
The icon on the right indicates that there is
only
one PC with a WA301 or WA101 installed. If there
is more than one PC in your wireless network,recheck the installation of the WA301 and WA101.
You may need to go through the installation process again.
Double-click the Offline or Online icon in the SysTray.
Introduction
NETGEAR
’
s Wireless
11X
Solution brings you a richer Internet experience! Now you can enjoy multi-
media audio and video streaming uninterrupted by simultaneous streaming from other PCs on your net-
work. And you can finally take full advantage of your cable or DSL connection. Relax on the deck, and
watch an Internet broadcast of a sports event from overseas while your kids are in their bedrooms,
streaming MP3 audio from the Internet. Ever on the alert,Wireless
11X
continuously monitors perform-
ance,correcting and avoiding interference problems as it provides you with protection from eavesdrop-
pers and hackers.All of the performance benefits apply to standard file and resource sharing.
The
WE102 Ethernet to Wireless Bridge
lets you seamlessly extend your high-speed Internet connection
or your existing Ethernet network from anywhere in your home without the installation of expensive
cabling.Today your whole family can enjoy streaming audio and video from the Internet with high-
quality reception.
>START HERE [BAR HEADING]
The instructions in this guide are for installing the WE102Bridge in a PC equipped with Microsoft
®
Windows
®
98.
Plan Your Time
Estimated setup time for this product is only
minutes to
minutes.
1. OPEN BOX AND VERIFY CONTENTS [BAR HEADING]
Verify that your package contains the following:
2. CONNECT NETGEAR TO YOUR ENVIRONMENT[BAR HEADING]
Before you begin installing the WE102Bridge, prepare the installation site. Make sure the site meets the
following operating environment requirements:
Characteristic Requirement
Temperature
Ambient temperature between 0 and 40
º
C (32 and 104
º
F).
No nearby heat sources, such as direct sunlight, warm air exhausts,
or heaters.
Humidity
90% maximum relative humidity, non-condensing.
Ventilation
Minimum 2 inches (5.08 cm) on all sides for cooling.
Adequate airflow in room or wiring closet.
Operating conditions
At least 6 feet (1.83 m) to nearest source of electromagnetic noise
(such as photocopy machine or arc welder).
Service access
Minimum 12 inches (19.68 cm) front and back for service access
and maintenance.
Front and back clearance for cables and wiring hardware,
such as punchdown blocks.
Power
Adequate power source within 6 feet (1.83 m).
Wiring hardware
Wiring hardware, such as punchdown blocks or patch panels, complete
before installing the WE102.
WE
102
MODEL
NETGEAR, Inc.
4500 Great America Parkway
Santa Clara, CA 95054 USA
Phone: 1-888-NETGEAR
www.NETGEAR.com
Support Information
See Support Information Card for phone numbers.
Internet / World Wide Web
Go to http://www.NETGEAR.com for the NETGEAR Web page.
Defective or damaged merchandise can be returned to your point-of-sale representative.
IMPORTANT!
Please register online.YOU MUST REGISTER TO OBTAIN TECHNICAL SUPPORT.PLEASE
RETAIN PROOF OF PURCHASE and this warranty information.To register your product,get product
support, or to obtain product information and NETGEAR product documentation, direct your Web
browser to the
Web page.If you do not have access to the World Wide
Web,you can register your product using the enclosed registration card and mail it to NETGEAR
customer service.
January 2001
M
-
W
E
1
0
2
N
A
-
0
*M-WE102NA-0*
START HERE
1
OPEN BOX AND VERIFY PACKAGE CONTENTS
3
TEST YOUR NETWORK CONNECTION
Home Network Ethernet to Wireless Bridge
Installation Guide
Wireless
11X
2
CONNECT NETGEAR TO YOUR ENVIRONMENT
WE102 Bridge
Warranty & Owner
Registration Card
Support Information Card
Category 5
Ethernet cable
Power adapter
and cord
,
RT314 Router
Cable or DSL modem
Internet
PC with WA301 Wireless
11X
PCI Network Card installed
PC
PC with WA101 Wireless
11X
USB Adapter
WE102 Bridge
RT314 Router
WE102 Bridge
RT314 Router
Cable or DSL modem
Internet
WE102 Bridge
1. Open the box
and verify its contents
2. Connect NETGEAR
to your environment
4. Adjust your antenna
3. Test your network connection
5. Enjoy being connected!
WE102.QCard.R1
1/24/01
5:02 PM
Page 1