Netgear WNCE2001 WNCE2001 User Manual - Page 6
Installation, Preparing to Change Your Internet Adapter Settings - - ethernet to wireless adapter
 |
UPC - 606449069464
View all Netgear WNCE2001 manuals
Add to My Manuals
Save this manual to your list of manuals |
Page 6 highlights
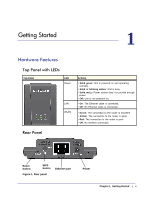
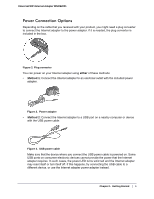
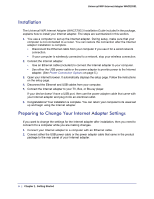
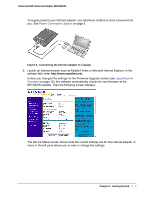
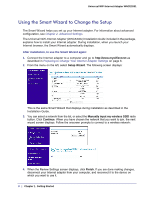
Universal WiFi Internet Adapter WNCE2001 Installation The Universal WiFi Internet Adapter (WNCE2001) Installation Guide included in the package, explains how to install your Internet adapter. The steps are summarized in this section. 1. You use a computer to set up the Internet adapter. During setup, make sure that your computer is not connected to a router. You can restore the connection after the Internet adapter installation is complete. • Disconnect the Ethernet cable from your computer if you use it for a wired network connection. • If your computer is wirelessly connected to a network, stop your wireless connection. 2. Connect the Internet adapter. • Use an Ethernet cable (included) to connect the Internet adapter to your computer. • Use either the USB power cable or the power adapter to provide power to the Internet adapter. (See Power Connection Options on page 5.) 3. Open your Internet browser. It automatically displays the setup page. Follow the instructions on the setup page. 4. Disconnect the Ethernet and USB cables from your computer. 5. Connect the Internet adapter to your TV, Box, or Blu-ray player. If your device doesn't have a USB port, then use the power adapter cable that came with your Internet adapter and plug it into an electrical outlet. 6. Congratulations! Your installation is complete. You can return your computer to its usual set up and begin using the Internet adapter. Preparing to Change Your Internet Adapter Settings If you want to change the settings for the Internet adapter after installation, then you need to connect it to a computer while you are making changes. 1. Connect your Internet adapter to a computer with an Ethernet cable. 2. Connect either the USB power cable or the power adapter cable that came in the product package to the rear panel of your Internet adapter. 6 | Chapter 1. Getting Started
-
 1
1 -
 2
2 -
 3
3 -
 4
4 -
 5
5 -
 6
6 -
 7
7 -
 8
8 -
 9
9 -
 10
10 -
 11
11 -
 12
12 -
13
-
14
-
15
-
16
-
17
-
18
-
19
-
20
-
21
-
22
-
23
-
24
-
25
-
26
 |
 |