Netgear WNR1000 WNR1000 Setup Manual - Page 20
adapter outlet of your wireless router - review
 |
UPC - 606449062588
View all Netgear WNR1000 manuals
Add to My Manuals
Save this manual to your list of manuals |
Page 20 highlights
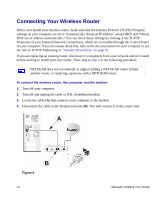
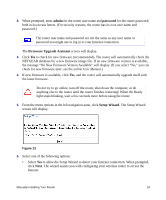
7. Connect any additional wired PCs to your router by inserting an Ethernet cable from a PC into one of the three remaining LAN ports. 8. Review that your network is now set up (as shown in Figure 9); you are ready to start your network. Figure 9 9. Start your network in the correct sequence, as described below. Failure to start or restart your network in the correct sequence could prevent you from accessing the Internet. To start your network: 1. Plug in and turn on the cable or DSL modem. Wait 2 minutes. 2. Plug the end of the power adapter's cord into the wall or a power strip, and into the power adapter outlet of your wireless router (F), as shown in Figure 10. Wait 1 minute. F Figure 10 16 Manually Installing Your Router
-
 1
1 -
2
-
3
-
4
-
5
-
6
-
7
-
8
-
9
-
10
-
11
-
12
-
13
-
14
-
 15
15 -
 16
16 -
 17
17 -
 18
18 -
 19
19 -
 20
20 -
 21
21 -
 22
22 -
 23
23 -
 24
24 -
 25
25 -
26
-
27
-
28
-
29
-
30
-
31
-
32
-
33
-
34
-
35
-
36
-
37
-
38
-
39
-
40
-
41
-
42
-
43
-
44
-
45
-
46
-
47
-
48
 |
 |

16
Manually Installing Your Router
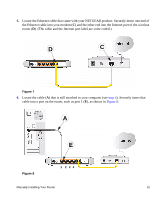
7.
Connect any additional wired PCs to your router by inserting an Ethernet cable from a PC into
one of the three remaining LAN ports.
8.
Review that your network is now set up (as shown in
Figure 9
); you are ready to start your
network.
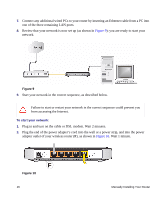
9.
Start your network in the correct sequence, as described below.
To start your network:
1.
Plug in and turn on the cable or DSL modem. Wait 2 minutes.
2.
Plug the end of the power adapter’s cord into the wall or a power strip, and into the power
adapter outlet of your wireless router (
F
), as shown in
Figure 10
. Wait 1 minute.
Figure 9
Failure to start or restart your network in the correct sequence could prevent you
from accessing the Internet.
Figure 10
F