Netgear WNR2000v3 WNR2000v3 Setup Manual - Page 14
For Windows users, For Mac users, Setting Up Your Router for, Internet Access - interface
 |
View all Netgear WNR2000v3 manuals
Add to My Manuals
Save this manual to your list of manuals |
Page 14 highlights
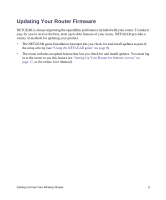
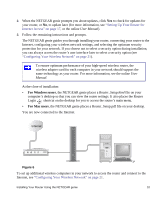
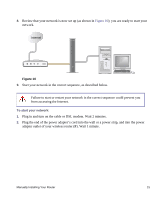
2. When the NETGEAR genie prompts you about updates, click Yes to check for updates for your router, or No, to update later (for more information, see "Setting Up Your Router for Internet Access" on page 17, or the online User Manual). 3. Follow the remaining instructions and prompts. The NETGEAR genie guides you through installing your router, connecting your router to the Internet, configuring your wireless network settings, and selecting the optimum security protection for your network. If you choose not to select a security option during installation, you can always access the router's user interface later to select a security option (see "Configuring Your Wireless Network" on page 21). To ensure optimum performance of your high-speed wireless router, the wireless adapter card for each computer in your network should support the same technology as your router. For more information, see the online User Manual. At the close of installation: • For Windows users, the NETGEAR genie places a Router_Setup.html file on your computer's desktop so that you can view the router settings. It also places the Router Login shortcut on the desktop for you to access the router's main menu. • For Mac users, the NETGEAR genie places a Router_Setup.pdf file on your desktop. You are now connected to the Internet. Internet •• 8+. Figure 6 To set up additional wireless computers in your network to access the router and connect to the Internet, see "Configuring Your Wireless Network" on page 21. Installing Your Router Using the NETGEAR genie 10
-
 1
1 -
2
-
3
-
4
-
5
-
6
-
7
-
8
-
 9
9 -
 10
10 -
 11
11 -
 12
12 -
 13
13 -
 14
14 -
 15
15 -
 16
16 -
 17
17 -
 18
18 -
 19
19 -
20
-
21
-
22
-
23
-
24
-
25
-
26
-
27
-
28
-
29
-
30
-
31
-
32
-
33
-
34
-
35
-
36
-
37
-
38
-
39
-
40
-
41
-
42
 |
 |