Nikon 4543 Instruction Manual
Nikon 4543 - SB 16B - Hot-shoe clip-on Flash Manual
 |
View all Nikon 4543 manuals
Add to My Manuals
Save this manual to your list of manuals |
Nikon 4543 manual content summary:
- Nikon 4543 | Instruction Manual - Page 1
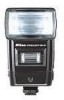
Nikon Speedlight INSTRUCTION MANUAL - Nikon 4543 | Instruction Manual - Page 2
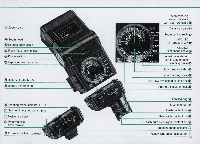
-NOMENCLATURE------------ Wide-Flash Adapter SW-7 Main flash head ® Main flash unit (J) Light sensor ® nn.nn/~ln,oo'" knob 2 - Nikon 4543 | Instruction Manual - Page 3
Zoom scale @Shooling mode indicator LEOs @TTL multiple flash terminal 3 - Nikon 4543 | Instruction Manual - Page 4
Diffusing the light 54rv 57 Bounce flash photography 54rv 56 Using a diffuser 57 Multiple Flash Photography 58rv62 TTL multiple flash photography 59rv61 Manual multiple flash photography 62 ACCESSORIES 63rv65 Sync Cords SC-10, 11, and 15 63 TTL Remote Cord SC-14 63 TTL Remote - Nikon 4543 | Instruction Manual - Page 5
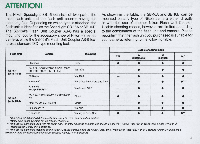
is suitable for your camera, referring to the following table . Usable shooting mode Flash unit· Camera F3-series Mounting Direct TTL A (automatic) M (manual) MD • • • • 58-16A FA, FE2, F-501/N2020', F-301/N2000', FG, FM 2, FG-20, EM , FE, FM Via AS-6 - • (with AS-S) F2-8eries - Nikon 4543 | Instruction Manual - Page 6
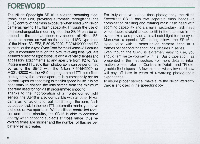
" and " Photograph ic Techniques. " A few minutes wisely invested now wi ll payoff later in years of rewarding photographic ex pe rie nces. To insure proper service, make sure the Nikon Warranty Ca rd is enclosed in the speedlight box. 6 - Nikon 4543 | Instruction Manual - Page 7
BASIC O P E R A T I O N 1 Set the openl closed knob • ® on the flash unit coupler to the OPEN position. 2 Attach the flash unit . coupler to the flash unit. Position the flash unit and flash unit coupler, so that the secondary flash head ® on the flash unit and the sen- sor (J) on the flash unit - Nikon 4543 | Instruction Manual - Page 8
-BASIC OPERATION-confinued---------- 3 lock the flash unit . coupler. Turn the open/closed knob to the "c losed " position (indicated by a dot) to lock the flash unit coupler ; make sure the flash unit and flash unit coupler fit tightly together. Note : To remove the flash unit coupler. set the - Nikon 4543 | Instruction Manual - Page 9
the " off " position ; then put the holder back into the chamber, so that the slots at both sides of the holder are aligned with the guide rails inside the battery chamber. 7. Close the lid. While applying pressure to the battery holder with your finger, slide the lid as far as it - Nikon 4543 | Instruction Manual - Page 10
- Vcamera, an optional V- Type Sync Cord is required. For details about flash unit attachment to the Nikonos-V, refer to the Sync Cord's instruction manual. With the 5B·16A, turn the locking ring @ around the mounting foot @ counterclockwise until the AS-8 's foot is uncovered (fig. 1). Then slide - Nikon 4543 | Instruction Manual - Page 11
11 - Nikon 4543 | Instruction Manual - Page 12
-BASIC OPERATION-confinued---------- 9 Tilt the flash head ® to . the normal shooting position. Tilt the flash head 90°, so that it faces straight ahead , 12 10. Set ASAIISO film speed. Turn the ASA/ISO film speed setting ring @ around the exposure calculator dial @, until the ASAIISO index @ is - Nikon 4543 | Instruction Manual - Page 13
.:rTL automatic operation, and section C is for progammed TTL auto operation (with the F-501/N2020 or F-301/N2000 camera set at a programmed exposure mede). For manual operation and synchronization with motor drive, see pages 23 and 24. 13 - Nikon 4543 | Instruction Manual - Page 14
through-the-Iens (TTL) flash exposure control. With the F-501/N2020 or F-301/N2000 camera , set the camera's exposure/shooting mode selector to A or a manual setting. A-15. Choose an flstop from the exposure calculator dial. Depending on how far away your subject is from the came ra, you must se - Nikon 4543 | Instruction Manual - Page 15
A-16 Set the lens aperture . ring to the appro· priate fI stop. If you decide to shoot at f/4, then you must set the aperture ring on the lens to f/4 . 8-14. Choose an f/stop from the exposure calculator dial. For non-TTL automatic operation , the exposure calculator dial provides a choice of two - Nikon 4543 | Instruction Manual - Page 16
-BASIC OPERATION-continued---------- B-15 Set the mode selector • @ to the blue or orange dot for automatic operation. If you select 1/4, you must set the selector to the orange dot, corres ponding to f/4 on the exposure calculator dial. B-16 Set the lens aperture . ring to the appro· priate f/ - Nikon 4543 | Instruction Manual - Page 17
C-15. S~t ,lens to the minimum aperture (largest f·number), C-16. Set the 58·16'5 mode selector to TTL. ....I • r I (I l 2 MD M fffIl ~ I For TTL operation • • I , , ) ( I { Al A2 .MoD . I I For automatic operation (A2) 17. Turn on the flash unit. Slide the S8-16's ON/OFF switch to the right - Nikon 4543 | Instruction Manual - Page 18
-BASIC OPERATION-continued---------- 18. Wait for the ready· light @ tocomeon. As soon as the flash ready-light built into the back of the flash unit comes on , the 88 -16 is ready to fire. With the except ion of the Nikon F2 -series, if your camera has an LED readylight inside the viewfinder, make - Nikon 4543 | Instruction Manual - Page 19
After you take the shot, watch the ready-light inside the camera 's viewfinder or the one on the 88 -16. After a short while , it will light up again to tell you the flash unit is recycled and ready to fire for the next shot. Note: If the flash unit fired at its maximum output, the ready-light - Nikon 4543 | Instruction Manual - Page 20
-CONTROLS IN D E T A I L AS-8 Flash Unit Couplers AS·S @ and AS·9 ® The detachable lower part of the SB -16, cal led the Flash Unit Coupler AS-8 or AS-9 , houses the mounting foot , the shooting mode selector with shooting mode indication LEDs , the ready-lightlopen -flash button , the light - Nikon 4543 | Instruction Manual - Page 21
. Actual shutt.r sp••d (••c .) 1/80 1/80 as set 1/250 1/250 as sel 1/250 as set as set 1/90 Viewfinder shutt.r ap••d Indlcallon 80 Mao LCD shows manual-set shutter speed; no indication at B or T LCD shows 250 LCD shows M250 LCD shows ma nua ll v-set shutter speed No indication (sec) 1/ 125 - Nikon 4543 | Instruction Manual - Page 22
or a longer focal length at that setting. However, please remember that the lower the numbered setting, the smaller the guide number and the narrower the automatic shooting range is. (The guide number and automatic shooting range for each zoom setting is shown in the table on pages 31 and 32.). To - Nikon 4543 | Instruction Manual - Page 23
dots in the middle indicating MD (Motor Drive) and M (Manual) operation respectively, and a white square at the far right lines on the bottom of the exposure calcu lator dial. M (manual operation) At the manu a ~ ~M) setting , th e -16 on manual. In the manual mode, exposure should be determined with the exposure - Nikon 4543 | Instruction Manual - Page 24
that of the flash unit's maximum power. Like the M setting , this setting is also for manual operation; therefore , the exposure shou ld be calculated manually using the exposure calcu lator dial or guide number equation shown on page 30. Note: As sufficient power is required for the flash unit to - Nikon 4543 | Instruction Manual - Page 25
2) Set the zoom setting knob Turn the zoom setting knob at the center on the dial until the zoom setting index is opposite the same letter as you selected in setting the zoom head. For example , if you set the zoom head at T for a 85mm lens, the zoom setting knob must also be set at T. Note: The W, - Nikon 4543 | Instruction Manual - Page 26
-CONTROLS IN DETAIL-continued--------- For through·the·lens (TTL) operation On the dial there are eight listops ranging from f/2 to f/22 . Each IIstop determines the usable distance range in which you can obtain the correct automatic exposure . These ranges are indicated by a series of color-coded - Nikon 4543 | Instruction Manual - Page 27
The auto shooting ranges for TTL photography are shown in the lollowi ng table. Example 3 If you are using ASA/ISO 100 film (with th e zoom head set at N for a 35 mm lens) and the subject is 2 m away, you can select either 1/2.8 , 1/4, 1/56, 1/8, f/11 or f/16. If a shorter recyc ling time is - Nikon 4543 | Instruction Manual - Page 28
-CONTROLS IN DETAIL-continued--------- For non-TTL automatic (A) operation For non -TTL automatic operation , you can select one of two flstops , indicated by the blue and orange aperture indicator lines at the bottom of the calculator dial. After determining the aperture , set the shooting mode - Nikon 4543 | Instruction Manual - Page 29
Example 2 If you are using ASAIISO 400 film, the usable aperture is now f/16 at A1 and 1/8 at A2. The auto shooting range varies according to the zoom head setting as shown in the table . At the same zoom head setting, the range is the same regardless 01 the film speed and the corresponding Iistop - Nikon 4543 | Instruction Manual - Page 30
-CONTROLS IN DETAll-continued--------- For manual (M) operation After setting the ASA/ISO exposure calculator dial , you can also determine the flstop by using the following equation : = flstop guide number flash-to-subject distance With ASAIISO 100 film and meters (and the zoom head set at - Nikon 4543 | Instruction Manual - Page 31
at various film speeds and zoom head settings is shown in the following table: Guide numbers in the manual mode Unit' m(tt) Zoom head ASAIISO film speed setting 800 400 200 100 50 25 T 119(390) 84 (276) 59 (194) 42 (138) 30(98) - Nikon 4543 | Instruction Manual - Page 32
to the exposure calculator dial, you can also determine the f/stop by using the guide number equation found on page 30. The guide number at various film speeds and zoom head settings is shown in the following table: Guide numbers in the MD mode Unit· m(tt) Zoom head setting T 800 30(98 - Nikon 4543 | Instruction Manual - Page 33
underexposure is certain to occur. In this case. take the picture on manual. TTL exposure compensation When shooti ng TTL auto fla sh pictures, you to give less expo sure (refer to the camera 's instruction manual for more information). The TTL auto shooting range changes according to the amount - Nikon 4543 | Instruction Manual - Page 34
1000 .-/ / • For Nikon F-5011N2020 and F-301IN2000 only ~ = Not possible; make the necessary compensation in the non-TTL automatic mode (see the following) or shoot on manual. 34 - Nikon 4543 | Instruction Manual - Page 35
Non-TTL automatic exposure compensation In the non-TTL automatic exposure mode, exposure compensation can be performed by stopping down or opening up the lens. With a dark subject , use a smaller aperture. When a subject is light in tone , use a larger aperture . 35 - Nikon 4543 | Instruction Manual - Page 36
-CONTROLS IN DETAll-continued--------- F3- series FA F-50 1/N2020 , FE2 FE FM2 F-30 1/N2000 FG FG·20 Ready· Light @ After the ON /OFF switch is turn ed on , the ready-light at the back of th e 8B -16 lights up to indicate that the 8B -16 is recyc led and ready to fire. At the same time, the - Nikon 4543 | Instruction Manual - Page 37
the automatic shooting range, use a wider aperture if possible or move closer to the subject. Because the voltage of batteries decreases with use, the guide number might also be reduced slightly. The flash output of the 88-16 depends on the available ambient light and the reflectivity of the subject - Nikon 4543 | Instruction Manual - Page 38
-CONTROLS IN DETAIL-continued--------- With the SB·16A As soon as the flash unit is turned on, both ready·lights blink in the following cases : 1) When the AS-8 's mounting foot is not securely locked. 2) When using the TTL mode with the Nikon F3-series camera and the camera 's film speed setting is - Nikon 4543 | Instruction Manual - Page 39
C.mer. F 3· ••rle. FA 'II. A S·' FE2 'II. AS·' FE 'II. AS· ' FM2 (with 1/250 • • c. ayno apead) via A S·' FM 2 (with 11200 ••0. aync .peed) 'I I. AS· ' F·501 /N2020 'II. AS·', F·301/N2OOQ 'II. A S·' FO 'II. A S·' FO ·20 'II. AS·. Nlkono.·Y 'II. Y'1'1pa Sync Cord and AS·. Shutt.r .peed Seili ng (••c - Nikon 4543 | Instruction Manual - Page 40
-CONTROLS IN DETAIL-continued--------_ With the SB-16B As soon as the flash unit is turned on , the ready- light on the flash unit lights up when the flash is ready to fire , while the ready-light in the camera 's viewfinder blinks in the following cases : 1) When the shooting mode selector is set - Nikon 4543 | Instruction Manual - Page 41
Camer a F 3-••rle. via AS·4 o r 7 FA FE2 FE FM2 (wUh 11250 s . c • • yn c . p.ed) FM2 (wllh 1/200 ••e. . yne . ptled) F·501 / N2020 , F ·30lIN2 000 FQ FQ ·20 Nlkono.·V v i a V.TYpe Sync Cord Shutt.r .ptled Setting (.ee.) All settings A1I settings except M250 and B (In p. S, A and M modes) M250, B ( - Nikon 4543 | Instruction Manual - Page 42
IN DETAIL-continued--------- Open- Flash Button @ The ready-light on the SB -16 can be used as an openflash button to fire the flash unit manually without having to trip the camera 's shutter. In this manner, you can create multiple-exposure "stroboscopic" effects or paint the scene with light by - Nikon 4543 | Instruction Manual - Page 43
In the TTL mode, test -firing must be performed by tripping the shutter. Note that , without film loaded in the camera , the ready-light will blink even if the correct exposure is obtainable . As a substitute for loaded roll film , you can use a strip of cut film (provided it is not too old) or a - Nikon 4543 | Instruction Manual - Page 44
-CONTROLS IN DETAIL-continued--------- Tilting/Rotating Flash Head ® For truly creative bounce flash photography, the 88 -16 has two flash heads. The main head tilts back 90° wi th click -stops at the 30°, 45° , 60°, 75° and 90° positions. It also rotates through an arc or 270°, 90° c lockwise with - Nikon 4543 | Instruction Manual - Page 45
Secondary Flash Head ® The smaller secondary head is built into the front of the fla sh unit and faces straight ahead. Its purpose is to fill in the shadows in the eye socket s and provide a ca tch light for the eyes when doing bounce flash . The secondary head has a guide number of 8. 45 - Nikon 4543 | Instruction Manual - Page 46
to set the zoom head knob on the exposure calculator dial at W2 . Because the SW-7 diffuses the light emitted from the · SB -16, the guide number is reduced to 19 at ASA/ISO 100 and meters (refer to pages 31 and 32), and the auto shooting ranges are less (refer - Nikon 4543 | Instruction Manual - Page 47
to attach a sync cord to the 88-16 for off-camera operation or you can attach a second electronic flaSh in series for manual multiple lighting setups. (For more detailed information about manual multiple flash , refer to pages 58 and 62 .) Notes: I) When the S8-16 is used off-camera via a sync cord - Nikon 4543 | Instruction Manual - Page 48
-PHOTOGRAPHIC TECHNIQUES--------- Synchro-Sunlight Fill-In Flash Photography A backlit subject , such as a person outside with hislher back to the sun or indoors in front of a window, may come out almost as a silhouette if the background is correctly exposed . On the other hand, if exposure - Nikon 4543 | Instruction Manual - Page 49
With fill-in fla sh: both the subject and the background come out properly exposed. 49 - Nikon 4543 | Instruction Manual - Page 50
below, calculate the flash-to-subject distance using the guide number for the fi lm in use (as shown on page 31) and the f/stop then you can shoot from any position. 5)Take the picture. Set the S8-16 for manual operation, turn it on and wait until it is fully recycled before taking the shot. This - Nikon 4543 | Instruction Manual - Page 51
the TTL-automatic mode !~ Same as Steps 1) and 2) in the manual mode. 3) Take the picture. With the S8-16 set at TTL and the desired exposure balance may not be obtained. In this case, use the 8B -16 on manual. 2) To give different exposures to the subject and background, you can re set the camera - Nikon 4543 | Instruction Manual - Page 52
-PHOTOGRAPHIC TECHNIQUES-continued------ Synchronization with slow shutter speeds If you are using the 88·16 at a high shutter speed under dim light, the background may come out too dark. To avoid this, use a slower shutter speed. The procedure for synchron ization with slow shutter speeds is the - Nikon 4543 | Instruction Manual - Page 53
Fast synchronization speed: the background is too dark. Slow synchronization speed: now detaifs in the background can be seen. 53 - Nikon 4543 | Instruction Manual - Page 54
-PHOTOGRAPHIC TECHNIQUES-continued Diffusing the Light Light is what gives form to solid objects. If the flash is pointed direc tly at th e subjec t and loca ted near th e lens, the subjec t will look fl at because of th e lack of shadows . Howeve r, if the fla sh is moved off-axis , shadows sta - Nikon 4543 | Instruction Manual - Page 55
Combination bounce and direct fla sh: soft, natural-looking lighting with a pleasing catchlight in the eyes. 55 - Nikon 4543 | Instruction Manual - Page 56
-PHOTOGRAPHIC TECHNIQUES-confinued------ The procedure for bounce flash is as follows : 1) Choose the bounce surface. Select the ceiling or wall you want to bounce the flash off of ; then tilt and/or rotate the main flash head so that it pOints in that direction. The position of the flash unit, the - Nikon 4543 | Instruction Manual - Page 57
Using a diffuser It is also possible to diffuse the light by placing a trans lucent material , such as one or mo re sheets of tracing paper, between the flash and subject. You can create more pronounced diffusion by placing a certain distance between the diffuser and flash than by wrapping the - Nikon 4543 | Instruction Manual - Page 58
the background. But by using more than one flash unit, you can solve these problems. With the 8B-16 and F3-series, FA, FE2, F-501/N2020, F-301/N2000, FG or Nikonos-V camera combination, both TIL and manual multiple flash photography are possible. In both cases, one important fact to remember is - Nikon 4543 | Instruction Manual - Page 59
TTL multiple flash photography 8y using the S8-16 connected to an F3-series, FA. FE2, F-501/N2020, F-301/N2000, FG or Nikonos-V (via V~ype Sync Cord) camera as a master flash unit and either the Nikon 8peedlight 88-11 , 88-14, 88-15, 88-16, 8817, S8-18 and/or 88-140 as slave flash unit(s), TIL - Nikon 4543 | Instruction Manual - Page 60
-PHOTOGRAPHIC TECHNIQUES-continued------ SYSTEM CHART FOR TTL MULTIPLE FLASH OPERATION ffiOfJ Nikon F3 @~ ~ @ ,Ikonos-v - 0 V-Type Sync Cord ~ @) IJ~!5 ~ ~ @~5B" l1Jl9JJ Nlkon F-5011 Nlkon FE2 SC-17 ~L.-O -Q:-r~-"--f-:-@)III~II @~ @)~SB-18 Nlkon F-3011 Nikon FG N2000 L @ - Nikon 4543 | Instruction Manual - Page 61
F~s." ~---- ~~S~-=2=3=-- I SB-11 SB-14/ ~____. SB-140 O SC-18 - - = SC-19 ~-El ~ AS-11 SB-141 SB-140 SB-16B ~-Ej ~ AS-11 o IlIL ail ., SC-18 SC-19 ,jllJIlll- SE? ~SB-18 61 - Nikon 4543 | Instruction Manual - Page 62
), SC-7 (approx. 25cm) or SC-6 (approx. 1m). All these sync cords are available as optional accessories . Note: In manual multiple flash operation, make sure to use both flash units on manual. In the TTL or non·TTL automatic shooting mode. the correct exposure cannot be obtained. because light from - Nikon 4543 | Instruction Manual - Page 63
ACCESSORIES Sync Cords 10, 11 , and 15 For use with cameras not provided with a hot shoe or for off-camera or multiple -flash lighting setups. The 8C-11 is 25cm while the 8C-15 is one meter. To use the 8C-1O with F2 - or F3-series cameras, use of the Nikon Flash Un it Coupler (A8-1 for the F2 and - Nikon 4543 | Instruction Manual - Page 64
-ACCESSORIES-continued------------ TTL Multi·Flash Sync Cords SC·18 and SC·19 The SC-18 and/or SC-19 are used to connect the flash units together for TTL multiple flash ope ration. The SC18 is 1.5m long , while the SC-19 is 3m. Flash Tripod Adaptor AS·11 The AS-11 enables the S8-16A. used as a - Nikon 4543 | Instruction Manual - Page 65
"RED EYE"------ Soft Flash Unit Case 55·16 The SS-16 accommodates the main flash unit of the S8-16 and both Flash Unit Couplers AS-8 and AS -9, one attached to the main flash unit, and one stored separately inside the pocket , with the Wide -Flash Adapter SW-7 attached to the flash head. If you do - Nikon 4543 | Instruction Manual - Page 66
avoid possible damage to the circuitry by battery leakage. If leakage should inadvertently occur, take the flash unit to your nearest Nikon authorized service facility. - To prevent damage to the flash unit 's electronic circuitry, keep the camera away from places where the temperature is likely to - Nikon 4543 | Instruction Manual - Page 67
salt water and out of the rain , - Never attempt to disassemble or repair the flash yourself. These delicate procedures should be left to an authorized service facility, 67 - Nikon 4543 | Instruction Manual - Page 68
OPTIMUM BATTERY PERFORMANCE------- New batteries. Between manufacturing and first use, all batteries exhibit some drain. Therefore , care should be taken to purchase the newest (and freshest) ones possible. To help you do this , some manufacturers stamp the date of manufacture on the bottom of each - Nikon 4543 | Instruction Manual - Page 69
AS -9) Electronic construction Automatic silicon· controlled rectifier and series circu itry Guide number at ASA/ISO At full output: 32 (52) with the 100 NiCd batteries recommended Number of flashes and recycling time (on manual at 25°C) Battery type Number of flashes' Recycling time ' - Nikon 4543 | Instruction Manual - Page 70
-SPECIFICATIONS-confinued----------- Manual exposure control Synchronization with motor driven camera Dimensions (W x H x D) SB·16A SB·16B Weight SB ·16A SB ·16B Accessories provided Full output at M setting Possible at MD setting with 1/16th of full output ; guide number is 8 at ASA/ISO 100 aM - Nikon 4543 | Instruction Manual - Page 71
71 - Nikon 4543 | Instruction Manual - Page 72
(1IIIro,,) No reproduction in any form of this manual , in whole or in part (except for brief quotation in critical articles or reviews). may be made without written authorization from Nippon Kogaku K.K. NIPPON KOGAKU K.K.
-
 1
1 -
 2
2 -
 3
3 -
 4
4 -
 5
5 -
 6
6 -
 7
7 -
8
-
9
-
10
-
11
-
12
-
13
-
14
-
15
-
16
-
17
-
18
-
19
-
20
-
21
-
22
-
23
-
24
-
25
-
26
-
27
-
28
-
29
-
30
-
31
-
32
-
33
-
34
-
35
-
36
-
37
-
38
-
39
-
40
-
41
-
42
-
43
-
44
-
45
-
46
-
47
-
48
-
49
-
50
-
51
-
52
-
53
-
54
-
55
-
56
-
57
-
58
-
59
-
60
-
61
-
62
-
63
-
64
-
65
-
66
-
67
-
68
-
69
-
70
-
71
-
72
 |
 |

Nikon
Speedlight
INSTRUCTION
MANUAL