Nikon 9235 Reference Manual
Nikon 9235 - Coolscan III Manual
 |
UPC - 018208092352
View all Nikon 9235 manuals
Add to My Manuals
Save this manual to your list of manuals |
Nikon 9235 manual content summary:
- Nikon 9235 | Reference Manual - Page 1
Nikon Scan 3 Reference Manual Overview (pp. 1-3) Getting Started (pp. 4-17) Tutorial (pp. 18-35) Reference (pp. 36-137) Appendices (pp. 138-152) - Nikon 9235 | Reference Manual - Page 2
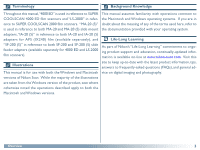
Overview About This Manual Welcome to Nikon Scan 3! At its most basic, Nikon Scan is source or acquire plug-in, allows you to open saved images, edit them, and save them to disk. Overview Supported scanners Nikon Scan 3 can be used with the following scanners: • 4000 ED (SUPER COOLSCAN 4000 ED) • - Nikon 9235 | Reference Manual - Page 3
This reference manual has been written to guide you through the process of using Nikon Scan to scan ) and other scan preferences. The manual ends with a series of appendices, including a visual index to the program's windows, menus, and dialogs, and instructions for reinstalling Nikon Scan. To make - Nikon 9235 | Reference Manual - Page 4
available separately for 4000 ED and LS-2000 film scanners). Illustrations This manual is for use with both the Windows and Macintosh versions of Nikon part of Nikon's "Life-Long Learning" commitment to ongoing product support and education, continually-updated information is available on-line at www - Nikon 9235 | Reference Manual - Page 5
Getting Started Installing Nikon Scan Before You Begin Installation (pp. 5-6) (pp. 7-17) About This Chapter This chapter takes you step-by-step through the process of installing Nikon Scan. Users who have already completed installation can proceed directly to the next chapter for a tutorial - Nikon 9235 | Reference Manual - Page 6
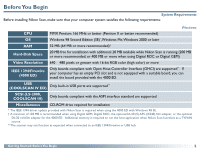
greater with 16-bit RGB color (high color) or more IEEE 1394/Firewire (4000 ED) Only boards compliant with Open Host-Controller Interface (OHCI) are supported**. If your computer has an empty PCI slot and is not equipped with a suitable board, you can install the board provided with the 4000 ED - Nikon 9235 | Reference Manual - Page 7
pixels or greater with 16-bit RGB color (thousands of colors) or more IEEE 1394/Firewire (4000 ED) Firewire Support 2.3.3 or later recommended† Built-in ports supported from Firewire Support 2.0. If you are using an old-model (beige) G3 desktop computer not equipped with a Firewire board, you can - Nikon 9235 | Reference Manual - Page 8
at the top left corner of the dialog, then click the Uninstall button to uninstall Nikon Scan. Nikon Scan 3 offers full support for the scanners supported under version 2.x. Users of Nikon Scan 2 can enjoy the improved functionality of Nikon Scan 3 while continuing to use their existing scanners - Nikon 9235 | Reference Manual - Page 9
Step 2-Start the installer Before starting installation of Nikon Scan, quit any other programs that may be running, including any viruschecking software. Insert the Nikon Scan 3 CD into the CD-ROM drive. After a pause, the Welcome dialog shown at right will open automatically. Windows Step 2-Start - Nikon 9235 | Reference Manual - Page 10
Scan. For information concerning installation and use, see the manuals provided. ReadMe Opens the ReadMe file, which may contain information that could not be included in the manual. Read this file before using Nikon Scan. Exit Exits the Welcome program - Nikon 9235 | Reference Manual - Page 11
the license agreement, take a few moments to view the ReadMe file, which may contain important information that could not be included in this manual. When you have finished, click Continue.... Step 5-Start the installation wizard The dialog shown at right will be displayed; click Next to proceed - Nikon 9235 | Reference Manual - Page 12
Step 6-Accept the license agreement The software license agreement will be displayed. After reading the agreement, click Yes to continue with installation. Step 7-Choose a location for Nikon Scan The default location for Nikon Scan is shown in the Destination Folder text box in the Choose - Nikon 9235 | Reference Manual - Page 13
Windows/Macintosh Step 8-Select an RGB profile When images are scanned in RGB, Nikon Scan uses calibrated RGB profiles to ensure consistent color reproduction. As part of the installation process, you can choose which of these profiles will be used as the default for the calibrated RGB color space - Nikon 9235 | Reference Manual - Page 14
8-3 Depending on your choice, you will be presented with one of the dialogs shown below. Narrow gamut: vivid, "saturated" colors Wide gamut: lowcontrast, "flat" colors Windows profiles (gamma 2.2) Macintosh profiles (gamma 1.8) Choose a profile from the list (sRGB is recommended for images - Nikon 9235 | Reference Manual - Page 15
8-4 A list of ten RGB color-space profiles will be displayed. Choose a profile for use as the initial calibrated RGB color space. The effects of the color range and gamma setting for each profile can be seen in the image to the right of the profile list. Select a profile and click OK. If you are not - Nikon 9235 | Reference Manual - Page 16
click Finish to display the ReadMe file. Take a few moments to view this file, which may contain information that could not be included in this manual. Step 10-Quit the installer Closing the ReadMe file returns you to the Welcome dialog. Click Exit to return to Windows. Windows Click here to - Nikon 9235 | Reference Manual - Page 17
Windows Step 11-Check that the Nikon Scan CD is in place If you will be connecting your scanner for the first time, before you will be able to use the device you will need to register it with the Windows Device Manager. Before proceeding to the next step, make sure the Nikon Scan 3 CD is inserted in - Nikon 9235 | Reference Manual - Page 18
-Register the scanner with Windows The registration process differs depending on the scanner and operating system used. Click here for step-by-step instructions on registering your scanner. Once you have registered your scanner, installation is complete. Click here to view the next chapter. Pg. For - Nikon 9235 | Reference Manual - Page 19
Tutorial Basic Scanning The Scan Window (pp. 19-25) Making a Scan (pp. 26-35) About This Chapter This chapter: • Introduces you to the scan window, the scanner control center • Takes you step-by-step through the process of making a scan This chapter provides enough information to enable you to - Nikon 9235 | Reference Manual - Page 20
the image into the host application, which can be any application that supports TWAIN (Windows) or Adobe Photoshop 5.0 plug-ins (Macintosh). • Nikon Scan from the host's import or acquire menu (see the host application manual for details). If you are using a Macintosh, the Nikon Scan 3.0 plugin - Nikon 9235 | Reference Manual - Page 21
Getting to Know the Scan Window Take a few moments to familiarize yourself with scan window controls. Thumbnail drawer tab Preview area (see 23) Control area Click to select frames to be scanned from multi-frame (see 21) film (this tab is not displayed when the MA-20 (S) or Contains the - Nikon 9235 | Reference Manual - Page 22
The Control Area Eject Button Autofocus Button Autoexposure Button Zoom Buttons Ejects film from multi-frame adapters (this button is disabled when the MA-20 (S) slide-mount adapter is in place). Control-click (Windows) or option-click (Macintosh) to eject a slide from the optional SF-200 (S) - Nikon 9235 | Reference Manual - Page 23
The Information Panel Orientation Dimensions/File Size Image Enhancement Scanner Extras Shows the orientation of the preview image relative to the original, reflecting any flips or rotations that have been performed. 44 Gives the height and width of the current crop in pixels, and the size of - Nikon 9235 | Reference Manual - Page 24
The Thumbnail Drawer Tab The Natural/Processed Tabs This tab is only displayed when a multi-frame adapter is inserted in the scanner. Clicking this tab opens the thumbnail drawer, where you can select the frame to be scanned by clicking the associated frame number. To view the frames as small - Nikon 9235 | Reference Manual - Page 25
The Tool Chest Layout Tools* Information* Crop† Curves* Use these tools to select the portion of the image to be scanned (the "crop") and to rotate and flip the image prior to scanning. You can also select a new focus area and scroll images that have been opened in Nikon Scan after scanning. 43 - Nikon 9235 | Reference Manual - Page 26
GEM: reduces the effect of film grain 51 This tool allows exposure for the colored elements in the scanner's light source to be adjusted manually. Use when you want to change exposure from the values produced by the autoexposure operation. 56 These tools offer you control over features specific - Nikon 9235 | Reference Manual - Page 27
Making a Scan The Basics This section covers the basics of making a scan, from opening the scan window to scanning an image into the host application. A detailed description of Nikon Scan's color editing and image enhancement features may be found in the following chapter. 1 STEP Open the scan - Nikon 9235 | Reference Manual - Page 28
Before making a scan, connect the scanner and turn it on as described in the scanner manual. You will also need to turn on your computer and wait for the operating system to start up. Step 1-Open the scan window Open the - Nikon 9235 | Reference Manual - Page 29
Step 4-Select the color model Select a color model according to how you intend to use the image. The options available depend on whether the Nikon Color Management system (CMS) is on (the default setting) or off. Option When to use it Grayscale Use for images that will be printed or displayed in - Nikon 9235 | Reference Manual - Page 30
or strip film without having to remove the media from the adapter between scans. The following multi-frame adapters are available for the Nikon scanners supported under Nikon Scan 3: • the SA-21 (4000 ED/COOLSCAN IV ED) and SA-20 (LS-2000/COOLSCAN III) strip-film adapters • the IA-20 (S) adapter - Nikon 9235 | Reference Manual - Page 31
By default, frames are identified by number only. To view a small preview image (thumbnail) for each frame, click the button. The button icon will change to ; click the button again to return to a frame number display. The frame to be scanned can be selected by clicking the associated frame number - Nikon 9235 | Reference Manual - Page 32
Step 6-Preview the frames to be scanned Click the Preview button. A preview of the image to be scanned will appear in the Natural and Processed tabs to the right of the control area. The Scan Progress window While scanning is in progress, the progress window will show the operation currently being - Nikon 9235 | Reference Manual - Page 33
Step 7-Open the Layout Tools palette Before scanning the image, you may need to use the Layout Tools in the Tool Chest to correct its orientation and select the area to be scanned. Click the triangle to the right of the palette to display the Layout Tools. Step 8-Adjust image orientation Depending - Nikon 9235 | Reference Manual - Page 34
Step 9-Select the area to be scanned After confirming that the crop button in the Layout Tools palette is selected, drag the mouse over the image to select the area to be scanned, also known as the "crop." You can change the size of the crop by dragging its borders, or move the entire crop to a new - Nikon 9235 | Reference Manual - Page 35
Step 10-Select an output resolution Click the triangle next to Crop in the Tool Chest to open the Crop palette. Enter a value for Resolution that matches the effective resolution of the printer or monitor on which the image will be displayed after scanning. Resolution can also be set by selecting an - Nikon 9235 | Reference Manual - Page 36
• Keep this crop Step 12-Adjust settings for the remaining frames Choose this option when you want to select the precise area If you selected multiple frames in the thumbnail drawer in Step to be scanned using the mouse, then adjust the output reso- 5, open the thumbnail drawer. The images - Nikon 9235 | Reference Manual - Page 37
Reference Getting the Most from Nikon Scan Adjusting Focus and Exposure (pp. 37-39) The Tool Chest (pp. 40-87) Reusing Settings (pp. 88-89) The Nikon Scan Applet (pp. 90-104) Preferences (pp. 105-137) About This Chapter This chapter covers scan window settings not detailed in the previous chapter, - Nikon 9235 | Reference Manual - Page 38
Adjusting Focus and Exposure Resetting Autofocus and Exposure Under normal circumstances, the scanner will automatically adjust focus and exposure before an image is displayed in the preview area. If the film is warped or uneven, however, part of the image may not be in focus, making it necessary to - Nikon 9235 | Reference Manual - Page 39
Selecting a New Focus Point • Control/option click the button Manual Focus Point Selection By default, clicking the button focuses the scanner on -Preview Settings 126 Preferences-Single Scan 128 Preferences-Batch Scan 58 Manual focus adjustment Reference: Adjusting Focus and Exposure 38 - Nikon 9235 | Reference Manual - Page 40
film or Auto exposure for positive film is turned off in the Preview Settings tab of the Preferences dialog, however, autoexposure must be performed manually before previewing media of the selected type. Similarly, if Auto exposure for negative film or Auto exposure for positive film is turned off - Nikon 9235 | Reference Manual - Page 41
The Tool Chest • Displaying the contents of a tool palette To display or hide the contents of a tool palette, click the Setting up Scans and Enhancing Images triangle to the left of the palette title. The Tool Chest contains the tool palettes you will use prior to scanning to select the area to - Nikon 9235 | Reference Manual - Page 42
• Opening a tool palette in a separate window Tool palettes can be opened in a separate window by clicking the palette title and dragging it outside the Tool Chest window to create a new Tool Chest window containing only the selected palette. Tools can be added to the new Tool Chest by dragging - Nikon 9235 | Reference Manual - Page 43
• Using the Tool Chest Between previewing an image and saving it to disk in the host application, there are four distinct stages to scanning an image, each involving separate tools: If you are using Nikon Scan as a stand-alone application, Stage 4 can be performed in the Nikon Scan applet after - Nikon 9235 | Reference Manual - Page 44
Setting up a Scan The Layout Tools, Information, and Crop Palettes The Layout Tools palette contains the following controls: Control Description Layout Tools The Layout Tools palette contains tools for use both in the scan window and in image windows opened in Nikon Scan applet when Nikon Scan - Nikon 9235 | Reference Manual - Page 45
Control Description Zoom Tool This tool is only available if Nikon Scan is being used as a stand-alone application and an image has been opened in the Nikon Scan applet, when it duplicates the function of the Zoom Cursor. For details, see 95. When the scan window is active, the zoom tool is - Nikon 9235 | Reference Manual - Page 46
Information This palette provides information about the size and location of the current crop, the position of the cursor within the active image, and the color of the pixel under the cursor. The Information palette contains the following items: Item X: Y: Description The vertical (Y) and - Nikon 9235 | Reference Manual - Page 47
Crop The Crop palette is where you specify the physical dimensions, or output size, of the image opened in the host application after scanning. How you set the output size depends on how you intend to use the image. • If the image will be printed or used in desktop publishing: After selecting a - Nikon 9235 | Reference Manual - Page 48
The Crop palette offers three methods for adjusting output size: • Keep this crop • Keep this output size Choose this option when you want to select the precise Choose this option when you want to select the general area to be scanned using the mouse, then adjust the output area to be scanned - Nikon 9235 | Reference Manual - Page 49
The other items in the Crop palette are described below: Input size File size Scale Output resolution menu Output size Output resolution Item Input size Description This display shows the dimensions of the current crop. The units for input size can be chosen from the menu to the right of the - Nikon 9235 | Reference Manual - Page 50
Item Description Choosing a resolution Scale Output resolution Scale (the output size relative to the size of the original) can be set by direct entry or using the Scale slider. Output resolution can be entered in this text box or set to match a particular output device by selecting the device - Nikon 9235 | Reference Manual - Page 51
The Crop Settings Menu Clicking the triangle at the top right of the Crop palette displays the Crop settings menu, where you can save or export crop settings and recall them as desired. The information saved includes scale, output resolution and size, and the size and location of the current crop. - Nikon 9235 | Reference Manual - Page 52
Retouching Photographs Digital ICE, Digital ROC, and Digital GEM (Digital ICE3) Nikon Scan is equipped with three photo retouch tools: Image Correction and Enhancement (ICE), Restoration of Color (ROC), and Grain Equalization and Management (GEM). These tools can be used to help repair defects - Nikon 9235 | Reference Manual - Page 53
Digital ICE is equivalent to the "Defect Correction" function in Nikon Scan 2. Digital ICE does not perform equally well with all types of film. If you are using Kodachrome film, you may find that Digital ICE does not have the desired effect, or that there is an overall degradation in image quality - Nikon 9235 | Reference Manual - Page 54
Grain Equalization and Management (GEM) Digital GEM, a tool for digitally reducing the effects of film grain, is built in to 4000 ED and COOLSCAN IV ED film scanners. To use Digital GEM, turn the Enable Post Processing check-box on and then select the amount of correction to be performed using the - Nikon 9235 | Reference Manual - Page 55
The Digital ICE3 Settings Menu Clicking the triangle at the top right of the Digital ICE Cubed palette displays the Digital ICE3 settings menu, where you can save or export image Digital ICE3 settings and recall them as desired. The Digital ICE3 settings menu contains the following options: Item - Nikon 9235 | Reference Manual - Page 56
adapter. LS-2000/COOLSCAN III only Option Description Pixel data size Manual focus adjustment Calibration Controls the amount of color information, or bit COOLSCAN III can not be adjusted. Allows you to adjust scanner focus manually using a slider or by direct text entry. Re-calibrates the - Nikon 9235 | Reference Manual - Page 57
Analog Gain The controls in the Analog Gain palette are used to adjust colors by modifying exposure for each of the colored elements in the scanner's light source. Gain is measured in Exposure Values (EVs), the same unit used for exposure compensation on many cameras. The controls for analog gain - Nikon 9235 | Reference Manual - Page 58
in use. This section lists the options available for the scanners and adapters supported under Nikon Scan 3. Bit Depth, Color, and File Size Scanning at a may be available on the web or from your nearest Nikon-authorized service center. For details, contact your Nikon representative or see the - Nikon 9235 | Reference Manual - Page 59
Manual Focus Adjustment Manual focus adjustment can be used when you are unable to obtain the desired results using autofocus. Adjust focus using the Position slider or enter a value - Nikon 9235 | Reference Manual - Page 60
Calibration Under most circumstances, calibration is performed automatically at intervals when no media are inserted in the scanner. If film has been left in the scanner for a long period of time, you may need to remove the film and click the Calibrate button to recalibrate the scanner. - Nikon 9235 | Reference Manual - Page 61
to images that show a normal balance among shadows, mid- night sky. tones, and highlights. Use a different setting only if you expe- rience problems scanning negatives using the automatic set- ting. • Lo-Cont. Highkey This setting is suited to low-contrast images with clearly-defined white areas - Nikon 9235 | Reference Manual - Page 62
Perform autofocus when film is inserted This check box is available only when the MA-20 (S) slide-mount adapter is inserted in a 4000 ED or COOLSCAN IV ED film scanner. When this option is checked, an autofocus operation will be automatically be performed when a slide is inserted in the adapter film - Nikon 9235 | Reference Manual - Page 63
IX240 Crop Choices IX240 crop choices for APS (IX240) film are available when the IA-20 (S) adapter (sold separately) is inserted in the 4000 ED, COOLSCAN IV ED, LS-2000, or COOLSCAN III. Slide Feeder Scan (4000 ED/LS-2000 only) This option is available when the SF-200 (S) slide feeder (sold - Nikon 9235 | Reference Manual - Page 64
Getting the Colors You Want: The Curves, Color Balance, and LCH Editor Palettes When scanning, you may come across images that are over- or under-exposed, obliterating details in highlights or shadows, or that show a general lack of contrast. You may also find that the colors are "flat" or - Nikon 9235 | Reference Manual - Page 65
Input is plotted along the horizontal axis, with shadows (the dark areas of the image) to the left, highlights (the bright areas of the image) to the right, and mid-tones in between. The left end of the axis marks the minimum possible value for colors in the selected channel (zero, or no color), the - Nikon 9235 | Reference Manual - Page 66
Step 1-Viewing the Histogram The first step in adjusting tone levels and color balance in the Curves palette is to view the histogram displayed in the background of the curve edit display. The histogram provides information on what tones are present in the image and in what amounts, information that - Nikon 9235 | Reference Manual - Page 67
Step 2-Channel Selection You can modify tones for all colors in the image using the master curve, or select any of the red, green, and blue or cyan, magenta, yellow, and black curves for editing using the channel menu (see right; when grayscale is selected, only the master curve [L] is displayed). - Nikon 9235 | Reference Manual - Page 68
Step 3-Setting the White Point and Black Point The endpoints of the curve are referred to as the "white point" and the "black point." The black point for a given channel represents the darkest shade (minimum value) for that color, the white point, the brightest shade (maximum value). In the CMYK - Nikon 9235 | Reference Manual - Page 69
Automatic Contrast Adjustment In automatic contrast adjustment, Nikon Scan automatically selects white and black points that exclude a certain percentage of the brightest and darkest pixels in the image, steepening curves for enhanced contrast (the exact percentage of pixels excluded can be - Nikon 9235 | Reference Manual - Page 70
White-Point and Black-Point Sliders The white-point and black-point sliders can be used to match the white and black points to the histogram displayed in the curve edit display. To edit the white point or black point, click the corresponding slider once to activate it, then drag it to the right or - Nikon 9235 | Reference Manual - Page 71
Sampling the Image for White Point or Black Point The white point or black point can be set by directly sampling the image, allowing you to choose the pixels that will be used to set the maximum (white point) or minimum (black point) output value. This makes it possible to set the black point by - Nikon 9235 | Reference Manual - Page 72
White Point and Black Point Output Levels Once you have set the input level for the black point and white point, output levels can be altered to reflect the actual shade of the darkest and brightest pixels in the image. If the darkest shade in the image represents a true black, for example, the - Nikon 9235 | Reference Manual - Page 73
Step 4-Setting the Gray Point The point midway between the maximum and minimum input values is known as the "gray point" (or "midpoint"). This point represents a neutral shade corresponding to an output level of 128. The gray point is controlled by a gray-point slider at the bottom of the curve edit - Nikon 9235 | Reference Manual - Page 74
Sampling the Image for Gray Point The gray point can also be set by direct sampling. Sampling the image leaves the selected pixel at its current brightness while adjusting color balance by altering the gray point for each of the component channels in the image. To sample the gray point, click the - Nikon 9235 | Reference Manual - Page 75
Step 5-Editing Curves Directly Fine adjustments can be made to brightness and contrast in specific portions of the tone range by adding additional points to the curves for each channel. These points can be freely adjusted by dragging them into new positions, changing the shape of the curve. - Nikon 9235 | Reference Manual - Page 76
The Curves Settings Menu Clicking the triangle at the top right of the Curves palette displays the Curves settings menu, where you can save or export curve settings and recall them as desired. Item Description Reset to Default Curve Settings Resets all curves to linear. Reset to Restores the - Nikon 9235 | Reference Manual - Page 77
Color Balance The Color Balance palette offers simple controls for adjusting overall brightness, contrast, and color balance for the entire image. Unlike the Curves palette, the Color Balance palette does not allow you to make changes that affect only a portion of the tone range. The controls - Nikon 9235 | Reference Manual - Page 78
Item Description While the brightness slider adjusts brightness for the image as a whole, the color-balance sliders (one for each channel in the current color model) allow the user to adjust brightColor ness for each color individually. For example, balance when the RGB color model is selected, - Nikon 9235 | Reference Manual - Page 79
The LCH Editor The LCH Editor models color using three components, Luminosity (brightness), Chroma (color saturation, or vividness), and Hue, each with its own edit display. The luminosity and chroma displays take the same form as the curve edit display in the Curves palette. By steepening the curve - Nikon 9235 | Reference Manual - Page 80
The desired editor can be chosen from the menu at the top the LCH Editor palette (see below). The Luminosity Editor Although it affects brightness rather than color, editing luminosity has a similar effect to editing the master curve in the Curves palette. Steepening the curve by, for example, - Nikon 9235 | Reference Manual - Page 81
The luminosity editor is shown below. Output level sliders Histogram Black point slider Input/output levels White point slider Gray point slider Item Description Histogram Shows the distribution of pixels of different luminosities in the input image. The horizontal axis shows luminosity (0- - Nikon 9235 | Reference Manual - Page 82
The Chroma Editor The chroma editor is a useful tool for adjusting color saturation. Steepening the curve increases saturation in the affected range, making colors more vivid. Flattening the curve results in flatter, less vivid colors. Moving the gray point to the left makes the image as a whole - Nikon 9235 | Reference Manual - Page 83
Item Description Black point slider Sets the minimum input level. Gray point Sets the gray point (gamma value) for slider chroma. White point slider Sets the maximum input level. Input/output Chroma input and output levels for the point levels under the cursor in the edit display. The - Nikon 9235 | Reference Manual - Page 84
The hue editor is shown below. The other controls in the hue editor are described below. Output slider Width slider Scale button To edit the hue curve, click once in the edit window to activate the hue editor, then click the point on the curve where it intersects with the portion of the - Nikon 9235 | Reference Manual - Page 85
The LCH Editor Settings Menu Clicking the triangle at the top right of the LCH Editor displays the LCH Editor settings menu, where you can save or export LCH settings and recall them as desired. The LCH Editor settings menu contains the following options: Item Description Reset to Default Resets - Nikon 9235 | Reference Manual - Page 86
Making Edges More Distinct Unsharp Mask Unsharp Mask is used to increase the sharpness of images by making edges more distinct. Unsharp Mask works by increasing the contrast of the edges in the image while leaving other areas untouched. The degree of sharpness is determined by three factors: - Nikon 9235 | Reference Manual - Page 87
Creating Unsharp Masks Step 1-Select a color Select a color from the color pop-up menu. The mask you create will be applied only to edges where the selected color predominates. To create a mask that applies to all colors, select All. Step 3-Check the results To compare the effects of the Unsharp - Nikon 9235 | Reference Manual - Page 88
The Unsharp Mask Settings Menu Clicking the triangle at the top right of the Unsharp Mask palette displays the Unsharp Mask settings menu, where you can save or export masks and recall them as desired. The Unsharp Mask settings menu contains the following options: Item Description Save Unsharp - Nikon 9235 | Reference Manual - Page 89
Reusing Settings The settings menu in the scan window control area allows you to save or export settings and recall them as desired. You can also create, restore, and delete default settings for multiframe adapters. The Settings Menu The following settings can be saved and recalled using the - Nikon 9235 | Reference Manual - Page 90
The options in the settings menu are described below. A Option Description Save Settings... Saves the current settings under a user-specified name. These settings will be added to the end of the settings menu, where they can be recalled by selecting the desired settings by name. Set User - Nikon 9235 | Reference Manual - Page 91
The Nikon Scan Applet Using Nikon Scan as a Stand-Alone Application When Nikon Scan is used as a TWAIN source or acquire plugin for another program such as Adobe Photoshop, its role is complete when the Scan button is clicked to scan the image into the host application. Any further operations - Nikon 9235 | Reference Manual - Page 92
The Nikon Scan Window (Windows) When you start the Nikon Scan applet in Windows, the Nikon Scan 3.0 window, containing a menu bar and toolbar, will open on the desktop. When you click the Scan button in the scan window, the resulting images will be opened separate image windows within the Nikon Scan - Nikon 9235 | Reference Manual - Page 93
The Toolbar (Windows) The Windows version of Nikon Scan includes a toolbar that allows access to many commonly used commands with a single click. The toolbar can be dragged out of the menu bar to a new position anywhere within the Nikon Scan window, where it will "float" in an independent window. - Nikon 9235 | Reference Manual - Page 94
Image Windows Unless Save to Disk is selected in the Preferences dialog, images scanned when Nikon Scan is used as a stand-alone application will be opened in separate image windows within the Nikon Scan applet. An image window is shown below. Windows Settings icon Zoom ratio Title bar Macintosh - Nikon 9235 | Reference Manual - Page 95
Viewing Information about the Image To view information about the image in an image window, click the settings icon, or select Settings Section from the View menu. Displaying the layout grid A layout grid can be displayed on the active window by checking Show Grid in the Layout Tools palette, or by - Nikon 9235 | Reference Manual - Page 96
Rotating and Flipping the Image The image in the active image window can be rotated or flipped using the tools in the Layout Tools palette, or by selecting Rotate CW (rotate clockwise), Rotate CCW (rotate counter-clockwise), Flip Horizontal, or Flip Vertical from the Transform sub-menu in the View - Nikon 9235 | Reference Manual - Page 97
Changing the Bit Depth and Color Model In the Windows version of Nikon Scan, you can change the color model and bit depth after scanning the image by selecting a new combination of color model and bit depth from the Document Color Space sub-menu in the Nikon Scan menu. The following options are - Nikon 9235 | Reference Manual - Page 98
Editing Images in the Nikon Scan Applet • LCH Editor Images opened in image windows within the Nikon Scan applet Make precise adjustments to brightness, color saturation, and can be edited using many of the tools available in the scan win- hue dow, including the following tool palettes: • - Nikon 9235 | Reference Manual - Page 99
desired drive and folder, enter a name for the image, and select a file type from the options available, then save the image. Files saved in a format supported by Nikon Scan can be opened in the Nikon Scan applet using the Open... option in the File menu. Choosing a Compression Ratio JPEG and PICT - Nikon 9235 | Reference Manual - Page 100
a JPEG file. This format can be read by most applications that support the JPEG format. Format Description Use TIFF when saving images for high- is not available in the Windows version of Nikon Scan, and does not support CMYK, sixteen-bit grayscale, or sixteen-bit RGB. This is the generic - Nikon 9235 | Reference Manual - Page 101
Printing Images The Print Setup dialog contains the following options: The image in the active window can be printed using the printing commands in the File menu. Windows Step 1-Set up your printer Before printing, select Print Setup... from the File menu to display the dialog shown below. Option - Nikon 9235 | Reference Manual - Page 102
Windows The Print Preview window contains the following buttons: Button Description Print Displays the Print dialog (see below). Next Page Previews the next page of a multi-page document. Step 3-Print the image To print the image, click the Print button in the Print Preview window, or select - Nikon 9235 | Reference Manual - Page 103
The Print dialog contains the following options: Windows Option Description Name Select the destination printer from this dropdown list. Properties Change settings for the selected printer. Print to file Check this box to print the image to disk. Scale If the image is larger than the - Nikon 9235 | Reference Manual - Page 104
bit-depth and color model Color Space for the image in the active image window. (Windows only) For details, see 96. Nikon Scan does not support simultaneous connection of more than one 4000 ED or of more than one COOLSCAN IV ED. If more than one scanner of the same type - Nikon 9235 | Reference Manual - Page 105
Option Bit Depth (Macintosh only) Film Type Eject Slide Feeder... Description If the scan window is active, this command can be used to choose a new setting for the Scan Bit Depth option in the Scanner Extras palette (see 57). If an image window is active, you can change the bit depth of the image - Nikon 9235 | Reference Manual - Page 106
Preferences • Viewing the Preferences Dialog To display the Preferences dialog, Fine Tuning Nikon Scan click the Prefs (Preferences) but- The settings in the Preferences dialog are used to modify the ton in the scan window. behavior of the controls in the scan window. If you are using Nikon - Nikon 9235 | Reference Manual - Page 107
The Preferences dialog contains separate tabs controlling: • The compensation performed when displaying images on the monitor (Gamma) • The profiles used to ensure consistent color reproduction across applications, as well as on your monitor and printer (Color Management) • The disk used for - Nikon 9235 | Reference Manual - Page 108
Nikon CMS off to edit uncalibrated RGB data from the scanner. can not be used when Nikon CMS is off, this adjustment must be made manually. The Color Management tab is where you turn Nikon CMS on and off and select the profiles for use with your monitor and the CMYK - Nikon 9235 | Reference Manual - Page 109
when your Nikon scanner. Fixed profiles detailing the color char- an image is displayed in the preview area or an image win- acteristics of supported Nikon scanners are provided with dow. Nikon Scan. An input profile is selected automatically based on the model of scanner used and the type of - Nikon 9235 | Reference Manual - Page 110
The Scanning Process The illustration below shows the role Nikon CMS plays in the scanning process. CMS profiles are shown in blue, user operations in red. When Nikon CMS is on, uncalibrated RGB image data from the scanner are converted to grayscale, CMYK, or calibrated RGB, depending on the color - Nikon 9235 | Reference Manual - Page 111
Color Management Preferences • Use Nikon Color Management System The profiles used by the Nikon Color Management System are This check-box turns the Nikon Color Management System specified by means of the Color Management tab in the Prefer- on and off. Changes to this setting only take effect - Nikon 9235 | Reference Manual - Page 112
The Monitor Sheet The Monitor sheet is where you can select the profile that will • Use factory default monitor profile (default) be used when images are displayed on your monitor, either in Nikon Scan is supplied with default monitor profiles for use the scan window preview area or a Nikon Scan - Nikon 9235 | Reference Manual - Page 113
The RGB Sheet The RGB sheet is where you select the color-space profile used for the calibrated RGB color model. The profile used can be selected from the Color space menu. Each of the profiles listed may be classified according to its gamma value and gamut. Gamma is a fundamental characteristic of - Nikon 9235 | Reference Manual - Page 114
Profiles can be further classified according to their gamut, or the range of colors that can be expressed using the profile. Gamut is conventionally expressed by means of chromaticity, a measure of color developed by the Commission Internationale de l'Éclairage (CIE). The CIE system, which is - Nikon 9235 | Reference Manual - Page 115
The following table shows the gamma values for the profiles included with Nikon CMS, together with the chromaticity values for the white point and for red, green, and blue. Profile White Point Gamma Chromaticity (x,y) Name Value Value Name R G B Apple RGB x 0.3127159 6500K (D65) y 0. - Nikon 9235 | Reference Manual - Page 116
Notes on RGB Profiles Provided with Nikon Scan Apple RGB (gamma 1.8) This profile is used in desk-top publishing applications and in Adobe Photoshop versions 4.0 or earlier, and is the typical RGB profile for Macintosh monitors. The corresponding RGB setting in Photoshop 5.0 is "Apple RGB." This - Nikon 9235 | Reference Manual - Page 117
sRGB (gamma 2.2) This RGB profile is used in the majority of Windows monitors. It closely resembles the RGB commonly used in color television, and is also used in the digital television broadcasting system that is on its way to becoming the industry standard in the United States of America. Software - Nikon 9235 | Reference Manual - Page 118
Wide Gamut RGB (compensated) (gamma 2.2) Nikon scanners can scan some colors that cannot be expressed using the Wide Gamut RGB color-space profile. The compensated Wide Gamut RGB profile redefines Wide Gamut RGB to include all the colors that can be output from the scanner. Because many of the - Nikon 9235 | Reference Manual - Page 119
The CMYK Sheet The CMYK sheet, shown below, is where you select a profile for • Use default CMYK (default) use with the CMYK color model. Nikon Scan is supplied with a default CMYK profile (the SWOP color library) for use when no other profile is avail- able. This profile is used when Use - Nikon 9235 | Reference Manual - Page 120
Keeping colors true in other applications Profile File name When an image is scanned in the Nikon Scan TWAIN source or acquire plug-in and opened in another application, or when an image saved using Nikon Scan is opened in another application, Wide Gamut RGB Apple RGB Color Match RGB NKWide.cim - Nikon 9235 | Reference Manual - Page 121
Scanning with Nikon CMS Off If the Use Nikon Color Management System check-box in the Color Management tab is off, profiles can not be used to ensure that the data from the scanner are reproduced accurately when passed to another application or displayed on the monitor. Because the color profiles - Nikon 9235 | Reference Manual - Page 122
The Gamma Tab The controls in the Gamma tab are only active if Nikon CMS is • Preview gamma off, when they are used to adjust data from the scanner so that Preview gamma applies to the image displayed in the preview they display correctly when previewed on your monitor or area of the scan window. - Nikon 9235 | Reference Manual - Page 123
chosen for preview gamma is applied before the data are passed to the host application. Use this setting when the host application does not support independent gamma settings and you want the final image to be modified for display on your monitor. Use application gamma In some environments, a value - Nikon 9235 | Reference Manual - Page 124
System Settings Choosing File Locations/Scratch Disks and File Types The File Locations/Scratch Disk and File Saving tabs allow you to adjust settings to suit your particular operating environment. The File Locations (Windows) or Scratch Disk (Macintosh) tab is where you choose the folder or disk - Nikon 9235 | Reference Manual - Page 125
The File Locations tab is shown below. Windows The Scratch Disks tab is shown below. Macintosh The folder currently selected for temporary storage is shown under Folder for Temporary Data. To choose a different location, click the button to the right of the text box and navigate to the desired - Nikon 9235 | Reference Manual - Page 126
the format most recently used to save images when Nikon Scan was used as a stand-alone application. Compression Level If the selected file type supports compression, you can control the amount using this menu. If this box is checked, you can choose a Use alternate creator code (Macintosh only - Nikon 9235 | Reference Manual - Page 127
Automating Tasks Single Scans, Batch Scans, and Automatic Actions Nikon Scan can be set to perform common tasks such as autofocus and exposure before making a preview, or to automatically preview images when film is inserted in the scanner. When Nikon Scan is used as a stand-alone application, you - Nikon 9235 | Reference Manual - Page 128
The Single Scan tab contains the following options: After scan Before scan Option Description Option Description Auto focus If this item is checked (the default setting), an autofocus operation will be performed as necessary before making a scan. Auto exposure for positive film If this - Nikon 9235 | Reference Manual - Page 129
The Batch Scan Tab The Batch Scan tab is used to specify the tasks performed auto- The Batch Scan tab contains the following options: matically before, during, and after batch scans. Before batch scan Option Description Prompt for this information If this item is checked (the default setting - Nikon 9235 | Reference Manual - Page 130
Before each image Option Description Auto focus If this item is checked (the default setting), an autofocus operation will be performed as necessary before each scan. Auto exposure If this item is checked (the default setting), an for positive autoexposure operation will be performed film as - Nikon 9235 | Reference Manual - Page 131
After each image Option Description Save to disk If this item is checked when Nikon Scan is used as a stand-alone application, the scanned images will be saved to disk instead of being opened in image windows in Nikon Scan. When the Scan button is clicked, a dialog will appear where you can - Nikon 9235 | Reference Manual - Page 132
The File Save Dialog (Batch Scans) When Save to disk is selected in the Batch Scan tab and Nikon Scan is used as a stand-alone application, the following dialog will appear when the Scan button is clicked. The File Saving Options dialog contains the following items: File Naming Files saved during a - Nikon 9235 | Reference Manual - Page 133
NEF,TIFF, JPEG, File Format PICT (Macintosh only), BMP (Windows only), and PICT JPEG (Macintosh only). Compression Level If the selected file type supports compression, you can control the amount using this menu. The Automatic Actions Tab The Automatic Actions tab sets the actions performed when - Nikon 9235 | Reference Manual - Page 134
adapter. If More than ten thumbnails is checked, the scanner will automatically generate thumbnails when film is inserted in an adapter that supports more than ten frames. Option Description If this item is checked, the scanner will automatically perform an autofocus opPerform eration when the - Nikon 9235 | Reference Manual - Page 135
Setting the Defaults for White Point, Gray Point, Black Point, and Auto Contrast The Advanced Color Tab Using the Advanced Color tab, you can specify output colors for the black, white, and gray points and change the size of the area sampled when the eyedropper tools in the Curves palette are used. - Nikon 9235 | Reference Manual - Page 136
Sample Point Size This setting determines the size of the area sampled when displaying the color value for the pixel under the cursor in the information window, or when the white-point, gray-point, and black-point tools are used in the Curves palette. You can select a sample sizes of 1 × 1, 3 × 3, - Nikon 9235 | Reference Manual - Page 137
The following options are available: Option Description Auto focus If this item is checked, an autofocus operation is performed as necessary when the Preview button is clicked. Auto exposure Check this item to perform an autoexpo- for positive sure operation as necessary when pre- film - Nikon 9235 | Reference Manual - Page 138
Setting Up a Layout Grid The following options are available: The Grid Tab The Grid tab determines the color and spacing of the grid displayed on the image in the active window when Show Grid is selected in the Layout Tools palette. Option Color Description The color of the grid is shown in the - Nikon 9235 | Reference Manual - Page 139
(pp. 139-145) Troubleshooting (pp. 146-147) Reinstall/Custom Install (pp. 148-152) About This Section The appendices provide: • A clickable index to Nikon Scan's windows, menus, and buttons • A guide to what to do when Nikon Scan does not function as expected • Instructions on reinstalling Nikon - Nikon 9235 | Reference Manual - Page 140
following pages provide a visual index to Nikon Scan's windows, menus, and palettes. For more information, click a menu option or tool button to open the manual to the page that explains its function. Information on menu commands not detailed elsewhere may be found in the notes on these pages. The - Nikon 9235 | Reference Manual - Page 141
The Tool Chest Layout Tools Information Crop Curves Color Balance LCH Editor Appendix A: Nikon Scan Visual Index 140 - Nikon 9235 | Reference Manual - Page 142
The Tool Chest (continued) Digital ICE Cubed Scanner Extras Analog Gain The Scan Progress Window Appendix A: Nikon Scan Visual Index 141 - Nikon 9235 | Reference Manual - Page 143
The Preferences Dialog Appendix A: Nikon Scan Visual Index 142 - Nikon 9235 | Reference Manual - Page 144
The Nikon Scan 3.0 Window (Windows) Image Window (Macintosh) Appendix A: Nikon Scan Visual Index 143 - Nikon 9235 | Reference Manual - Page 145
Nikon Scan Menus (Windows) Close Closes the active image window Save Saves the image in the active window under its existing name About Nikon Scan 3.0 Displays version information for Nikon Scan Edit Menu Commands The Undo (Ctrl Z), Cut (Ctrl X), and Paste (Ctrl V) commands are only active during - Nikon 9235 | Reference Manual - Page 146
Nikon Scan Menus (Macintosh) About Nikon Scan Displays version information for Nikon Scan New This command is always grayed out and unavailable. Close Closes the active image window Save Saves the image in the active window under its existing name Edit Menu Commands The Undo ( Z), Cut ( X), Paste - Nikon 9235 | Reference Manual - Page 147
Troubleshooting Should you encounter any problems using Nikon Scan, check the list below before contacting your retailer or Nikon representative. Problem as described in the hardware manual. Nikon Scan displays the error The application does not support Adobe Photoshop 5.0 plug-ins. - Nikon 9235 | Reference Manual - Page 148
Problem Possible Cause • The monitor profile chosen in the Color Management tab of the Preferences dialog does not match your monitor. • The CMYK profile chosen for resolution in the Crop palette is too high. 111 118 112 63 46 39 60 - 111 118 112 121 - 46 85 47 Appendix B:Troubleshooting 147 - Nikon 9235 | Reference Manual - Page 149
Appendix C Reinstall/Custom Install When Nikon Scan does not function as expected (see Appendix B, "Troubleshooting"), it may indicate that you need to reinstall the program. This appendix describes how to uninstall and reinstall Nikon Scan on both the Macintosh and - Nikon 9235 | Reference Manual - Page 150
begin deinstallation. If any of the components used by Nikon Scan are also used by another program, a confirmation dialog will be displayed. Follow the instructions in the dialog to remove the component or leave it untouched. Click here to proceed to the next step. Depending on where you purchased - Nikon 9235 | Reference Manual - Page 151
Windows Step 3-Delete scanner settings Delete all files in the following folders: • Windows 98 Second Edition (SE)/Windows Me Windows\Application Data\Nikon\MaidMods\Settings Windows\Application Data\Nikon\Nikon Scan\3.0\Cache Windows\Application Data\Nikon\Nikon Scan\3.0\Settings • Windows 2000 - Nikon 9235 | Reference Manual - Page 152
may affect the operation of Nikon Scan after reinstallation. To prevent this problem, Nikon Scan comes with a special utility, called RegSweeper, which CD in the folder NKScan\NikonScan3\Utilities\PDFfile. To view the manual using Adobe Acrobat Reader, doubleclick the RegSweeper.pdf icon. Macintosh - Nikon 9235 | Reference Manual - Page 153
Custom Install (Macintosh Only) The Macintosh version of the Nikon Scan installer comes with a custom install option that allows you to choose the components that will be installed. To perform a custom install: Step 3-Select components The installer dialog will display the options shown below.
-
 1
1 -
 2
2 -
 3
3 -
 4
4 -
 5
5 -
 6
6 -
 7
7 -
8
-
9
-
10
-
11
-
12
-
13
-
14
-
15
-
16
-
17
-
18
-
19
-
20
-
21
-
22
-
23
-
24
-
25
-
26
-
27
-
28
-
29
-
30
-
31
-
32
-
33
-
34
-
35
-
36
-
37
-
38
-
39
-
40
-
41
-
42
-
43
-
44
-
45
-
46
-
47
-
48
-
49
-
50
-
51
-
52
-
53
-
54
-
55
-
56
-
57
-
58
-
59
-
60
-
61
-
62
-
63
-
64
-
65
-
66
-
67
-
68
-
69
-
70
-
71
-
72
-
73
-
74
-
75
-
76
-
77
-
78
-
79
-
80
-
81
-
82
-
83
-
84
-
85
-
86
-
87
-
88
-
89
-
90
-
91
-
92
-
93
-
94
-
95
-
96
-
97
-
98
-
99
-
100
-
101
-
102
-
103
-
104
-
105
-
106
-
107
-
108
-
109
-
110
-
111
-
112
-
113
-
114
-
115
-
116
-
117
-
118
-
119
-
120
-
121
-
122
-
123
-
124
-
125
-
126
-
127
-
128
-
129
-
130
-
131
-
132
-
133
-
134
-
135
-
136
-
137
-
138
-
139
-
140
-
141
-
142
-
143
-
144
-
145
-
146
-
147
-
148
-
149
-
150
-
151
-
152
-
153
 |
 |

Nikon Scan 3 Reference Manual
Overview
(pp. 1–3)
Getting Started
(pp. 4–17)
Tutorial
(pp. 18–35)
Reference
(pp. 36–137)
Appendices
(pp. 138–152)