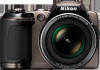
Nikon COOLPIX L120 User Manual - Page 120
The Clock Battery, Home Time Zone, Daylight Saving Time, Imprinting the Date on Images, Print date
 |
View all Nikon COOLPIX L120 manuals
Add to My Manuals
Save this manual to your list of manuals |
Page 120 highlights
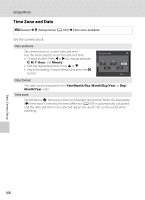
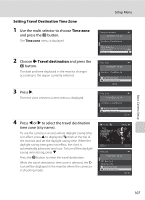
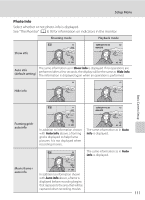
Basic Camera Setup Setup Menu C The Clock Battery The camera's clock is powered by a clock battery that is independent of the batteries that power the camera. The clock battery charges when the main batteries are installed or an AC adapter is connected, and can provide several days of backup power after about 10 hours of charging. C w (Home Time Zone) • To switch to the home time zone, choose w Home time zone in step 2 and press the k button. • To change the home time zone, choose w Home time zone in step 2 and perform steps 3 and 4, to set the home time zone. C Daylight Saving Time When the daylight saving time begins or ends, turn the daylight saving time option on or off using the time zone selection screen in Step 4. D Imprinting the Date on Images After setting the date and time, set the Print date setting (A 112) in the setup menu. Once Print date is set, the shooting date and time can be imprinted on the image data when taking pictures. 108
-
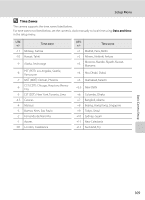
 1
1 -
2
-
3
-
4
-
5
-
6
-
7
-
8
-
9
-
10
-
11
-
12
-
13
-
14
-
15
-
16
-
17
-
18
-
19
-
20
-
21
-
22
-
23
-
24
-
25
-
26
-
27
-
28
-
29
-
30
-
31
-
32
-
33
-
34
-
35
-
36
-
37
-
38
-
39
-
40
-
41
-
42
-
43
-
44
-
45
-
46
-
47
-
48
-
49
-
50
-
51
-
52
-
53
-
54
-
55
-
56
-
57
-
58
-
59
-
60
-
61
-
62
-
63
-
64
-
65
-
66
-
67
-
68
-
69
-
70
-
71
-
72
-
73
-
74
-
75
-
76
-
77
-
78
-
79
-
80
-
81
-
82
-
83
-
84
-
85
-
86
-
87
-
88
-
89
-
90
-
91
-
92
-
93
-
94
-
95
-
96
-
97
-
98
-
99
-
100
-
101
-
102
-
103
-
104
-
105
-
106
-
107
-
108
-
109
-
110
-
111
-
112
-
113
-
114
-
 115
115 -
 116
116 -
 117
117 -
 118
118 -
 119
119 -
 120
120 -
 121
121 -
 122
122 -
 123
123 -
 124
124 -
 125
125 -
126
-
127
-
128
-
129
-
130
-
131
-
132
-
133
-
134
-
135
-
136
-
137
-
138
-
139
-
140
-
141
-
142
-
143
-
144
-
145
-
146
-
147
-
148
-
149
-
150
-
151
-
152
-
153
-
154
-
155
-
156
-
157
-
158
-
159
-
160
-
161
-
162
-
163
-
164
 |
 |