Nikon COOLPIX L610 Reference Manual - Page 62
Notes About Capturing 3D Images
 |
View all Nikon COOLPIX L610 manuals
Add to My Manuals
Save this manual to your list of manuals |
Page 62 highlights
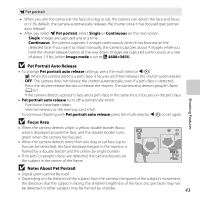
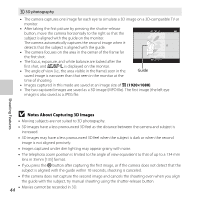
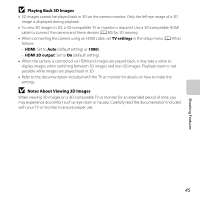
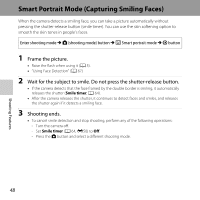
s 3D photography • The camera captures one image for each eye to simulate a 3D image on a 3D-compatible TV or monitor. • After taking the first picture by pressing the shutter-release button, move the camera horizontally to the right so that the subject is aligned with the guide on the monitor. The camera automatically captures the second image when it detects that the subject is aligned with the guide. • The camera focuses on the area in the center of the frame for the first shot. • The focus, exposure, and white balance are locked after the Cancel first shot, and R is displayed on the monitor. • The angle of view (i.e., the area visible in the frame) seen in the Guide saved image is narrower than that seen in the monitor at the time of shooting. • Images captured in this mode are saved at an image size of n (1920×1080). • The two captured images are saved as a 3D image (MPO file). The first image (the left eye image) is also saved as a JPEG file. Shooting Features B Notes About Capturing 3D Images • Moving subjects are not suited to 3D photography. • 3D images have a less pronounced 3D feel as the distance between the camera and subject is increased. • 3D images may have a less pronounced 3D feel when the subject is dark or when the second image is not aligned precisely. • Images captured under dim lighting may appear grainy with noise. • The telephoto zoom position is limited to the angle of view equivalent to that of up to a 134 mm lens in 35mm [135] format. • If you press the k button after capturing the first image, or if the camera does not detect that the subject is aligned with the guide within 10 seconds, shooting is canceled. • If the camera does not capture the second image and cancels the shooting even when you align the guide with the subject, try manual shooting using the shutter-release button. 44 • Movies cannot be recorded in 3D.
-
 1
1 -
2
-
3
-
4
-
5
-
6
-
7
-
8
-
9
-
10
-
11
-
12
-
13
-
14
-
15
-
16
-
17
-
18
-
19
-
20
-
21
-
22
-
23
-
24
-
25
-
26
-
27
-
28
-
29
-
30
-
31
-
32
-
33
-
34
-
35
-
36
-
37
-
38
-
39
-
40
-
41
-
42
-
43
-
44
-
45
-
46
-
47
-
48
-
49
-
50
-
51
-
52
-
53
-
54
-
55
-
56
-
 57
57 -
 58
58 -
 59
59 -
 60
60 -
 61
61 -
 62
62 -
 63
63 -
 64
64 -
 65
65 -
 66
66 -
 67
67 -
68
-
69
-
70
-
71
-
72
-
73
-
74
-
75
-
76
-
77
-
78
-
79
-
80
-
81
-
82
-
83
-
84
-
85
-
86
-
87
-
88
-
89
-
90
-
91
-
92
-
93
-
94
-
95
-
96
-
97
-
98
-
99
-
100
-
101
-
102
-
103
-
104
-
105
-
106
-
107
-
108
-
109
-
110
-
111
-
112
-
113
-
114
-
115
-
116
-
117
-
118
-
119
-
120
-
121
-
122
-
123
-
124
-
125
-
126
-
127
-
128
-
129
-
130
-
131
-
132
-
133
-
134
-
135
-
136
-
137
-
138
-
139
-
140
-
141
-
142
-
143
-
144
-
145
-
146
-
147
-
148
-
149
-
150
-
151
-
152
-
153
-
154
-
155
-
156
-
157
-
158
-
159
-
160
-
161
-
162
-
163
-
164
-
165
-
166
-
167
-
168
-
169
-
170
-
171
-
172
-
173
-
174
-
175
-
176
-
177
-
178
-
179
-
180
-
181
-
182
-
183
-
184
-
185
-
186
-
187
-
188
-
189
-
190
-
191
-
192
-
193
-
194
-
195
-
196
-
197
-
198
-
199
-
200
-
201
-
202
-
203
-
204
-
205
-
206
-
207
-
208
-
209
-
210
-
211
-
212
-
213
-
214
-
215
-
216
-
217
-
218
-
219
-
220
-
221
-
222
-
223
-
224
-
225
-
226
-
227
-
228
-
229
-
230
-
231
-
232
-
233
-
234
-
235
-
236
-
237
-
238
-
239
-
240
-
241
-
242
-
243
-
244
-
245
-
246
-
247
-
248
-
249
-
250
-
251
-
252
 |
 |