Nikon COOLPIX P900 Quick Start Guide for customers in Europe
Nikon COOLPIX P900 Manual
 |
View all Nikon COOLPIX P900 manuals
Add to My Manuals
Save this manual to your list of manuals |
Nikon COOLPIX P900 manual content summary:
- Nikon COOLPIX P900 | Quick Start Guide for customers in Europe - Page 1
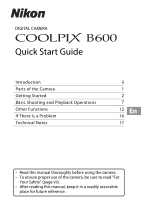
DIGITAL CAMERA Quick Start Guide Introduction ii Parts of the Camera 1 Getting Started 2 Basic Shooting and Playback Operations 7 Other Functions 12 If There Is a Problem 16 Technical Notes 17 • Read this manual thoroughly before using the camera. • To ensure proper use of the camera, - Nikon COOLPIX P900 | Quick Start Guide for customers in Europe - Page 2
accessories • Solutions when there is a problem or an error message is displayed Connecting to a Smart Device SnapBridge Connection Guide: Explains how to connect the camera with smart devices. You can download the latest version (PDF format) from our Download Center. See the "Reference Manual - Nikon COOLPIX P900 | Quick Start Guide for customers in Europe - Page 3
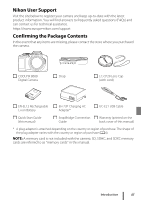
contact the store where you purchased the camera. COOLPIX B600 Digital Camera Strap LC-CP29 Lens Cap (with cord) EN-EL12 Rechargeable Li-ion Battery EH-73P Charging AC Adapter* UC-E21 USB Cable Quick Start Guide (this manual) SnapBridge Connection Guide Warranty (printed on the back cover - Nikon COOLPIX P900 | Quick Start Guide for customers in Europe - Page 4
Devices • SnapBridge: When you establish a wireless connection, this app enables you to upload images and movies to your smart device. See the included "SnapBridge Connection Guide" for information on how to download the app and establish a connection. iv Introduction - Nikon COOLPIX P900 | Quick Start Guide for customers in Europe - Page 5
Accessories Nikon COOLPIX cameras are designed to the highest standards and include complex electronic circuitry. Only Nikon brand electronic accessories (including battery chargers, batteries, AC adapters, and USB cables) certified by Nikon specifically for use with this Nikon digital camera - Nikon COOLPIX P900 | Quick Start Guide for customers in Europe - Page 6
without Nikon's prior written permission. • Illustrations and screen content shown in this manual may differ from the actual product. • Nikon reserves the transferring ownership to another person, make sure to reset all of the camera's settings in Reset all in the setup menu (A14). After resetting, - Nikon COOLPIX P900 | Quick Start Guide for customers in Europe - Page 7
Safety" in its entirety before using this product. Keep these safety instructions where all those who use this product will read them. DANGER the product producing smoke, heat, or unusual odors, immediately disconnect the battery or power source. Continued operation could result in fire, burns or - Nikon COOLPIX P900 | Quick Start Guide for customers in Europe - Page 8
radio-frequency emissions produced by this product could interfere with equipment onboard aircraft or in hospitals or other medical facilities. • Remove the battery and disconnect the AC adapter if this product will not be used for an extended period. Failure to observe this precaution could result - Nikon COOLPIX P900 | Quick Start Guide for customers in Europe - Page 9
fire or product malfunction. • Do not transport the camera with a tripod or similar accessory attached. Failure to observe this precaution could result in injury or product malfunction. DANGER for Batteries • Do not mishandle batteries. Failure to observe the following precautions could result in - Nikon COOLPIX P900 | Quick Start Guide for customers in Europe - Page 10
• If battery liquid comes into contact with a person's skin or clothing, immediately rinse the affected area with plenty of clean water. Failure to observe this precaution could result in skin irritation. x Introduction - Nikon COOLPIX P900 | Quick Start Guide for customers in Europe - Page 11
Parts of the Camera The Camera Body 34 5 2 1 8 9 10 11 12 67 15 14 13 1 Zoom control 2 Shutter-release button 3 Power switch/power-on lamp (charge lamp) 4 Mode dial 5 Flash 6 q (snap-back zoom) button 7 Side zoom control 8 b (e movie-record) button 9 s (display) button 10 c (playback) - Nikon COOLPIX P900 | Quick Start Guide for customers in Europe - Page 12
Getting Started How to Attach the Strap and Lens Cap Attach the lens cap to the strap, and then attach the strap to the camera. Attach the strap at two places. B Lens Cap When the camera is not in use, attach the lens cap to the lens to protect it. 2 Getting Started - Nikon COOLPIX P900 | Quick Start Guide for customers in Europe - Page 13
have turned off, and then open the battery-chamber/memory card slot cover. • Move the battery latch to eject the battery. • Gently push the memory card into the camera to partially eject the memory card. • Be careful when handling the camera, battery, and memory card immediately after using the - Nikon COOLPIX P900 | Quick Start Guide for customers in Europe - Page 14
the country or region of purchase. The shape of the plug adapter varies with the country or region of purchase. • Charging starts when the camera is connected to an electrical outlet while the battery is inserted, as shown in the illustration. The power-on lamp (charge lamp) slowly flashes while the - Nikon COOLPIX P900 | Quick Start Guide for customers in Europe - Page 15
USB-AC adapter or a battery charger for a mobile phone. Failure to observe this precaution could result in overheating or in damage to the camera. Camera Setup When the camera is turned on for the press the k button. Cancel Choose time zone and set date and time? Yes No Cancel Getting Started 5 - Nikon COOLPIX P900 | Quick Start Guide for customers in Europe - Page 16
press I to turn it off, the time goes back one hour. London, Casablanca Back 4 Press HI to select a date format and press the k button. 5 Enter the current date and time for the camera clock and press the k button. • Press JK to highlight items and press HI to change. • Select the minute field - Nikon COOLPIX P900 | Quick Start Guide for customers in Europe - Page 17
memory. • Press the s (display) button to switch the information displayed on the screen each time. 25m 0s 500 Battery level indicator Number of exposures remaining 2 Hold the camera steady. • Keep fingers and other objects away from the lens, flash, AF-assist illuminator, microphone, and speaker - Nikon COOLPIX P900 | Quick Start Guide for customers in Europe - Page 18
. • When you are using digital zoom, the camera focuses in the center of the frame and the focus area is not displayed. • If the focus area or focus indicator flashes, the camera is unable to focus. Modify the composition and try pressing the shutter-release button halfway again. 5 Without lifting - Nikon COOLPIX P900 | Quick Start Guide for customers in Europe - Page 19
the power switch or shutter-release button. C When Using a Tripod • We recommend using a tripod to stabilize the camera in the following situations: the flash does not fire - When the zoom is at a telephoto position • When using a tripod to stabilize the camera during shooting, set Photo VR to Off - Nikon COOLPIX P900 | Quick Start Guide for customers in Europe - Page 20
hold down the c button while the camera is turned off, the camera turns on in playback mode. 2 Use to shooting mode, press the c button or shutter-release button. • When e is displayed in full-frame 4/4 • Move the zoom control toward g (i) in full-frame playback mode to zoom in on an image. - Nikon COOLPIX P900 | Quick Start Guide for customers in Europe - Page 21
Deleting Images 1 In playback mode, press the l (delete) button to delete the image currently displayed on the screen. 2 Use the multi selector HI to select the desired deletion method and press the k button. • To exit without deleting, press the d button. Delete Current image Erase selected - Nikon COOLPIX P900 | Quick Start Guide for customers in Europe - Page 22
or self-collage function to take pictures. • M (Short movie show) mode The camera creates a short movie that is up to 30 seconds long (e 1080/30p or S shooting mode or while the setting screen is displayed. Press the shutter-release button halfway to quickly switch to shooting mode. You can show or - Nikon COOLPIX P900 | Quick Start Guide for customers in Europe - Page 23
to shooting conditions. When m (fill flash) is selected, the flash always fires. Self-timer 2 The camera releases the shutter when the set number of seconds elapses after you press the shutter-release button. 3 Macro mode Use macro mode when you take close-up pictures. • Creative slider When - Nikon COOLPIX P900 | Quick Start Guide for customers in Europe - Page 24
Menu Operations You can press the d (menu) button to display the menu screen and change the camera's settings. • The displayed menu varies depending on the status of the camera (during shooting or playback). • Menu items are categorized by the icons on the left side of the screen. When shooting - Nikon COOLPIX P900 | Quick Start Guide for customers in Europe - Page 25
Monitor settings Date stamp Self-timer: after release Photo VR AF assist 5 Press HI to select a menu option, and press the k button to confirm the selection. • Certain options cannot be selected depending on the current shooting mode or the state of the camera. 6 Press HI to select a setting, and - Nikon COOLPIX P900 | Quick Start Guide for customers in Europe - Page 26
Is a Problem Troubleshooting If the camera fails to function as expected, check the following before consulting your retailer or Nikon-authorized service representative. • Turning off the camera once may solve the issue. • If you cannot find a relevant entry, also check "If There Is a Problem" in - Nikon COOLPIX P900 | Quick Start Guide for customers in Europe - Page 27
more information, contact the retailer or the local authorities in charge of waste management. DISPOSE OF USED BATTERIES ACCORDING TO THE INSTRUCTIONS. This symbol on the battery indicates that the battery is to be collected separately. The following apply only to users in European countries: • All - Nikon COOLPIX P900 | Quick Start Guide for customers in Europe - Page 28
accept liability for use in other countries. Users who are unsure as to the original country of sale should consult with their local Nikon service center or Nikon-authorized service representative. This restriction applies to wireless operation only and not to any other use of the product. Security - Nikon COOLPIX P900 | Quick Start Guide for customers in Europe - Page 29
Corporation declares that the radio equipment type COOLPIX B600 is in compliance with Directive 2014/53/EU. The full text of the EU declaration of conformity is available at the following internet address: https://imaging.nikon.com/support/pdf/DoC_N1811.pdf. • Maximum output power: - Wi-Fi: 11.3 dBm - Nikon COOLPIX P900 | Quick Start Guide for customers in Europe - Page 30
or magnetic fields. Doing so could result in loss of data or camera malfunction. Do Not Point the Lens at Strong Light Sources for Extended Before Removing or Disconnecting the Power Source or Memory Card Do not remove the battery while the product is on, or while images are being saved or deleted. - Nikon COOLPIX P900 | Quick Start Guide for customers in Europe - Page 31
, or green) or always off (black), this is not a malfunction and has service representative. • After removing the battery from the camera or optional battery charger, put the battery in a plastic bag, etc. in order to insulate it. Charging the Battery Check the battery level before using the camera - Nikon COOLPIX P900 | Quick Start Guide for customers in Europe - Page 32
use. Charging an Exhausted Battery Turning the camera on or off while an exhausted battery is inserted in the camera may result in reduced battery life. Charge the exhausted battery before use. Storing the Battery • Always remove the battery from the camera or optional battery charger when it is - Nikon COOLPIX P900 | Quick Start Guide for customers in Europe - Page 33
covered by the warranty. Storage Remove the battery if the camera will not be used for an extended period. To prevent mold or mildew, take the camera out of storage at least once a month. Turn the camera on and release the shutter a few times before putting the camera away again. Do not store the - Nikon COOLPIX P900 | Quick Start Guide for customers in Europe - Page 34
Memory Cards That Can Be Used The camera supports SD, SDHC, and SDXC memory cards. • Memory cards with and logos are registered trademarks owned by Bluetooth SIG, Inc. and any use of such marks by Nikon Corporation is under license. • Apple®, App Store®, the Apple logos, Mac, OS X, macOS, iPhone - Nikon COOLPIX P900 | Quick Start Guide for customers in Europe - Page 35
-Fi Alliance. • All other trade names mentioned in this manual or the other documentation provided with your Nikon product are the trademarks or registered trademarks of their respective holders. Use of the Made for Apple badge means that an accessory has been designed to connect specifically to the - Nikon COOLPIX P900 | Quick Start Guide for customers in Europe - Page 36
26 Technical Notes - Nikon COOLPIX P900 | Quick Start Guide for customers in Europe - Page 37
Technical Notes 27 - Nikon COOLPIX P900 | Quick Start Guide for customers in Europe - Page 38
within the sales territory of Nikon Europe B.V. (e.g. Europe/Russia/others). See details under: https://www.europe-nikon.com/support In order to avoid any unnecessary inconvenience, we advise you to read the user manuals carefully before contacting the dealer or our authorized service network. Your - Nikon COOLPIX P900 | Quick Start Guide for customers in Europe - Page 39
to use the product for its normal purpose or according to the user instructions on the proper use and maintenance, and to installation or use of the against the dealer arising from their sales/purchase contract. Notice: An overview of all authorized Nikon Service Stations can be found online by - Nikon COOLPIX P900 | Quick Start Guide for customers in Europe - Page 40
No reproduction in any form of this manual, in whole or in part (except for brief quotation in critical articles or reviews), may be made without written authorization from NIKON CORPORATION. 2019 CT9F03(11) 6MQ02411-03
-
 1
1 -
 2
2 -
 3
3 -
 4
4 -
 5
5 -
 6
6 -
 7
7 -
8
-
9
-
10
-
11
-
12
-
13
-
14
-
15
-
16
-
17
-
18
-
19
-
20
-
21
-
22
-
23
-
24
-
25
-
26
-
27
-
28
-
29
-
30
-
31
-
32
-
33
-
34
-
35
-
36
-
37
-
38
-
39
-
40
 |
 |
DIGITAL CAMERA
Quick Start Guide
Introduction
ii
Parts of the Camera
1
Getting Started
2
Basic Shooting and Playback Operations
7
Other Functions
12
If There Is a Problem
16
Technical Notes
17
•
Read this manual thoroughly before using the camera.
•
To ensure proper use of the camera, be sure to read “For
Your Safety” (page vii).
•
After reading this manual, keep it in a readily accessible
place for future reference.