Nikon D700 Quick Guide
Nikon D700 - Digital Camera SLR Manual
 |
UPC - 018208096220
View all Nikon D700 manuals
Add to My Manuals
Save this manual to your list of manuals |
Nikon D700 manual content summary:
- Nikon D700 | Quick Guide - Page 1
cv 1 - Nikon D700 | Quick Guide - Page 2
Dials 18 Release Mode 23 Using the Flash 24 Live View 26 g Hand-Held 26 h Tripod 28 Picture Controls 30 Custom Picture Controls 32 The Fn Button 34 Guides and Tips 35 Help 35 Formatting Memory Cards 35 Two-Button Reset: Restoring Default Settings 35 Menu Guide 36 D PLAYBACK MENU 36 - Nikon D700 | Quick Guide - Page 3
Quick Start Guide Follow these steps for a quick start with your camera. 1 Attach the strap. 2 Charge the battery. 3 Insert the battery. 4 Attach a lens. Rotate the lens until it clicks into place. Mounting index 3 - Nikon D700 | Quick Guide - Page 4
Quick Start Guide 5 Insert a Type I CompactFlash memory card (q). When the memory card is fully inserted, the eject button will pop up (w) and the green access lamp will light briefly. 6 Turn the camera on. See page 38 of the User's Manual for information on choosing a language and setting the time - Nikon D700 | Quick Guide - Page 5
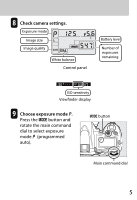
8 Check camera settings. Exposure mode Image size Image quality White balance Control panel Battery level Number of exposures remaining ISO sensitivity Viewfinder display 9 Choose exposure mode e. Press the I button and rotate the main command dial to select exposure mode e ( - Nikon D700 | Quick Guide - Page 6
Quick Start Guide 10 Choose single frame release mode. Hold the release mode dial AF). This allows the focus point to be selected manually. AF-area mode selector 12 Rotate the focus- mode selector to S (single-servo AF). The camera focuses when the shutter-release button is pressed halfway, and - Nikon D700 | Quick Guide - Page 7
13 Press the shutter-release button halfway to focus, then press it the rest of the way down to take the photograph. Focus indicator Viewing and Deleting Photographs Press K to view photographs. Press O twice to delete the photograph currently displayed in the monitor. 7 - Nikon D700 | Quick Guide - Page 8
fully charged. If in doubt, charge the battery before use or use an EH-5a or EH-5 AC adapter (available separately). Supported Operating Systems The camera can be connected to computers running the following operating systems: • Windows: Windows Vista Service Pack 1 (32-bit Home Basic/Home Premium - Nikon D700 | Quick Guide - Page 9
1 Turn the camera off. Turn the camera off and confirm that a memory card is inserted. 2 Turn the computer on and connect the supplied UC- E4 USB cable as shown below. Do not use force or attempt to insert the connectors at an angle. Connect the camera directly to the computer; do not connect the - Nikon D700 | Quick Guide - Page 10
start automatically if Yes was selected in the Auto-Launch setting dialog when Nikon Transfer was first installed. 4 Confirm that the camera is displayed in the transfer options "Source" panel. If the camera is not displayed, check that the camera is on D700 and connected to the computer. 10 - Nikon D700 | Quick Guide - Page 11
5 Click Start Transfer. At default settings, all pictures on the camera memory card will be transferred. When transfer is complete, pictures will be displayed in ViewNX. Start Transfer button ViewNX ViewNX is used to view photographs after they have been transferred to the computer. ViewNX can - Nikon D700 | Quick Guide - Page 12
the following palettes. • Folders: Navigate the folder tree. • Metadata: View information (including XMP/IPTC data) on selected photographs • Quick Adjustment: Make simple changes to NEF (RAW) images, including adjustments to exposure compensation, white balance and Picture Control settings. 12 - Nikon D700 | Quick Guide - Page 13
when shutter-release button is pressed halfway. In mode S (single-servo AF), focus locks when the camera focuses. In mode C (continuous-servo AF), the camera continues to adjust focus until the shutter is released (pg. 39). Mode M (manual) Focus is adjusted manually using the lens focusing ring. 13 - Nikon D700 | Quick Guide - Page 14
image is zoomed in, press the W button to zoom out. AF-area mode selector Choose how the camera selects the focus point for autofocus. H Auto-area AF: The camera camera focuses on the subject in the selected focus point only. R (information display/quick settings display) button Press once to view - Nikon D700 | Quick Guide - Page 15
O (delete) button (pg. 7) Diopter adjustment control Lift and rotate until the display in the viewfinder is in focus. Metering selector Rotate the metering selector to choose a metering method. Z Center-weighted (pg. 41) Assigns the greatest weight to the center of the frame. a Matrix Meters most - Nikon D700 | Quick Guide - Page 16
The Quick Settings Display To change settings for the items listed below, press the R button in the shooting information display. Highlight items using the multi selector and press J to view the menu for the selected item. 1 10 2 9 3 8 76 5 4 1 Active D-Lighting: Prevent loss of detail in - Nikon D700 | Quick Guide - Page 17
noise reduction: Reduce noise at slow shutter speeds. 8 Custom Settings bank: Choose a Custom Settings bank. 9 Shooting menu bank: Choose a shooting menu bank. 10 High ISO noise reduction: Reduce noise at high sensitivities. Viewing Button Assignments 0, 2, and 4 icons indicate the "button press - Nikon D700 | Quick Guide - Page 18
The Command Dials The settings that can be adjusted by pressing a button and rotating a command dial are listed below. Sub-command dial Control Panel Main command dial 18 - Nikon D700 | Quick Guide - Page 19
Adjust flash compensation Choose flash mode Select bracketing exposure increment (pg. 34) Activate or cancel bracketing/select number of shots in bracketing sequence (pg. 34) 19 - Nikon D700 | Quick Guide - Page 20
The Command Dials Choose an image size* Set image quality* Fine-tune white balance*/Set color temperature*/Choose a white balance preset* Choose a white balance setting* Set ISO sensitivity* 20 - Nikon D700 | Quick Guide - Page 21
Set exposure compensation Choose the exposure mode e Programmed Auto f Shutter-Priority Auto g Aperture-Priority Auto h Manual * Can also be adjusted from the shooting menu (pg. 37). 21 - Nikon D700 | Quick Guide - Page 22
The Command Dials Once the exposure mode has been selected, the following settings can be adjusted by rotating the command dials (pg. 21). Choose a e combination of aperture and shutter speed f Choose a shutter speed g Choose an aperture h Choose an aperture h Choose a shutter speed 22 - Nikon D700 | Quick Guide - Page 23
takes photographs at a slow rate while the shutterrelease button is pressed. Continuous high speed The camera takes photographs at a fast rate while the shutterrelease button is pressed. Live view Frame photographs in the monitor (pg. 26). Self-timer Take pictures with the selftimer. Mirror - Nikon D700 | Quick Guide - Page 24
Using the Flash 1 Raise the flash. Press the flash pop-up button. The built-in flash will pop up and begin charging. When the flash is - Nikon D700 | Quick Guide - Page 25
of the flash, press the depth-of-field preview button. The camera will emit a modeling preflash (pg. 44). 4 Lower the flash. Press the flash gently downward until it clicks into place. Flash Sync Speed When 1/320 s (Auto FP) is selected for Custom Setting e1 (Flash sync speed, pg. 43), the built-in - Nikon D700 | Quick Guide - Page 26
mode. Press the release mode dial lock release and rotate the release mode dial to a (live view). In the shooting menu, select Handheld for Live view > Live view mode. The Release mode option in the Live view menu can be used to choose from single frame and continuous release modes. 2 Display the - Nikon D700 | Quick Guide - Page 27
the monitor, press the shutter-release button halfway or press the B button. The mirror will click down, the monitor will turn off, and the camera will focus. 4 Check the composition and shoot. Release the shutter-release or B button and check the composition in the monitor. Exit Press the shutter - Nikon D700 | Quick Guide - Page 28
the release mode dial lock release and rotate the release mode dial to a (live view). In the shooting menu, select Tripod for Live view > Live view mode. The Release mode option in the Live view menu can be used to choose from single frame and continuous release modes. 2 Frame the photograph. Frame - Nikon D700 | Quick Guide - Page 29
the lens in the monitor. Press the shutter-release button all the way down. The view through the lens will be displayed in the monitor. Exit 4 Focus. The camera will focus while the B button is pressed. The view in the monitor can be magnified to check focus by pressing the X button. Press J to - Nikon D700 | Quick Guide - Page 30
Picture Control from the Picture Control menu, or make separate detailed adjustments to individual Picture Control settings. Nikon Picture Controls Q Standard Standard processing for balanced results. R Neutral Minimal processing for natural results. S Vivid Pictures are enhanced for a vivid - Nikon D700 | Quick Guide - Page 31
. Thumbnail/playback zoom out button Q Standard Choose a preset variation on the selected picture control for balanced sharpening, contrast, and saturation. Adjust individual settings manually. T Monochrome Create the effect of monochrome photographs taken with a color filter. Choose the tint - Nikon D700 | Quick Guide - Page 32
an existing Picture Control and save it as a new, custom Picture Control. Rename Rename existing custom Picture Controls. Delete Delete custom Picture Controls. Load/save Save custom Picture Controls to the memory card, or load custom Picture Controls created with ViewNX (supplied) or Capture NX - Nikon D700 | Quick Guide - Page 33
Choose an existing Picture Control. Adjust Picture Control settings. Choose a destination for the custom Picture Control. The new Picture Control appears in the Picture Control list. Enter a name. 33 - Nikon D700 | Quick Guide - Page 34
Custom Setting f5 (Assign FUNC. button; pg. 45) controls the function performed by the Fn button, either by itself or in combination with the command dials.* i Choose image Menu g Live view e +NEF (RAW) m Virtual horizon None (default) * Most of these options can also be performed by using either - Nikon D700 | Quick Guide - Page 35
. Memory cards can also be formatted in the setup menu (pg. 45). Two-Button Reset: Restoring Default Settings Camera settings can be restored to default values by holding the QUAL and E buttons down together for more than two seconds (these buttons are marked by a green dot). Custom Settings - Nikon D700 | Quick Guide - Page 36
a CF icon can be saved to the memory card using the Save/load settings > Save settings option in the camera setup menu (pg. 47). The saved settings can be copied to other D700 cameras by inserting the memory card into the camera and selecting Save/load settings > Load settings. 36 D PLAYBACK MENU - Nikon D700 | Quick Guide - Page 37
The Menu Guide lists the options in the top two levels of the menus. C SHOOTING MENU Shooting menu bank Reset shooting menu Active folder File naming Image quality (pg. 20) Image size A B C D Rename Yes No New folder number Select folder File naming NEF (RAW)+JPEG fine NEF (RAW)+JPEG normal NEF ( - Nikon D700 | Quick Guide - Page 38
Menu Guide White balance (pg. 20) Set Picture Control Manage Picture Control Color space Active D-Lighting Vignette control Long exp. NR Auto Incandescent Fluorescent Direct sunlight Flash Cloudy Shade Choose color temp. Preset manual Standard Neutral Vivid Monochrome Save/edit Rename* Delete* - Nikon D700 | Quick Guide - Page 39
. 20) ISO sensitivity auto control Live view (pg. 26) Multiple exposure Interval timer shooting Live view mode Release mode Done Number of shots Auto gain Choose start time Now Start time A CUSTOM SETTING MENU Custom setting bank A B C D Rename Reset custom settings Yes No (default) (default - Nikon D700 | Quick Guide - Page 40
Menu Guide a Autofocus a2 AF-S priority selection Release Focus a3 Dynamic AF area* 9 points 21 points 51 points 51 points ( (default) (default) (default) (default) (default) (default) (default) (default) * Only applies when focus mode selector is rotated to mode C. 40 A CUSTOM SETTING MENU - Nikon D700 | Quick Guide - Page 41
c1 Shutter-release button AE-L c2 Auto meter-off delay On Off 4 s 6 s 8 s 16 s 30 s 1 min. 5 min. 10 min. 30 min. No limit (default) (default) 41 A CUSTOM SETTING MENU - Nikon D700 | Quick Guide - Page 42
Guide c Timers/AE lock c3 Self-timer delay c4 Monitor off delay 2 s 5 s 10 s 20 s Playback Menus Shooting info display Image review On sequence Off Reset d7 Shooting info display Auto Manual d8 LCD illumination On Off 42 A CUSTOM SETTING MENU (default) (default) (default) (default) - Nikon D700 | Quick Guide - Page 43
) HR6 (AA Ni-MH) FR6 (AA lithium) ZR6 (AA Ni-Mn) Use MB-D10 batteries first Use camera battery first e Bracketing/flash e1 Flash sync speed e2 Flash shutter speed 1/320 s 15 s 1/8 s 1/4 s 1/2 s 1 s 2 s 4 s 8 s 15 s 30 s (default) (default) (default) (default) (default) 43 A CUSTOM SETTING MENU - Nikon D700 | Quick Guide - Page 44
attached and turned on. f Controls f1 D switch f2 Multi selector center button* f3 Multi selector f4 Photo info/ playback LCD backlight (D) Both Shooting mode Playback mode Reset meter-off delay Do nothing Info C/Playback D Info D/Playback C 44 A CUSTOM SETTING MENU (default) (default) (default) - Nikon D700 | Quick Guide - Page 45
Customize Reverse rotation command dials Change main/sub Aperture setting Menus and playback f10 Release button to Yes use dial No f11 No memory card Playback mode is Thumbnail on/off. B SETUP MENU Format memory card LCD brightness Clean image sensor Lock mirror up for cleaning Yes No -3 - - Nikon D700 | Quick Guide - Page 46
Menu Guide Video mode HDMI World time Language NTSC PAL Auto 480p (progressive) 576p (progressive) 720p (progressive) 1080i (interlaced) Time zone Date and time Date format Daylight saving time (default) 46 B SETUP MENU - Nikon D700 | Quick Guide - Page 47
Image comment Auto image rotation Dust off ref photo Battery info Wireless transmitter Image authentication Copyright information Save/load settings GPS Virtual horizon Non-CPU lens data AF fine tune Firmware version Done Input comment Attach comment On Off Start Clean sensor and then start - Mode - Nikon D700 | Quick Guide - Page 48
(default) Warm filter Color balance - Image overlay - Side-by-side comparison * - * Available only if the J button is pressed to display the retouch menu during full-frame playback. O MY MENU Add items Playback menu (default) Shooting menu Custom setting menu Setup menu Retouch menu
-
 1
1 -
 2
2 -
 3
3 -
 4
4 -
 5
5 -
 6
6 -
 7
7 -
8
-
9
-
10
-
11
-
12
-
13
-
14
-
15
-
16
-
17
-
18
-
19
-
20
-
21
-
22
-
23
-
24
-
25
-
26
-
27
-
28
-
29
-
30
-
31
-
32
-
33
-
34
-
35
-
36
-
37
-
38
-
39
-
40
-
41
-
42
-
43
-
44
-
45
-
46
-
47
-
48
 |
 |
