Nikon F100 Instruction Manual
Nikon F100 - F 100 SLR Camera Manual
 |
UPC - 018208017966
View all Nikon F100 manuals
Add to My Manuals
Save this manual to your list of manuals |
Nikon F100 manual content summary:
- Nikon F100 | Instruction Manual - Page 1
WWW.LENSINC.NET (En) INSTRUCTION MANUAL En - Nikon F100 | Instruction Manual - Page 2
knob P. 63 Viewfinder eyepiece Shutter speed/aperture lock button P. 49/ 51 Custom Setting button P. 70 Camera back lock release P. 20 Camera back lock release lever P. 20 Film confirmation window Coupling contacts for Multi-Power High Speed Battery Pack MB-15 Supplied accessories Body cap P. 19 - Nikon F100 | Instruction Manual - Page 3
, the LCD's response time slows; when the temperature rises, it returns to normal. 4 • Viewfinder Display 12mm-dia. reference circle for Center-Weighted Metering area Focus brackets (focus area) P. 37 Spot Metering (4mm ø) area P. 45 Aperture lock indicator P. 51 Shutter speed lock indicator P. 49 - Nikon F100 | Instruction Manual - Page 4
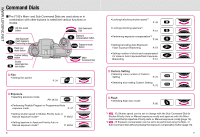
F100's Main- and Sub-Command Dials are used alone or in combination with other buttons to select/set various functions or modes. ISO film speed button Sub-Command Dial Auto Exposure/ Flash Exposure Bracketing button Flash sync mode button Exposure compensation button Exposure mode button Custom - Nikon F100 | Instruction Manual - Page 5
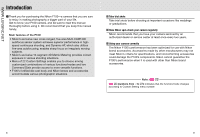
functions. • F100's fortified die-cast body and Nikon lenses and accessories accommodate various photographic situations. • Take trial shots Take trial shots before shooting at important occasions like weddings or graduations. • Have Nikon spot-check your camera regularly Nikon recommends that you - Nikon F100 | Instruction Manual - Page 6
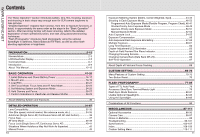
64 Changing Focusing Screens 65 Changing Camera Back (Data Back MF-29 66 Self-Timer Operation 67 About Depth of Field and Focus Tracking 68 CUSTOM SETTING 69-76 Menu/Features of Custom Setting 70-75 Two-Button Reset 76 FLASH PHOTOGRAPHY 77-85 Types of TTL Auto Flash 78 Accessory Shoe/Sync - Nikon F100 | Instruction Manual - Page 7
Adjustment/LCD Illuminator (P. 63); Depth-of-Field Preview/Film Plane Indicator (P. 64); Changing Focusing Screens (P. 65); Changing Camera Back (Data Back MF-29) (P. 66) Self-Timer Operation (P. 67); Remote control operation (P. 94) 13 Shooting Composition Exposure Focus Film Lens Batteries - Nikon F100 | Instruction Manual - Page 8
in this section are as follows: Lens attached D-type AF Nikkor Film advance mode Single frame AF mode Single Servo AF Focus area Center* AF area mode Single Area AF Exposure metering 3D Matrix Metering Exposure mode Programmed Auto* * Can be set using the Two-Button Reset. See page - Nikon F100 | Instruction Manual - Page 9
mode, battery power, frame counter, focus area and Custom Setting (when Custom Setting is selected) in the LCD panel automatically turn off 6 sec. after the power switch is turned on and the camera remains unused. (All the indications in viewfinder turn off.) Lightly press the shutter release button - Nikon F100 | Instruction Manual - Page 10
BASIC OPERATION WWW.LENSINC.NET Mount Lens 2 Turn the power switch off and mount the lens to the camera body. 2.1 Check the lens type. Check points Use D- or G-type AF Nikkor lens to utilize all the functions of this camera. (See page 32 for Lens Compatibility.) Make sure to turn the power - Nikon F100 | Instruction Manual - Page 11
BASIC OPERATION WWW.LENSINC.NET Load Film 3 Turn the power switch on, set the camera's film speed setting to DX-coded film DX (page 34) and load DX-coded film. Film speed will be set automatically (ISO 25-5000). Close camera back and press ISO (film speed) the shutter release button to - Nikon F100 | Instruction Manual - Page 12
points Do not attempt to rotate the lens focus ring manually while the focus mode is set to S or C. With the focus mode set at S (Single Servo AF), shutter cannot be released when the subject is out of focus. See pages 36-43 for details regarding focus mode, focus area and AF area mode. See page - Nikon F100 | Instruction Manual - Page 13
button ∆ to set the exposure mode to ¡ (Programmed Auto). Check points Three metering systems-the F100 features Matrix, Center-Weighted and Spot Metering (page 44). Four exposure modes-the F100 features Programmed Auto, ShutterPriority Auto, Aperture-Priority Auto and Manual exposure modes. Each - Nikon F100 | Instruction Manual - Page 14
using the focus area selector (page 37) or use focus lock (page 40). The optional Data Back MF-29 lets you imprint date and/or time on your photos/negatives (page 92). 6.2 Compose frame and focus by lightly pressing the shutter release button. • Keep your elbow propped against your body for support - Nikon F100 | Instruction Manual - Page 15
BASIC OPERATION WWW.LENSINC.NET Confirm Indications in Viewfinder and Release Shutter 7 Confirm that / (in-focus indicator) appears in the viewfinder, then slowly, fully depress the shutter release button. Camera automatically tracks subject that has been moving. 7.1 Confirm indications in - Nikon F100 | Instruction Manual - Page 16
Center-Weighted Metering, most of the meter's sensitivity is concentrated on the 12mm-diameter center circle in the viewfinder. Spot Metering sensitivity is concentrated in a small, selected focus area from five available focus areas. Using D- or G-type Nikkor lenses, the F100 camera performs 3D - Nikon F100 | Instruction Manual - Page 17
indication in the LCD panel and viewfinder; set/confirm aperture using the lens aperture ring. CAUTION: Nikkor lenses/accessories that cannot be attached to the F100 The following Nikkor lenses/accessories cannot be attached to the F100 (otherwise camera body or lens may be damaged): • TC-16A - Nikon F100 | Instruction Manual - Page 18
when the exposure meter is off.) Open the camera back and remove the film cartridge. 34 • When battery power is very low, or at low temperatures, film may not start rewinding or film rewind may stop at mid-roll, and o-- and frame number will blink in the LCD panel. In this case, turn the power - Nikon F100 | Instruction Manual - Page 19
LENSINC.NET Autofocus • Set focus mode selector to S or C for autofocus operation. • Set focus mode selector to S (Single Servo AF with Focus-Priority) or C (Continuous Servo AF with Release-Priority). Camera continues to focus automatically on the subject when the shutter release button is lightly - Nikon F100 | Instruction Manual - Page 20
Priority, focus area indication does not appear in the LCD panel and viewfinder. • When the telephoto lens is attached or the subject is very dark, the closest subject may not be selected. In this case, use Single Area AF. · 9, 10: Dynamic AF Mode with Closest Subject Priority can be set to be - Nikon F100 | Instruction Manual - Page 21
). · 21: Only focus can be set to lock when , button is pressed (page 75). 3 While keeping the focus locked, recompose and shoot. • After you have locked focus, do not change the camera-to-subject distance. Otherwise, refocus and lock the focus again. • If you keep the shutter release button lightly - Nikon F100 | Instruction Manual - Page 22
a lens other than an AF Nikkor (page 33) is attached. • Manual focus using Electronic Rangefinder • Set the focus mode selector to M. The focus can be confirmed with / indication in the viewfinder. The Electronic Rangefinder works with most Nikkor lenses (including AF Nikkors when operated manually - Nikon F100 | Instruction Manual - Page 23
Matrix Metering/3D Matrix Metering w: Center-Weighted Metering Center-Weighted Metering places special emphasis on brightness within the 12mm-diameter circle in the viewfinder, so it is useful for basing exposure on a specific area of the scene. e: Spot Metering Exposure Matrix Metering provides - Nikon F100 | Instruction Manual - Page 24
Set/confirm aperture with the lens aperture ring since ƒ-appears instead of the aperture value in the LCD panel and viewfinder. 2 Compose picture, focus and shoot. • When the subject is too dark or bright, one of the following warning indications will appear in the viewfinder or LCD panel. • H1: Use - Nikon F100 | Instruction Manual - Page 25
-Priority Auto Enables you to manually set your desired shutter speed (30-1/8000 sec.); the camera automatically selects the proper aperture the viewfinder. Set/confirm aperture with the lens aperture ring since ƒ-appears instead of the aperture value in the LCD panel and viewfinder. 2 Set the - Nikon F100 | Instruction Manual - Page 26
flash photography, varying the aperture changes the flash shooting distance (page 85). 1 Rotate the Main-Command Dial while pressing the exposure mode ∆ button to select £. • When CPU Nikkor lens other than G-type is not set to its minimum aperture setting, ƒEE blinks in the LCD panel and viewfinder - Nikon F100 | Instruction Manual - Page 27
-1 EV Over +2 EV Over +3 EV Over +3 EV 3 Compose picture, focus and shoot. Exposure factor with AF Micro-Nikkor lens When an AF Micro-Nikkor lens is attached and you're setting aperture using Sub-Command Dial aided by an external exposure meter, you do not need to take the exposure factor into - Nikon F100 | Instruction Manual - Page 28
picture. Set exposure to a mode other than Manual. 1 Rotate the metering system selector while pressing the metering system selector lock release to select Center-Weighted or Spot Metering. • Matrix Metering is not recommended since the exposure cannot be properly locked. 2 Position focus area on - Nikon F100 | Instruction Manual - Page 29
pronounced contrast or when bracketing exposure with color slide film (where the latitude of the proper exposure is minimal). Use CenterWeighted or Spot Metering. Exposure compensation can be performed in any exposure mode. 1 Set exposure compensation by rotating the MainCommand Dial while pressing - Nikon F100 | Instruction Manual - Page 30
(page 56) is also set, Bracketing will be combined with the exposure compensation values. It is useful to perform Bracketing with a compensated value of over +2 EV or under -2 EV. • With film advance mode in continuous shooting (C or Cs), fully depress and hold the shutter release button until the - Nikon F100 | Instruction Manual - Page 31
be performed in any of the available exposure modes. 1 Rotate and set the film advance mode selector to Z while pressing the film advance mode selector lock release. 2 Rotate the Main-Command Dial while pressing the ˚ button to set the desired exposure compensation. 3 Compose picture, confirm focus - Nikon F100 | Instruction Manual - Page 32
with lithium batteries. Note that continuous exposure time is reduced when shooting at low temperatures. 3 Compose picture, focus and shoot. • The shutter will be open as long as the shutter release button is kept fully depressed. • Use of the optional remote cord (page 94) reduces camera shake. 62 - Nikon F100 | Instruction Manual - Page 33
Remove the lens from the camera body and pull the focusing screen release latch outward using the supplied tweezers. • The holder will spring open when the focusing screen release latch is pulled outward using the tweezers. 2 Remove the screen by grasping the small tab with the tweezers, and set the - Nikon F100 | Instruction Manual - Page 34
back and body. • To attach the camera back, attach it while pressing the camera back release pin. See the instruction manual of the Data Back MF-29 for details. 66 • Self-timer shooting cannot be performed unless the camera's shutter can be released (i.e. when subject cannot be brought into focus - Nikon F100 | Instruction Manual - Page 35
subject stops moving and / appears in the viewfinder. In Continuous Servo AF, camera continues to track subject (even with a subject which started moving in the middle of the focus detection) and focus is not locked. CUSTOM SETTING Using the Custom Setting feature, you can create a combination of - Nikon F100 | Instruction Manual - Page 36
settings. 70 • Menu number and Custom Setting options 1. Automatic film rewind at the end of film roll (page 29) Options: 0: Disabled (initial setting) 1: Enabled At default setting, film rewind is started by pressing the two film rewind buttons „. However, the camera can be set to start film - Nikon F100 | Instruction Manual - Page 37
54) Options: 0: Disabled (initial setting) 1: Enabled At default setting, Auto Exposure Lock can be performed by pressing the , button. However, Auto Exposure can be set to be locked by lightly pressing the shutter release button. 8. Film advance with closing the camera back (when power switch is on - Nikon F100 | Instruction Manual - Page 38
Sub-Command Dial in Aperture-Priority Auto or Manual exposure mode. However, it can be set to be changed using the lens' aperture ring with CPU Nikkor lens other than Gtype. • Aperture will be displayed in one steps and regardless of the setting in Custom Setting menu 12, the aperture can only be - Nikon F100 | Instruction Manual - Page 39
in the LCD panel. To cancel Custom Setting, release one of the two buttons once while the ç indication is blinking, then press both buttons again (page 70). 76 FLASH PHOTOGRAPHY You can enjoy the excitement of the Nikon F100's advanced flash technology by using Nikon's advanced SB-80DX, SB-28/28DX - Nikon F100 | Instruction Manual - Page 40
the F100. (The Flash mode automatically switches to Standard TTL flash with Spot Metering.) Center-Weighted Fill-Flash Center-Weighted Fill-Flash is performed with a TTL AF Speedlight and non-CPU lens. Since Center-Weighted Metering is used instead of Matrix Metering with a nonCPU lens, flash output - Nikon F100 | Instruction Manual - Page 41
mode selector to NORMAL.) ¤: Slow Sync Normally, the camera's shutter speed is automatically set to 1/60 to 1/250 sec. for flash photography in Programmed Auto or Aperture-Priority Auto exposure mode. However, for shooting nighttime scenes, Slow Sync uses a slower shutter speed (down to 30 sec.) to - Nikon F100 | Instruction Manual - Page 42
flash exposure compensation is set, = appears in the viewfinder without the compensation value. NOTE: Flash attachments made by manufacturers other than Nikon Use only Nikon Speedlights. Other units may damage the camera's electrical circuit due to incompatible voltage requirements (not compatible - Nikon F100 | Instruction Manual - Page 43
and D- or G-type Nikkor are attached, and Automatic Balanced Fill-Flash with TTL Multi Sensor is used. 1 Attach the Speedlight and set the metering system. • Set the metering system to Matrix or Center-Weighted Metering. 2 Set the exposure mode and confirm shutter speed and aperture. • When - Nikon F100 | Instruction Manual - Page 44
focus autofocus operation determine Subject Priority areas. If the subject moves from the the focusing. selected focus area, camera automatically focuses on the subject utilizing the Focus Tracking and determining the data from the other focus areas (· 10). 86 MISCELLANEOUS The Nikon F100 - Nikon F100 | Instruction Manual - Page 45
of optional accessories, including power sources, Data Back and Speedlight are available for the F100. • 3V Lithium Battery Holder MS-13 • Two 3V lithium batteries (CR123A or DL123A) can be used with the MS-13 in place of the supplied battery holder. • Multi-Power High Speed Battery Pack MB-15 - Nikon F100 | Instruction Manual - Page 46
Especially for use with PC-Nikkor lens. * Focus brackets and 12mm ø center circle are not etched on the focusing screens. • Lenses • A wide variety of lenses - 16mm to 600mm wideangle, telephoto, zoom, Micro or DC (Defocus image Control) - is available for the F100. 90 • Filters • Nikon filters - Nikon F100 | Instruction Manual - Page 47
day/hour/minute - or leave the film blank. See page 66 for details on attaching Data Back MF-29 in place of the camera back. • Speedlight SB-80DX • Speedlight SB-80DX normally uses four AA-type alkaline-manganese batteries with a guide number of 38/125 (manual flash, 35mm zoom-head position, ISO 100 - Nikon F100 | Instruction Manual - Page 48
F100 cameras for simultaneous operation Approx. 40cm (1.3 ft.) Adapter cord to connect a remote accessory for 2-pin remote terminal such as Radio Control Set MW-2, Intervalometer MT-2 or Modulite Remote Control Set ML-2 to F100 Approx. 20cm (0.7 ft.) Useful in reducing camera shake or releasing - Nikon F100 | Instruction Manual - Page 49
the camera unused for a long period of time may cause mold to grow and result in malfunction. Turn the power on and release the shutter a few times once per month. Nikon cannot be held responsible for any malfunction resulting from the use of the camera other than as specified in this manual. 97 - Nikon F100 | Instruction Manual - Page 50
-Power High Speed Battery Pack MB-15, six 1.5V alkaline-manganese or lithium batteries, or Ni-MH battery MN-15 can be used to power the F100. • Change the batteries well before the end of their life and prepare spare batteries before important photographic occasions. • Turn the camera power off when - Nikon F100 | Instruction Manual - Page 51
focus distance, aperture or flash shooting distance range. Err blinks • Malfunction detected. • Release shutter again. If the warning indication remains, or this warning appears frequently, contact authorized Nikon dealer or service center. FuL blinks • Shooting data is full in • Turn - Nikon F100 | Instruction Manual - Page 52
-Priority Auto or Manual exposure mode, Center-Weighted or Spot Metering Electronic Rangefinder usable with lens with maximum aperture of f/5.6 or faster Viewfinder Fixed eye-level pentaprism, built-in diopter adjustment (-3 to +1m-1) Eyepoint 21mm (at -1.0m-1) Focusing screen B-type BriteView - Nikon F100 | Instruction Manual - Page 53
, Custom, exposure mode, Flexible Program, flash sync mode, AF area mode, focus area, battery power, frame counter Camera back Hinged back (removable); AF area mode selector, focus area selector; changeable with Data Back MF-29 10-pin remote terminal Equipped Power source AA-type battery holder - Nikon F100 | Instruction Manual - Page 54
Optional exclusive Data Back MF-29, 3V lithium battery holder MS-13, Multi- accessories Power High Speed Battery Pack MB-15, Ni-MH Battery MN-15, Quick Charger MH-15, E-type focusing screen, Soft case CF-57/58 All specifications apply when fresh AA-type alkaline-manganese batteries are used at - Nikon F100 | Instruction Manual - Page 55
with TTL Multi Sensor 78, 82 C Center-Weighted Metering ......30, 33, 45 Center-Weighted Fill-Flash............78, 82 Continuous shooting 35 Continuous silent low-speed shooting 35 Continuous Servo AF 23, 36 CPU Nikkor lens 19, 32-33, 78 Custom Setting 69 D Depth of field 50, 68 Diopter - Nikon F100 | Instruction Manual - Page 56
is on 6 Focus area selection changed to continuously in the same direction 0: Disabled (initial setting) 1: Enabled 7 Auto Exposure Lock when shutter release button is lightly pressed 0: Disabled (initial setting) 1: Enabled 8 Film advance with closing the camera back (when power switch - Nikon F100 | Instruction Manual - Page 57
WWW.LENSINC.NET No reproduction in any form of this manual, in whole or in part (except for brief quotation in critical articles or reviews), may be made without written authorization from NIKON CORPORATION. K NIKON CORPORATION FUJI BLDG., 2-3, MARUNOUCHI 3-CHOME, CHIYODA-KU, TOKYO 100-8331, JAPAN
-
 1
1 -
 2
2 -
 3
3 -
 4
4 -
 5
5 -
 6
6 -
 7
7 -
8
-
9
-
10
-
11
-
12
-
13
-
14
-
15
-
16
-
17
-
18
-
19
-
20
-
21
-
22
-
23
-
24
-
25
-
26
-
27
-
28
-
29
-
30
-
31
-
32
-
33
-
34
-
35
-
36
-
37
-
38
-
39
-
40
-
41
-
42
-
43
-
44
-
45
-
46
-
47
-
48
-
49
-
50
-
51
-
52
-
53
-
54
-
55
-
56
-
57
 |
 |

En
INSTRUCTION MANUAL
(En)
WWW.LENSINC.NET