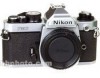
Nikon FM2 Instruction Manual
Nikon FM2 - FM2 - Body Manual
 |
UPC - 018208016839
View all Nikon FM2 manuals
Add to My Manuals
Save this manual to your list of manuals |
Nikon FM2 manual content summary:
- Nikon FM2 | Instruction Manual - Page 1
Nikon INSTRUCTION MANUAL CE - Nikon FM2 | Instruction Manual - Page 2
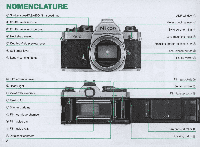
@ Shutter curtains @ Film cartridge chamber ® Film guide pin @ Film guide rails @ Data back contacts 2 ADR window @ Meter coupling lever @ Sync cord terminal @ Lens mounting index @ Focusing screen release latch @ Lens release button @ Reflex mirror @ Film sprockets ® Serial number ® Film anti-curl - Nikon FM2 | Instruction Manual - Page 3
shoe @ Meter coupling ridge ® Hot-shoe contact @ R.."nv-linlht contact @ Accessory shoe ® Camera back lock lever @ Film rewind knob @ Film rewind crank ® Film plane indicator @ Motor drive shutter coupling @ Motor drive coupling @ Film rewind button @ Memo holder Distance scale @ Focusing ring - Nikon FM2 | Instruction Manual - Page 4
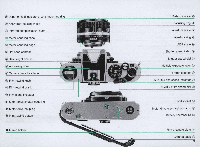
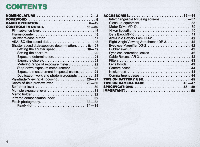
30 Multiple exposure lever 31 Memo holder 32 Infrared compensation index 32 Flash photography 33-35 Ready-light 34-35 ACCESSORIES 36-44 Interchangeable focusing screens 36- 37 Close-up equipment 38 Motor Drive MD-12 39 Nikon Speedlights 40 Data Back MF-16 41 Anti -Cold Battery Pack OB - Nikon FM2 | Instruction Manual - Page 5
. The Nikon FM2 offers many special features including top shutter speed of 1/4000 sec., and flash synchronization speeds as fast as 1/250 sec. The FM2 also incorporates a TTL full·aperture metering system and high-precision mechanically-controlled shutter curtains. These features enable full manual - Nikon FM2 | Instruction Manual - Page 6
infants and small children. In case a battery is accidentally swallowed, call a doctor immediately as the material inside the batteries can cause serious problems. 3 Put the battery chamber • lid back in Its place. Slip the battery clip back into the camera body baseplate and screw it clockwise - Nikon FM2 | Instruction Manual - Page 7
. 30 sec. after you have taken your finger off the button. 6 Check battery power. • Switch the exposure meter on while looking through the viewfinder. If one or two of the red LED exposure indicator lamps inside lights up this would mean normal condition. Note: When the shutter speed dial ® is - Nikon FM2 | Instruction Manual - Page 8
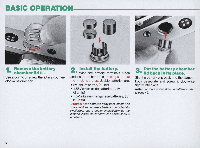
camera body. Then twist the lens mounting ring ~ counterclockwise until it clicks into place. Confirm that the aperture/focusing index is right on top. To remove: Push the lens release button @ and turn the lens mounting ring clockwise until the lens comes off. Note: When changing lenses with film - Nikon FM2 | Instruction Manual - Page 9
back down to secure it in place. Note: You can use any of the 3Smm film cartridges available on the market. It is advisable to handle film in the shade to avoid direct exposure to sunlight. 10 Insert the film leader • In the takeup spool. Pull the leader across gently and insert it into - Nikon FM2 | Instruction Manual - Page 10
the sprockets and that the film is set between the film guide rails @. 13 Take up film slack. • Fold out the film rewind crank @ and rotate it in the direction of the arrow on the film rewind knob until it stops. Then fold the crank back in. 14 Make blank exposures • until the frame counter 53 - Nikon FM2 | Instruction Manual - Page 11
exposure. For film speeds not indicated in the ASAIISO film speed dial ®, refer to page 18. 16 Hold the camera and • point It at the subject. Basic holding posture: Use your left hand to cradle the camera, with your fingers wrapped around the lens and the elbow propped against your body for support - Nikon FM2 | Instruction Manual - Page 12
the viewfinder. Then turn the shutter speed dial ® and/or lens aperture ring @ until the LED lamp for the symbol for correct exposure 0 lights up. Important! Intermediate settings of lens aperture but not of shutter speed are usable. Nota: The meter reads the light over the entire focusing screen - Nikon FM2 | Instruction Manual - Page 13
on the subject • by rotating the lens focusing ring 46 • The FM2 is provided with the Type K2 focusing screen as standard. Look through the viewfinder while turning the focusing ring until the two halves of the split image rangefinder coincide perfectly to form a single unbroken image and the image - Nikon FM2 | Instruction Manual - Page 14
button. Look through the viewfinder, and depress the shutter release button. In depressing the shutter release button, apply light but steady pressure with the ball of your index finger to avoid camera shake that might result in image blur. 20 Advance the film. • Wind the film advance lever as far - Nikon FM2 | Instruction Manual - Page 15
advance lever into place. When you 're not using the camera, you should set the film advance lever to this position which locks the shutter release button and keeps the exposure indicator lamps inside the viewfinder switched off even if the shutter release button is accidentally pressed . Note: Even - Nikon FM2 | Instruction Manual - Page 16
indicated by white dots in between the even numbers. Even if there 's no film in the camera, the frame counter is operative, advancing by a single frame every time the film advance lever is fully wound. After frame 36 of a 36-exposure roll of film, the counter will not operate even if you repeatedly - Nikon FM2 | Instruction Manual - Page 17
the button from its locked position, pull out the film advance lever to the standoff position. Slight pressure on the shutter release button will then switch on both the exposure meter and the LED exposure information display inside the viewfinder. The meter and the display remain on for approx. 30 - Nikon FM2 | Instruction Manual - Page 18
to a given amount of light. The higher the number, the greater the sensitivity, and vice versa. The ASAIISO of your film is indicated on the cartridge itself. It is also printed on the film carton and on the data sheet packed inside. Shutter speed dial ® 'exposure determination Setting the shutter - Nikon FM2 | Instruction Manual - Page 19
Fast shutter speed SlOw snutter speed 19 - Nikon FM2 | Instruction Manual - Page 20
the position of the numbers engraved although intermediate lens apertures are usable continuously. Lens aperture greatly affects depth of field (see page 28). With the exception of a few special lenses, Nikkor and Nikon Series E lenses enable full-aperture light measurement even when the aperture - Nikon FM2 | Instruction Manual - Page 21
the lens aperture. A shutter speed of 1/500 sec. lets in twice as much light as a setting of 1/1000 sec ., and only half as much light as 1/250 sec. An aperture setting of 1111 lets in twice as much light as 1116, half as much as 118. Thus, if the correct exposure for a particular picture -taking - Nikon FM2 | Instruction Manual - Page 22
IN DETAIL-contlnued----------, Metering range of exposure meter When there is a proper combination of lens aperture and shutter speed, 0 lights up, indicating correct exposure. This sign will not light up when the aperture and shutter speed combination is not suitable for correct exposure. Also, if - Nikon FM2 | Instruction Manual - Page 23
on the camera body, such as when a non-AI lens or an extension ring is mounted on the camera. The procedure is as follows: 1) Set the ASA/ ISO number. 2) Compose your picture and·secure subject focus . 3) Press the shutter release button lightly to turn the meter on. 4) Perform exposure measurement - Nikon FM2 | Instruction Manual - Page 24
-continued------ - - - Exposure measurement in special cases The exposure meter of the Nikon FM2 adopts the centerweighted exposure measurement system in which approxi- mately 60 % of the total amount of light is measured by the 12 mm·diameter circle at the center of the focusing screen. When the - Nikon FM2 | Instruction Manual - Page 25
between specific photo types and proper exposure. Since this is meant to be a guide, in practice you should make further.compensation by experimentation until you achievelthe proper results. • The exposure compensation values listed below are reference data obtained when general-purpose film was - Nikon FM2 | Instruction Manual - Page 26
the image area of the actual photograph so the actual picture comes out larger tha n the image in the viewfinder. Note that the picture comes out trimmed down in the case of mounted slides or service-size prints from negatives. With AF Nikkor lenses: Set the lens' A-M ring or A-M switch to "M." 26 - Nikon FM2 | Instruction Manual - Page 27
Split· image focusing Microprism grid focusing Matte outer field focusing Out of focus In focus 27 - Nikon FM2 | Instruction Manual - Page 28
the lines. Shown in the photo is an example of the difference in depth of field with a 50mm f/1.4 lens when using different aperture set· tings at a set focusing distance of 2 m. Control of depth of field enables selective blurring of the background elements of a picture either to let the major - Nikon FM2 | Instruction Manual - Page 29
Lens set at 1/1.4 Only major subject is in focus. Lens set at 1/16 Most objects near to far are in focus. 29 - Nikon FM2 | Instruction Manual - Page 30
you to examine depth of field before shooting _The image in the viewfinder " darkens " according to the selected f/number-the smaller the aperture (i.e., the larger the fl number), the " darker" the image. Components of the picture that appear in focus when the lever is pressed wi ll be in the zone - Nikon FM2 | Instruction Manual - Page 31
, observe the following : 1) Take the first shot. (Press the shutter release button.) 2) Pull the multiple exposure lever in the direction of the arrow shown in the photo, as you wind the film advance lever fully. The frame counter will not advance ; only the shutter is ready to be released again - Nikon FM2 | Instruction Manual - Page 32
farther away than that in visible -light photo graphy. As a rule of thumb, you can compensate for this shift in focus by referring to the infrared compensation index (in the form of either a dot or a line) near the focusing index on the lens barrel. (Some lenses, including the Reflex Nikkor, do not - Nikon FM2 | Instruction Manual - Page 33
the guide number of the electronic flash unit or flashbulb in use. Also, if the speedlight requires the use of a connecting cord, insert the cord into the camera body's sync cord terminal @. Since the FM2's hot- shoe contact becomes active only when an electronic flash unit is mounted, touching - Nikon FM2 | Instruction Manual - Page 34
to remove your eye from the viewfinder. Before you shoot, make sure the ready-light is on. The moment the shutter light availability with speedlights other than the 8B-28, 8B-27, 8B-26, 8B-25, 8B-24, 8B-22, 8B-20, 8B-19 and 8B-16B, refer to page 35. Picture taken by balancing the flash exposure - Nikon FM2 | Instruction Manual - Page 35
in EUcountries. .. With S8-140, usable only for visible-light flash photography. .., Flash output is determined by the lens' ASA/ISO ring setting. The focusing ring is coupled to the diaphragm, so as the lens Is focused, the aperture Is simultaneously set to provide the correct exposure. 35 - Nikon FM2 | Instruction Manual - Page 36
focusing screens , Type B2 (matte/Fresnel with focusing spot) and Type E2 (matte/Fresnel with focusing spot and etched grid lines) are also available for the FM2 to match your particular requirements . To change focusing screens, follow this procedure: 1. Remove the lens from the camera body - Nikon FM2 | Instruction Manual - Page 37
composition. Consists of Type B2 matte field with etched horizontal and vertical lines. Also useful with PC-Nikkor lenses. Type K2 clear-matte screen Type K screen Caution: Type K2IB2IE2 focusing screens have a notched tab. If you use the Type KlBlEscreen, you must make exposure compensation. 37 - Nikon FM2 | Instruction Manual - Page 38
PK-llA, 12 and 13. 3) Bellows Focusing Attachment PB-6. The Auto Extension Rings and the PB-6 are attached between the lens and camera body. If one of the rings is used with an AI lens, exposure determination is at full aperture because the exposure meter is linked to the automatic diaphragm of the - Nikon FM2 | Instruction Manual - Page 39
have to wind film manually or take his eye off the viewfinder. The MO-12 can be mounted onto the FM2 by simply inserting and tightening its built-in screw into the tripod socket @ at the base of the camera body. Note that lightly pressing the MO-12's trigger activates the FM2's exposure meter. 39 - Nikon FM2 | Instruction Manual - Page 40
those for professionals. The Nikon 88-28, 88-27, 88-26, 88-25, 88-24, 88-22, 88-20 , 88-19, or 88-168 Speed light can be directly mounted onto the FM2's built-in hot shoe. These speed lights also activate the camera's LED ready-light inside the viewfinder which lights up when the flash unit is fully - Nikon FM2 | Instruction Manual - Page 41
or picture counting (up to 2000) ; each mode is displayed on the data back in clear LCD numerals and printed by LED 's, on the photo in unobtrusive red numerals. Serving as a handy clock , a quartz timer with alarm is incorporated. Note: The Nikon FM2 a/so accepts Data Back MF-12. In this case, use - Nikon FM2 | Instruction Manual - Page 42
. Rubbereyecup Attached to the finder eyepiece, this eyecup excludes strong light and helps prevent eye fatigue. Eyepiece correction lenses Accessory lenses that screw onto the viewfinder eyepiece to enable near- and farsighted photographers.to take pictures without having to wear eyeglasses - Nikon FM2 | Instruction Manual - Page 43
by the exposure meter, Notes: 1) For lens protection, the NC filter is recommended, 2) When shooting a backlit subject or if there's a bright light source in the frame, a ghost Image is likely to resuff from the use of a finer, In this case, you should take the picture without a filter, Black&wni1 - Nikon FM2 | Instruction Manual - Page 44
mounted with a lens smaller than 50 mm f/1 .4. The CF-28 is for the camera mounted with any lens from 50mm fl1 .2 to 105mm f/2 .5. When a motor drive is attached to the FM2, use the CF-29 case. The soft-type CS -16 case is also available. Neckstraps Available are the leather neckstrap AN-1 (black - Nikon FM2 | Instruction Manual - Page 45
material inside the batteries can cause serious problems. • Battery power falls off in extremely cold temperatures and this may cause the camera 's photometeric circuit to malfunction . In this situation, use new batteries and protect the camera body from the cold. Note that battery power will be - Nikon FM2 | Instruction Manual - Page 46
If the Inside of the camera body accidentally gets wet , its internal precision parts may get rusty. Take the camera righ t away to the nea rest authorized Nikon dealer for a checkup which may require repair payment. • When not uSing the camera for a long time, take out the batteries and store the - Nikon FM2 | Instruction Manual - Page 47
more than 30cm (approx. 12 inches) away from the lens surface and move the nozzle around so that the stream of air is not concentrated in one spot. • Clean metallic parts with a blower·type brush or with a dry. soft cloth. • Before usi ng the camera. it is a good practice to check it thor· oughly - Nikon FM2 | Instruction Manual - Page 48
------------ Type of camera : Usable film : Picture format: Lens mount: Shutter: Shutter speed settings : Self-timer: Viewfinder : Viewfinder display: Focusing screen : Mirror: 35mm single-lens reflex (SLR) focal plane shutter camera Any cartridge-type 35 mm film 24mmx36mm Nikon F bayonet mount - Nikon FM2 | Instruction Manual - Page 49
Film sensitivity range: Power source: Exposure meter switch: Battery power check: Camera back: Dimensions (W x H x D): (camera body only) Weight: (camera body only) ASAIISO 12"'6400 Choice of one 3V lithium battery, two 1.55V silver-oxide batteries, or two 1.5V alkaline-manganese batteries Light - Nikon FM2 | Instruction Manual - Page 50
of these lenses are fitted with meter coupling ridges (see illustration). Almost all lenses now manufactured by Nikon are the AI type. However, please confirm whether or not your lens is AI before using it with the FM2. Although almost all Nikkor lenses that have the Nikon F bayonet mount, as well - Nikon FM2 | Instruction Manual - Page 51
No reproduction in any form of this manual, In whole or In part (except for brief quotation In critical articles or reviews). may be made without written authorization from NIKON CORPORATION. r Nikon , '~ NIKON CORPORATION FUJI BLDG., 2-3, MARUNOUCHI3-CHOME, CHIYODA-KU, TOKYO 100-8331, JAPAN
-
 1
1 -
 2
2 -
 3
3 -
 4
4 -
 5
5 -
 6
6 -
 7
7 -
8
-
9
-
10
-
11
-
12
-
13
-
14
-
15
-
16
-
17
-
18
-
19
-
20
-
21
-
22
-
23
-
24
-
25
-
26
-
27
-
28
-
29
-
30
-
31
-
32
-
33
-
34
-
35
-
36
-
37
-
38
-
39
-
40
-
41
-
42
-
43
-
44
-
45
-
46
-
47
-
48
-
49
-
50
-
51
 |
 |
Nikon
INSTRUCTION
MANUAL
CE