Nikon Z 50 Setting Guide Video Edition
Nikon Z 50 Manual
 |
View all Nikon Z 50 manuals
Add to My Manuals
Save this manual to your list of manuals |
Nikon Z 50 manual content summary:
- Nikon Z 50 | Setting Guide Video Edition - Page 1
Professional Setting Guide -Video Edition- - Nikon Z 50 | Setting Guide Video Edition - Page 2
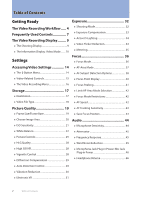
Display 40 ● Focus Peaking 41 Storage 17 ● Destination 17 ● Limit AF-Area Mode Selection 42 ● Focus Mode Restrictions 42 ● Video File Type 18 ● AF Speed 42 Picture Quality 19 ● Frame Size/Frame Rate 19 ● AF Tracking Sensitivity 43 ● Save Focus Position 43 ● Choose Image Area 20 - Nikon Z 50 | Setting Guide Video Edition - Page 3
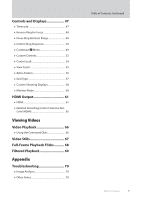
61 ● External Recording Control: External Rec. Cntrl (HDMI 65 Viewing Videos Video Playback 66 ● Using the Command Dials 66 Video Stills 67 Full-Frame Playback Flicks 68 Filtered Playback 69 Appendix Troubleshooting 70 ● Image Artifacts 70 ● Other Notes 70 Table of Contents, Continued - Nikon Z 50 | Setting Guide Video Edition - Page 4
camera controls and insert a battery and memory card. ● The supplied EH-7P charging AC adapter or an optional AC adapter is recommended for extended recording. The camera can also be powered via USB. For more information, see page 744 of the Z 9 Reference Guide, available from the Nikon Video - Nikon Z 50 | Setting Guide Video Edition - Page 5
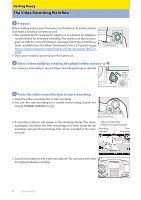
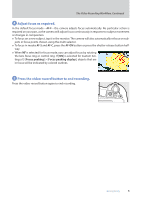
Video Recording Workflow, Continued 4 Adjust focus as required. In the default focus mode-AF-F-the camera adjusts focus automatically. No particular action is required on your part, as the camera -C, press the AF-ON button or press the shutter-release button halfway. ● When MF is selected for focus - Nikon Z 50 | Setting Guide Video Edition - Page 6
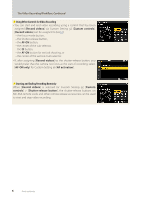
− the AF-ON button for vertical shooting, or − the center of the vertical multi selector. • If, after assigning [Record videos] to the shutter-release button, you would prefer that the camera not focus at the start of recording, select [AF-ON only] for Custom Setting a6 [AF activation]. Starting and - Nikon Z 50 | Setting Guide Video Edition - Page 7
button Fn2 button Fn3 button Image sensor g (Fn4) button O (Q) button Speaker Monitor b button U button Power switch Shutter-release button E button S (Q) button Video-record button Control panel Connector for external microphone Headphone connector HDMI connector USB connector Focus-mode button - Nikon Z 50 | Setting Guide Video Edition - Page 8
can greatly complicate the post-production process, particularly when it comes to video. For this reason, we recommend that, before exchanging lenses or the like, you configure the sensor shield to close when the camera is turned off. This can be accomplished by selecting [Sensor shield closes - Nikon Z 50 | Setting Guide Video Edition - Page 9
of recording. o r Frame size and rate The frame size (in pixels) and frame rate for video recording (0 19). iu t Time remaining y Video file type The recording time available for videos (0 17). The video file type (0 18). u Sound level The sound level for audio recording. Displayed in red if - Nikon Z 50 | Setting Guide Video Edition - Page 10
DISP button to choose the information displayed in video mode. The type and content of the Card High-Temperature Warning A high-temperature warning appears in the shooting display when the temperature of the memory card rises. Do not attempt to remove the memory card; instead, wait for the camera - Nikon Z 50 | Setting Guide Video Edition - Page 11
The Video Recording Display, Continued ■ Customizing the Displays The indicators shown in the displays can be chosen using Custom Settings g12 [Custom monitor shooting display] and g13 [ - Nikon Z 50 | Setting Guide Video Edition - Page 12
The Video Recording Display, Continued ■ The Virtual Horizon Display The virtual horizon can be used to help level the camera. It can be used, for example, to level the camera when it is mounted on a tripod. At default settings, it can be viewed by pressing the DISP button to cycle to Display 3. ● - Nikon Z 50 | Setting Guide Video Edition - Page 13
turn the display off. The display type can be selected using Custom Setting d16 [Virtual horizon type]. ■ Using Zoom in Video Mode To zoom in on the display in video mode (to a maximum of approximately 16×), press the X button. ● Use the X and W (Q) buttons to zoom in and out. ● A navigation window - Nikon Z 50 | Setting Guide Video Edition - Page 14
video-related controls, or the video recording menu. The i-Button Menu ● To display the video i menu, rotate the photo/video selector to 1 and either press the i button or tap the i icon. Option [Set Picture Dials Items for which the camera displays an on-screen guide can be adjusted by - Nikon Z 50 | Setting Guide Video Edition - Page 15
Picture Control Microphone sensitivity White balance 0 0 32 0 33 0 21 0 20 0 36, 37 0 25 0 44 0 22 ■ Custom Controls The following controls can be assigned video [Vertical multi selector center] y [Command dials] G [Shutter-release button] 3 [Lens Fn2 button] S [Lens Fn button] l [Lens - Nikon Z 50 | Setting Guide Video Edition - Page 16
] [Video file type] [Frame size/frame rate] [Image area] [ISO sensitivity settings] [White balance] [Set Picture Control] [Manage Picture Control] by check marks (4) and those that cannot by dashes (-). i-button menu 4 Camera controls - Other menus 4 • The items that can be accessed via the - Nikon Z 50 | Setting Guide Video Edition - Page 17
recording. Destination i-button menu 4 To choose the slot used for video recording when two memory cards are Camera controls inserted: Other menus - 4 1 With the camera in video mode, press the i button and then high- light [Destination] and press J. ●Options will be displayed. ●You can - Nikon Z 50 | Setting Guide Video Edition - Page 18
of brightnesses (dynamic range). This mode supports HDR (high dynamic range). It has a wider dynamic range than SDR. • It is available only when [H.265 10-bit (MOV)] is selected for [Video file type]. This mode uses Nikon's unique log curve. Choose for pictures with a wide dynamic range. 3D LUTs - Nikon Z 50 | Setting Guide Video Edition - Page 19
settings covered in this section control video picture quality. Frame Size/Frame Rate Choose the video frame size (in pixels) and frame rate. ■ Choosing a Frame Size and Frame Rate i-button menu 4 Camera controls - Other menus 4 1 With the camera in video mode, press the i button and then - Nikon Z 50 | Setting Guide Video Edition - Page 20
Picture Quality, Continued Choose Image Area i-button menu 4 Choose the image area. Select [FX] to shoot videos in what is referred Camera controls 4 to as "FX-based video format", [DX] to shoot in "DX-based video format". Other menus 4 ■ Video Image Area Options The illustration shows the - Nikon Z 50 | Setting Guide Video Edition - Page 21
Picture Quality, Continued ISO Sensitivity i-button menu 4 Videos recorded in modes P, S, and A are shot using auto ISO sensitivity Camera controls 4 (ISO AUTO in the shooting display and control panel), ISO sensitivity can be manually set to values between ISO 64 and Hi 2.0 by holding the - Nikon Z 50 | Setting Guide Video Edition - Page 22
Picture temperature by rotating the sub-command dial. ● When preset manual is selected, you can choose a white balance preset by selection is shown in the shooting display. i-button menu 4 Camera controls 4 Other menus 4 U button ■ Fine-Tuning White video recording menu. 22 Settings - Nikon Z 50 | Setting Guide Video Edition - Page 23
Picture Quality, Continued ■ "Auto" and "Natural Light Auto": Locking Auto White Balance You can temporarily lock auto white balance when shooting in [Auto] and [Natural light - Nikon Z 50 | Setting Guide Video Edition - Page 24
Picture Quality, Continued ■ Measuring a New Value for Preset Manual White Balance Use preset manual white balance to until the des- tination preset is displayed. ●Choose from presets d-1 through d-6. 3 Release the U button briefly and then press it again to select direct measurement mode. ●The - Nikon Z 50 | Setting Guide Video Edition - Page 25
will exit to the shooting display. g (Fn4) button n [Auto] The camera automatically adjusts settings based on the [Neutral] Picture Control to optimize contrast and outlines for videos. • Recommended for most situations. Q [Standard] Choose for results that give more priority to resolution - Nikon Z 50 | Setting Guide Video Edition - Page 26
Controls that have been modified from default settings are indicated by an asterisk ("U"). ■ Picture Control Settings Manual adjustments [Effect level] Mute or heighten the effect of Creative Picture Controls. [Quick sharp] Use [Quick sharp] to quickly adjust levels for balanced [Sharpening - Nikon Z 50 | Setting Guide Video Edition - Page 27
camera adjust the setting automatically. • Results vary with exposure and the position of the subject in the frame. The o Indicator The o indicator under the value display in the Picture for black-and-white photography. Toning (Monochrome Only) Pressing 3 when an option other than [B&W] (black-and- - Nikon Z 50 | Setting Guide Video Edition - Page 28
Picture Quality, Continued HLG Quality i-button menu 4 Adjust HLG video image processing options for use when [HLG] is cho- Camera controls - sen for tone mode. Other menus 4 HLG quality can be adjusted using [HLG quality] in the video recording menu. ■ HLG Quality Settings Manual - Nikon Z 50 | Setting Guide Video Edition - Page 29
[ON] to reduce barrel distortion when shooting with wide-angle Camera controls lenses and pin-cushion distortion when shooting with long lenses. Other menus - 4 [Auto distortion control] is available in both the photo shooting and video recording menus. Changes to one apply to the other. ● When - Nikon Z 50 | Setting Guide Video Edition - Page 30
Picture Quality, Continued Vibration Reduction Choose whether to enable vibration reduction. i-button menu 4 Camera controls - Other menus 4 ■ Choosing a Vibration Reduction Option 1 With the camera in video Vibration reduction may be unavailable with some lenses. • We recommend that you wait - Nikon Z 50 | Setting Guide Video Edition - Page 31
Picture Quality, Continued Electronic VR i-button menu 4 Choose whether to enable electronic vibration reduction in video mode. Camera controls - Other menus 4 1 With the camera in video mode, press the i button and then high- light [Electronic VR] and press J. ●Options will be displayed. ● - Nikon Z 50 | Setting Guide Video Edition - Page 32
choose a shooting mode, hold the I button and rotate the main Camera controls 4 command dial. Other menus - ● The selected option is as in mode P. 2 The maximum ISO sensitivity for videos recorded with [ON] selected for [Electronic VR] in the video recording menu is ISO 25600. 3 The upper limit - Nikon Z 50 | Setting Guide Video Edition - Page 33
Exposure Compensation i-button menu 4 Exposure compensation is used to alter exposure from the value sug- Camera controls 4 gested by the camera. It can be used to make pictures brighter or darker. Other menus - Hold the E button and rotate a command dial. E button ● E icons appear - Nikon Z 50 | Setting Guide Video Edition - Page 34
Camera controls 4 ural contrast. Use for high-contrast scenes, for example when photo- Other menus 4 graphing brightly-lit outdoor scenery through a door or window or tak- ing pictures of shaded subjects on a sunny day. Settings can be adjusted using [Active D-Lighting] in the video recording - Nikon Z 50 | Setting Guide Video Edition - Page 35
controls 4 Other menus 4 Settings can be adjusted using [Metering] in the video recording menu. ● The option currently selected is shown in the shooting display. ■ Metering Options L [Matrix metering] The camera meters a wide area of the frame and sets exposure according to tone distribution - Nikon Z 50 | Setting Guide Video Edition - Page 36
focus settings used when recording videos. Focus Mode Choose how the camera focuses. i-button menu 4 Camera controls 4 Other menus 4 AF] AF-F [Full-time AF] MF [Manual focus] Use with stationary subjects. • The camera focuses when the shutter-release button is pressed halfway or the AF-ON - Nikon Z 50 | Setting Guide Video Edition - Page 37
panel. Focus-mode button ■ AF-Area Mode Options d [Single-point AF] The camera will focus on the subject in the selected focus point only. f [Wide-area the reticle over the target and start tracking by pressing the shutter-release button halfway n [Subject-tracking AF] or by pressing J or AF - Nikon Z 50 | Setting Guide Video Edition - Page 38
Detection Options i-button menu 4 Choose the type of subject to which the camera gives priority when fo- Camera controls - cusing using autofocus. Other menus 4 ■ Choosing a Subject Detection Option 1 With the camera in video mode, press the i button and then high- light [AF-area mode/subj - Nikon Z 50 | Setting Guide Video Edition - Page 39
vehicles. Subject Detection The performance of subject-detection may drop if either [HLG] or [N-Log] is selected for video tone mode. ■ [AF When Subject Not Detected] Choose whether the camera focuses if unable to detect a subject of the type selected for [Subject detection] when AF-F is selected - Nikon Z 50 | Setting Guide Video Edition - Page 40
Display Choose focus point display options. i-button menu - Camera controls - Other menus 4 Settings can be adjusted using Custom Setting a11 [Focus point display]. ■ Manual Focus Mode Choose whether the focus point is displayed at all times in manual focus mode. ● [ON]: The focus point is - Nikon Z 50 | Setting Guide Video Edition - Page 41
Focus, Continued Focus Peaking i-button menu 4 When focus peaking is enabled in manual focus mode, objects that are Camera controls 4 in focus are indicated by colored outlines in the display. Other menus 4 Settings can be adjusted using Custom Setting a13 [Focus peaking] > [Focus peaking - Nikon Z 50 | Setting Guide Video Edition - Page 42
]. ● Choose higher values for faster focus, lower values for slower focus. Use [When to apply] to choose when the selected option applies. D [Always] The camera focuses at the selected speed at all times in video mode. E [Only while recording] Focus is adjusted at the selected speed only while - Nikon Z 50 | Setting Guide Video Edition - Page 43
by quickly shifting focus to a new subject in the same area. Save Focus Position i-button menu - Choose whether the camera saves the current focus position when Camera controls turned off and restores it when turned on. Other menus - 4 Settings can be adjusted using [Save focus position - Nikon Z 50 | Setting Guide Video Edition - Page 44
sensitivity. Using an External Microphone • Audio can be recorded with videos using external microphones with 3.5 mm mini-jack plugs connected to the camera's microphone connector. • Use [Mic jack plug-in power] in the video recording menu to choose whether the power for the external microphone is - Nikon Z 50 | Setting Guide Video Edition - Page 45
in and external micro- Camera controls phones respond. Other menus - 4 Settings can be adjusted using [Frequency response] in the video recording menu. ● [Wide reduction for optional stereo microphones that support this feature can be enabled or disabled using microphone controls. Settings 45 - Nikon Z 50 | Setting Guide Video Edition - Page 46
controls - Other menus 4 Settings can be adjusted using [Mic jack plug-in power] in the video recording menu. ● The camera does not provide power to external microphones when [OFF] is selected. ● To prevent noise from interference generated by the power supply, we recommend turning plug- - Nikon Z 50 | Setting Guide Video Edition - Page 47
con- nected to the camera via an HDMI cable. The camera supports Atomos SHOGUN, NINJA, and manually]: Enter the hour, minute, second, and frame number manually. • [Current time]: Set the time code to the current time as reported by the camera clock. Before proceeding, select [Time zone and date - Nikon Z 50 | Setting Guide Video Edition - Page 48
via an FTZ II or FTZ mount adapter. ● Certain Z mount lenses that can only be focused manually are not supported. Focus Ring Rotation Range i-button menu - Choose how far lens focus or control rings must be rotated to go all the Camera controls way from the minimum focus distance to infinity - Nikon Z 50 | Setting Guide Video Edition - Page 49
g2 [Custom controls]. Customize i Menu i-button menu - Choose the items listed in the i menu displayed when the i button is Camera controls pressed in video mode. Other menus - 4 1 Highlight Custom Setting g1 [Customize i menu] and press J. 2 Highlight the position you want to change and - Nikon Z 50 | Setting Guide Video Edition - Page 50
E [Exposure compensation] 9 [ISO sensitivity settings] m [White balance] h [Set Picture Control] 6 [HLG quality] y [Active D-Lighting] w [Metering] s [Focus position using Custom Setting g1 [Customize i menu]. 2 With the camera in video mode, press the i button and then high- light [Multi-selector - Nikon Z 50 | Setting Guide Video Edition - Page 51
. 1 Assign [Multi selector exposure comp.] to the desired position using Custom Setting g1 [Customize i menu]. 2 With the camera in video mode, press the i button and then high- light [Multi selector exposure comp.] and press J. ●Options will be displayed. ●You can also select an option using - Nikon Z 50 | Setting Guide Video Edition - Page 52
[Custom controls] to choose the roles played by Camera controls - camera controls during filming. Other menus 4 1 Highlight for vertical shooting] F [Vertical multi selector center] y [Command dials] G [Shutter-release button] 3 [Lens Fn2 button] S [Lens Fn button] l [Lens control ring] - Nikon Z 50 | Setting Guide Video Edition - Page 53
Displays, Continued ■ Roles That Can Be Assigned to Camera Controls The roles that can be assigned to these videos] ---- 4 4 - 4 4 -- 4 4 - 4 --- v [Shooting mode] --- 4 n [Shooting menu bank] 4 4 4 4 -- 4 -- 4 4 ------- J [Choose image area] 4 4 4 4 -- 4 -- 4 4 ------- h [Set Picture - Nikon Z 50 | Setting Guide Video Edition - Page 54
and M. • The display may flicker while aperture is adjusted. Control Lock i-button menu - Lock exposure settings or focus-point selection during filming. Camera controls Other menus 4 4 Settings can be adjusted using Custom Setting g3 [Control lock]. Select [ON] to lock shutter speed at its - Nikon Z 50 | Setting Guide Video Edition - Page 55
Controls and Displays, Continued View Assist i-button menu - Preview the effects of the [HLG] and [N-Log] tone modes during record- Camera controls - ing using simplified colors for enhanced contrast. Other menus 4 Settings can be adjusted using Custom Setting g8 [View assist]. Select [ON] - Nikon Z 50 | Setting Guide Video Edition - Page 56
mode, only focus peaking will take effect. To view the zebra display in manual focus mode, select [OFF] for Custom Setting a13 [Focus peaking] > [Focus peaking display]. Turning the Zebra Display On and Off Using Camera Controls • Zebra pattern can be assigned to a control using Custom Setting g2 - Nikon Z 50 | Setting Guide Video Edition - Page 57
Controls and Displays, Continued Grid Type Choose a framing grid for video mode. i-button menu - Camera controls - Other menus 4 The grid can be selected using Custom Setting g11 [Grid type]. It is displayed either by: ● pressing a control to which [Framing grid] - Nikon Z 50 | Setting Guide Video Edition - Page 58
Displays, Continued Custom Shooting Displays i-button menu - Choose the shooting displays accessible by pressing the DISP button in Camera controls - video mode. The displays can be tailored to different conditions. Other menus 4 Display 1 Display 2 Display 4 Display 3 The monitor and - Nikon Z 50 | Setting Guide Video Edition - Page 59
■ Histogram Selecting (M) [Histogram] displays an RGB histogram. Controls and Displays, Continued ■ Framing Grid Selecting (M) [Framing grid] displays a framing grid. The type of grid can be selected using Custom Setting g11 [Grid type] (0 57). ■ Center Indicator Selecting (M) [Center indicator] - Nikon Z 50 | Setting Guide Video Edition - Page 60
the M button to cycle through the displays as follows. [Automatic display switch]: The camera automatically switches between the viewfinder and monitor displays based on information from the eye sensor. ● In video mode, the eye sensor will not trigger the viewfinder while the monitor is tilted - Nikon Z 50 | Setting Guide Video Edition - Page 61
. The cable must be purchased separately. Always turn the camera HDMI connector for connection to camera off before connecting or disconnecting a cable. ● If a memory card is inserted in the camera when it is connected to a recorder, video will be recorded both to the recorder and the memory - Nikon Z 50 | Setting Guide Video Edition - Page 62
camera. If it does not, the camera will search for a supported resolution and frame rate. If no supported resolution and frame rate is found, output will be suspended. ● The camera searches for a supported search order No memory card inserted in camera Memory card inserted in camera 4320/30p V - Nikon Z 50 | Setting Guide Video Edition - Page 63
if: • output resolution is higher than the current frame size or • the recorder does not support the selected output resolution. Caution: "4320p (Progressive)" and "2160p (Progressive)" If a memory card is inserted when [4320p (progressive)] or [2160p (progressive)] is selected for output resolution - Nikon Z 50 | Setting Guide Video Edition - Page 64
10-bit (MOV)] or [H.265 8-bit (MOV)] is selected for [Video file type] in the video recording menu varies with the frame size and rate. Frame size/frame rate [Frame size/frame rate]. Recording to External Recorders That Support a Bit Depth of 10 Bits The HDMI signal will be output at a bit - Nikon Z 50 | Setting Guide Video Edition - Page 65
menus 4 Settings can be adjusted using [External rec. cntrl (HDMI)] in the video recording menu. ● For information on whether your recorder supports external recording control, consult the manufacturer. ● The camera display will turn off automatically when the time selected for Custom Setting c3 - Nikon Z 50 | Setting Guide Video Edition - Page 66
full-frame playback. Press the shutter-release button halfway to return to shooting mode. Using the Command Dials During video playback, the command dials can be used . Use this feature to review video footage in detail. ■ Customizing the Command Dials for Video Playback Choose the roles played - Nikon Z 50 | Setting Guide Video Edition - Page 67
button, then highlight [Save current frame] and press J. ● This option is not available with videos recorded with [ProRes 422 HQ 10-bit (MOV)] or [H.265 10-bit (MOV)] selected for [Video file type] in the video recording menu. ! [Save Current Frame] • Stills are saved at the dimensions selected for - Nikon Z 50 | Setting Guide Video Edition - Page 68
Protect the current picture. W [Voice memo] Record and play voice memos. Voice memos cannot be added to videos. [None] Flicking up or down has no effect. ● Pictures selected by flicking priority upload marking to be added when the camera is connected to a computer or FTP server. 68 Viewing - Nikon Z 50 | Setting Guide Video Edition - Page 69
include pictures that have yet to be uploaded. [Select for upload • Select (M) both options to include both pictures that have and pictures that have not been uploaded. (FTP)] [Voice memo] M: Include pictures with voice memos. [Retouched pictures] M: Include retouched pictures. Viewing Videos - Nikon Z 50 | Setting Guide Video Edition - Page 70
maximum length is reached, - you switch shooting modes, - you switch modes using the photo/video selector, - the lens is removed, or - the camera's internal temperature rises. ● The current video will not be saved if the battery is removed during recording. 70 Appendix © 2022 Nikon Corporation
-
 1
1 -
 2
2 -
 3
3 -
 4
4 -
 5
5 -
 6
6 -
 7
7 -
8
-
9
-
10
-
11
-
12
-
13
-
14
-
15
-
16
-
17
-
18
-
19
-
20
-
21
-
22
-
23
-
24
-
25
-
26
-
27
-
28
-
29
-
30
-
31
-
32
-
33
-
34
-
35
-
36
-
37
-
38
-
39
-
40
-
41
-
42
-
43
-
44
-
45
-
46
-
47
-
48
-
49
-
50
-
51
-
52
-
53
-
54
-
55
-
56
-
57
-
58
-
59
-
60
-
61
-
62
-
63
-
64
-
65
-
66
-
67
-
68
-
69
-
70
 |
 |
Professional
Setting Guide
—Video Edition—