Nikon Z 7 Network Guide
Nikon Z 7 Manual
 |
View all Nikon Z 7 manuals
Add to My Manuals
Save this manual to your list of manuals |
Nikon Z 7 manual content summary:
- Nikon Z 7 | Network Guide - Page 1
Network Guide • Read this manual thoroughly before using the camera. • After reading this manual, keep it in a readily accessible En place for future reference. - Nikon Z 7 | Network Guide - Page 2
and playback, read: The User's Manual (included) Master basic camera operations as well as features specific to this camera. • Table of Contents • Getting to Know the Camera • First Steps • Basic Photography and Playback • Basic Settings • Shooting Controls • The i Button • Troubleshooting ii - Nikon Z 7 | Network Guide - Page 3
For a guide to all aspects of camera operation, read: The Reference Manual (pdf) In addition to the material covered in the User's Manual supplied with the camera, the Reference Manual details the options available in the camera menus and covers such topics as connecting the camera to other - Nikon Z 7 | Network Guide - Page 4
connected. Be sure to read this guide and the camera manual thoroughly and to keep them where they will be read by all those who use the product. Should damage to this guide render it illegible, a replacement copy (pdf ) can be downloaded from the Nikon Download Center. Symbols and Conventions To - Nikon Z 7 | Network Guide - Page 5
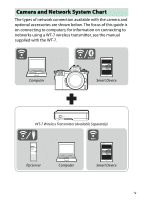
The types of network connection available with the camera and optional accessories are shown below. The focus of this guide is on connecting to computers; for information on connecting to networks using a WT-7 wireless transmitter, see the manual supplied with the WT-7. Computer Smart Device WT - Nikon Z 7 | Network Guide - Page 6
Can Do for You The camera supports network connections to computers, smartphones, tablets, and other devices. Once connected, you can upload pictures or control the camera remotely. Want to upload pictures to a computer? ...then connect via Wi-Fi (0 1) Using the camera's built-in wireless LAN - Nikon Z 7 | Network Guide - Page 7
via Bluetooth or Wi-Fi. Want to upload pictures to a computer or ftp server, control the camera from a computer, or control the camera from a web browser? ...then connect using the WT-7 (0 37) Connecting to a network using the optional WT-7 wireless transmitter gives access to a variety - Nikon Z 7 | Network Guide - Page 8
to language in any form, by any means, ensure that the information in this without Nikon's prior written guide is accurate and complete, we permission. would appreciate it were you to • Nikon reserves the right to change bring any errors or omissions to the the appearance and specifications - Nikon Z 7 | Network Guide - Page 9
Notice Concerning Prohibition of Copying or Reproduction Note that simply being in possession of material that has been digitally copied or reproduced by means of a scanner, digital camera, or other device may be punishable by law. • Items prohibited by law from being copied • Cautions on certain - Nikon Z 7 | Network Guide - Page 10
Table of Contents About This Guide iv Camera and Network System Chart v What Networks Can Do for You vi Notices viii Connecting to Computers via Wi-Fi 1 What Wi-Fi Can Do for - Nikon Z 7 | Network Guide - Page 11
WT-7 37 What the WT-7 Can Do for You 38 Connecting Using the WT-7 39 Menu Guide 40 Connect to Smart Device 40 Pairing (Bluetooth 40 Select to Send (Bluetooth 41 Wi-Fi 45 MAC Address 45 Wireless Transmitter (WT-7 46 Wireless Transmitter 46 Troubleshooting 47 Appendix 48 Index 49 xi - Nikon Z 7 | Network Guide - Page 12
-Long Learning" commitment to ongoing product support and education, continually-updated information is available online at the following sites: • For users in the U.S.A.: https://www.nikonusa.com/ • For users in Europe and Africa: https://www.europe-nikon.com/support/ • For users in Asia, Oceania - Nikon Z 7 | Network Guide - Page 13
Once the devices are paired, you will be able to connect to the computer from the camera. The Wireless Transmitter Utility is a computer application available for download from the Nikon Download Center: https://downloadcenter.nikonimglib.com Be sure to download the latest version after reading the - Nikon Z 7 | Network Guide - Page 14
-Point Mode The camera and computer connect via direct wireless link, with the camera acting as a to a wireless network. Infrastructure Mode The camera connects to a computer on an existing Internet while connected to the camera. D Infrastructure Mode This guide assumes you are connecting via - Nikon Z 7 | Network Guide - Page 15
the steps below to create a direct wireless link to a computer in access-point mode. 1 Display network settings. Select Connect to PC in the camera setup menu, then highlight Network settings and press 2. 2 Select Create profile. Highlight Create profile and press J. 3 Select Direct connection to PC - Nikon Z 7 | Network Guide - Page 16
Click the wireless LAN icon in the menu bar and select the SSID displayed by the camera in Step 3. When prompted to supply a password, enter the encryption key displayed by the camera in Step 3. 5 Launch the Wireless Transmitter Utility. When prompted, launch the Wireless Transmitter Utility on the - Nikon Z 7 | Network Guide - Page 17
. In the Wireless Transmitter Utility, select the camera name displayed in Step 5 and click Next. 7 Enter the authentication code. The camera will display an authentication code. Enter the authentication code in the dialog displayed by the Wireless Transmitter Utility and click Next. Connecting - Nikon Z 7 | Network Guide - Page 18
pairing is complete, press J. In the Wireless Transmitter Utility, click Next. The application will close automatically. A connection will now be established between the camera and computer. 9 Check the connection. When a connection is established, the network SSID will be displayed in green in the - Nikon Z 7 | Network Guide - Page 19
steps below to connect to a computer on an existing network in infrastructure mode. 1 Display network settings. Select Connect to PC in the camera setup menu, then highlight Network settings and press 2. 2 Select Create profile. Highlight Create profile and press J. Connecting to Computers via Wi-Fi - Nikon Z 7 | Network Guide - Page 20
press X in Step 3, then press J and choose from the following options: • Push-button WPS: For routers that support push-button WPS. Press the camera J button to connect. • PIN-entry WPS: The camera will display a PIN; to connect, use a computer to enter the PIN into the router (for more information - Nikon Z 7 | Network Guide - Page 21
4 Choose a network. Highlight a network SSID and press J (if the desired network is not displayed, press X to search again). Encrypted networks are indicated by a h icon; if the selected network is encrypted, you will be prompted to enter the encryption key as described in Step 5. If the network is - Nikon Z 7 | Network Guide - Page 22
5 Enter the encryption key. When prompted to enter the encryption key for the wireless router, press J... ...and enter the key as described below. For information on the encryption key, see the documentation for the wireless router. Press X when entry is complete. Press X again to initiate the - Nikon Z 7 | Network Guide - Page 23
following options and press J. • Obtain automatically: Select this option if the network is configured to supply the IP address automatically. • Enter manually: When prompted, enter an IP address by rotating the main command dial to highlight segments, pressing 4 and 2 to change and pressing J to - Nikon Z 7 | Network Guide - Page 24
. In the Wireless Transmitter Utility, select the camera name displayed in Step 7 and click Next. 9 Enter the authentication code. The camera will display an authentication code. Enter the authentication code in the dialog displayed by the Wireless Transmitter Utility and click Next. 12 Connecting - Nikon Z 7 | Network Guide - Page 25
pairing is complete, press J. In the Wireless Transmitter Utility, click Next. The application will close automatically. A connection will now be established between the camera and computer. 11 Check the connection. When a connection is established, the network SSID will be displayed in green in the - Nikon Z 7 | Network Guide - Page 26
utility's online help. Selecting Pictures for Upload Follow the steps below to select pictures for upload. 1 Start playback. Press the K button on the camera and select full-frame or thumbnail playback. 2 Press the i button. Select a picture and press the i button to display the playback i menu. 14 - Nikon Z 7 | Network Guide - Page 27
> Options > Auto send. Upload begins only after the photo has been recorded to the memory card; be sure a memory card is inserted in the camera. Movies and photographs taken in movie mode are not uploaded automatically when recording is complete but must instead be uploaded from the playback display - Nikon Z 7 | Network Guide - Page 28
to send the remaining pictures. D Loss of Signal Wireless transmission may be interrupted if the signal is lost, but can be resumed by turning the camera off and then on again. 16 Connecting to Computers via Wi-Fi - Nikon Z 7 | Network Guide - Page 29
Wi-Fi to connect to a smart device. D Access-Point Mode An error will occur if the computer's wireless connection is disabled before the camera's. Disable camera Wi-Fi first. Reconnecting To reconnect to an existing network, either: • select Enable for Connect to PC > Wi-Fi connection in the setup - Nikon Z 7 | Network Guide - Page 30
of charge from the Apple App Store® and on Google Play™. Visit the Nikon website for the latest SnapBridge news. What SnapBridge Can Do for You Using the SnapBridge app, you can: • Download pictures from the camera Download existing pictures or download new pictures as they are taken. • Control the - Nikon Z 7 | Network Guide - Page 31
Wireless Connections Using the SnapBridge app, you can connect via Wi-Fi (0 20) or Bluetooth (0 26). Connecting via Bluetooth allows you to set the camera clock and update location data using information provided by the smart device. Wi-Fi Bluetooth Connecting to Smart Devices 19 - Nikon Z 7 | Network Guide - Page 32
device (for details, see the documentation provided with the device), check that there is space available on the camera memory card, and ensure that the batteries in the camera and smart device are fully charged to prevent the devices turning off unexpectedly. 1 Smart device: Launch the SnapBridge - Nikon Z 7 | Network Guide - Page 33
If you have launched the app before, open the tab and tap > Wi-Fi mode before proceeding to Step 3. 2 Smart device: Choose the camera and connection type. When prompted to choose the camera type, tap mirrorless camera and then tap Wi-Fi connection. Connecting to Smart Devices 21 - Nikon Z 7 | Network Guide - Page 34
smart device will instruct you to ready the camera. Turn the camera on. Do NOT tap Next until you have completed Step 4. 4 Camera: Enable Wi-Fi. Select Connect to smart device > Wi-Fi connection in the setup menu, then highlight Establish Wi-Fi connection and press J. The camera SSID and password - Nikon Z 7 | Network Guide - Page 35
5 Smart device: Tap Next. Tap Next once you have enabled Wi-Fi on the camera as described in the preceeding step. 6 Smart device: Tap View options. After reading the instructions displayed by the smart device, tap View options. • Android devices: Wi-Fi settings will be displayed. • iOS devices: The - Nikon Z 7 | Network Guide - Page 36
7 Smart device: Enter the camera SSID and password. Enter the SSID and password displayed by the camera in Step 4. Android device (actual displays may differ) iOS device (actual displays may differ) You will not be required to enter the password when next you connect to the camera. 24 Connecting to - Nikon Z 7 | Network Guide - Page 37
8 Smart device: Return to the SnapBridge app. After a Wi-Fi connection is established, Wi-Fi mode options will be displayed. See online help for information on using the SnapBridge app. D Ending Wi-Fi Connections To end the Wi-Fi connection, tap . When the icon changes to , tap and select Exit Wi-Fi - Nikon Z 7 | Network Guide - Page 38
to a Paired Device" (0 36). ❚❚ Connecting for the First Time: Pairing Before connecting via Bluetooth for the first time, you will need to pair the camera and smart device as described below. See "Android", below, if you are using an Android device, or "iOS" (0 31) for information on pairing with - Nikon Z 7 | Network Guide - Page 39
2 Android device: Launch the SnapBridge app. If this is the first time you have launched the app, tap Connect to camera and proceed to Step 3. If you have launched the app before, open the tab and tap Connect to camera. Connecting to Smart Devices 27 - Nikon Z 7 | Network Guide - Page 40
3 Android device: Choose the camera. Tap the camera name. 4 Camera/Android device: Check the authentication code. Confirm that the camera and Android device display the same authentication code (circled in the illustration). 28 Connecting to Smart Devices - Nikon Z 7 | Network Guide - Page 41
you are using). D Pairing Error If you wait too long between pressing the button on the camera and tapping the button on the Android device, pairing will fail and an error will be displayed. • Camera: Press J and return to Step 1. • Android device: Tap OK and return to Step 2. Connecting to Smart - Nikon Z 7 | Network Guide - Page 42
: Follow the on-screen instructions. Camera: Press J. The camera will display a message stating that the devices are connected. Android device: Pairing is complete. Tap OK to exit to the tab. D Pairing for the First Time The first time you pair the Android device with a camera after installing the - Nikon Z 7 | Network Guide - Page 43
iOS device. For information on Android devices, see "Android" (0 26). 1 Camera: Ready the camera. Select Connect to smart device > Pairing (Bluetooth) in the setup menu, then highlight Start pairing and press J... ...to display the camera name. 2 iOS device: Launch the SnapBridge app. If this is the - Nikon Z 7 | Network Guide - Page 44
If you have launched the app before, open the tab and tap Connect to camera. 3 iOS device: Choose the camera. Tap the camera name. 32 Connecting to Smart Devices - Nikon Z 7 | Network Guide - Page 45
4 iOS device: Read the instructions. Read the pairing instructions carefully and tap Understood. 5 iOS device: Select an accessory. When prompted to select an accessory, tap the camera name again. Connecting to Smart Devices 33 - Nikon Z 7 | Network Guide - Page 46
iOS you are using). D Pairing Error If you wait too long between pressing the button on the camera and tapping the button on the iOS device, pairing will fail and an error will be displayed. • Camera: Press J and return to Step 1. • iOS device: Dismiss the SnapBridge app and check that it is - Nikon Z 7 | Network Guide - Page 47
Follow the on-screen instructions. Camera: Press J. The camera will display a message stating that the devices are connected. iOS device: Pairing is complete. Tap OK to exit to the tab. D Pairing for the First Time The first time you pair the iOS device with a camera after installing the SnapBridge - Nikon Z 7 | Network Guide - Page 48
❚❚ Connecting to a Paired Device Connecting to a smart device that has already been paired with the camera is quick and easy. 1 Camera: Enable Bluetooth. In the setup menu, select Connect to smart device > Pairing (Bluetooth) > Bluetooth connection, then highlight Enable and press J. 2 Smart device: - Nikon Z 7 | Network Guide - Page 49
over Ethernet or wireless networks. D Before Connecting the WT-7 Before connecting the WT-7, confirm that the firmware for the camera and WT-7 have been updated to the latest versions. For more information, visit the Nikon website for your region (0 xii). Connecting to Networks Using the WT-7 37 - Nikon Z 7 | Network Guide - Page 50
(image transfer mode), you can also upload them to ftp servers (ftp upload mode). Pictures can be uploaded as they are taken. • Control the camera and take pictures remotely from a computer InstallingCamera Control Pro 2 (available separately) on a network computer gives you complete control over - Nikon Z 7 | Network Guide - Page 51
(WT-7) > Wireless transmitter > Use in the camera setup menu. A Menu Options for the WT-7 All menu options for the WT-7 can be found in the setup menu under Wireless transmitter (WT-7). For more information, see the manual provided with the WT-7. See the manual provided with the WT-7 for more - Nikon Z 7 | Network Guide - Page 52
Menu Guide Read this section for information on the menu items used when the camera is connected to a network. All devices using Bluetooth. Option Start pairing Paired devices Bluetooth connection Description Pair the camera with a smart device (0 26). List paired smart devices or switch from - Nikon Z 7 | Network Guide - Page 53
immediately when a connection is established. Option Auto select to send Manual select to send Deselect all Description If On is selected, photos movie mode, which must be selected for upload manually). Regardless of the option selected with the camera, photos are uploaded in JPEG format at - Nikon Z 7 | Network Guide - Page 54
channel manually. • Current settings: View current Wi-Fi settings. • Reset connection settings: Select Yes to reset Wi-Fi settings to default values. Send While Off If On is selected, upload of images to smart devices connected via Bluetooth will continue even when the camera is off. 42 Menu Guide - Nikon Z 7 | Network Guide - Page 55
Connect to PC Connect to computers via Wi-Fi. Wi-Fi Connection Select Enable to connect using the settings currently selected for Network settings. Menu Guide 43 - Nikon Z 7 | Network Guide - Page 56
or Manual to choose the channel manually) and authentication/encryption type (OPEN or WPA2-PSK-AES) used for connection to the camera. If manually to enter the IP address (Address) and sub-net mask (Mask). Note that an IP address is required for infrastructure mode connections. 44 Menu Guide - Nikon Z 7 | Network Guide - Page 57
has been recorded to the memory card; be sure a memory card is inserted in the camera. Movies and photos taken in movie mode are not uploaded automatically when recording is complete but must "sending" icon will immediately be terminated. MAC Address Display the camera MAC address. Menu Guide 45 - Nikon Z 7 | Network Guide - Page 58
PC are automatically disabled. Information on the Wireless transmitter option can be found below; for information on Choose hardware, Network settings, and Options, see the manual provided with the WT-7. Wireless Transmitter Select Use to enable WT-7 when it is connected to the - Nikon Z 7 | Network Guide - Page 59
.html For information on the WT-7, see the manual provided with the transmitter. For information on the Wireless Transmitter Utility or Camera Control Pro 2, see the online help for the application in question. Problem Solution 0 The camera displays a TCP/IP error. Check settings for the - Nikon Z 7 | Network Guide - Page 60
Appendix Apple Public Source License This product includes Apple mDNS source code that is subject to the terms of the Apple Public Source License located at URL https://developer.apple.com/opensource/. This file contains Original Code and/or Modifications of Original Code as defined in and that are - Nikon Z 7 | Network Guide - Page 61
N Access-point mode 2, 3 Android 26 Authentication/encryption 42 Auto send 15, 45 B Network settings 3, 7, 44 O Options 45 P Bluetooth 26, 40 C Camera Control Pro 2 38 Connect to computers 1 Connect to PC 43 Connect to smart devices 18 D Deselecting pictures 15 Direct connection to PC - Nikon Z 7 | Network Guide - Page 62
No reproduction in any form of this manual, in whole or in part (except for brief quotation in critical articles or reviews), may be made without written authorization from NIKON CORPORATION. SB8K01(11) 6MOA2711-01
-
 1
1 -
 2
2 -
 3
3 -
 4
4 -
 5
5 -
 6
6 -
 7
7 -
8
-
9
-
10
-
11
-
12
-
13
-
14
-
15
-
16
-
17
-
18
-
19
-
20
-
21
-
22
-
23
-
24
-
25
-
26
-
27
-
28
-
29
-
30
-
31
-
32
-
33
-
34
-
35
-
36
-
37
-
38
-
39
-
40
-
41
-
42
-
43
-
44
-
45
-
46
-
47
-
48
-
49
-
50
-
51
-
52
-
53
-
54
-
55
-
56
-
57
-
58
-
59
-
60
-
61
-
62
 |
 |

Network Guide
•
Read this manual thoroughly before using the camera.
•
After reading this manual, keep it in a readily accessible
place for future reference.
En