NordicTrack 2500 R English Manual
NordicTrack 2500 R Manual
 |
View all NordicTrack 2500 R manuals
Add to My Manuals
Save this manual to your list of manuals |
NordicTrack 2500 R manual content summary:
- NordicTrack 2500 R | English Manual - Page 1
QUESTIONS? If you have questions, or if there are missing parts, we will guarantee complete satisfaction through direct assistance from our and instructions in this manual before using this equipment. Save this manual for future reference. USER'S MANUAL Visit our website at www.nordictrack.com new - NordicTrack 2500 R | English Manual - Page 2
AND ADJUSTMENT 8 HOW TO FOLD AND MOVE THE TREADMILL 22 TROUBLE-SHOOTING 23 CONDITIONING GUIDELINES 25 PART LIST 26 ORDERING REPLACEMENT PARTS 27 LIMITED WARRANTY Back Cover Note: An EXPLODED DRAWING is attached in the center of this manual. NordicTrack is a registered trademark of ICON Health - NordicTrack 2500 R | English Manual - Page 3
owner to ensure that all users of this treadmill are adequately informed of all warnings and precautions. 2. Use the treadmill only as described in this manual. 12. Failure to use a properly functioning surge suppressor could result in damage to the control system of the treadmill. If the control - NordicTrack 2500 R | English Manual - Page 4
. 25. Inspect and tighten all parts of the treadmill regularly. 26. Never insert or treadmill, and before performing the main- tenance and adjustment procedures de- scribed in this manual. Never remove the motor hood unless instructed to do so by an authorized service representative. Servicing - NordicTrack 2500 R | English Manual - Page 5
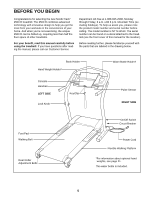
YOU BEGIN Congratulations for selecting the new NordicTrack® 2500 R treadmill. The 2500 R combines advanced technology with innovative design to help you get the most from your workouts in the convenience of your home. And when you're not exercising, the unique 2500 R can be folded up, requiring - NordicTrack 2500 R | English Manual - Page 6
shown. 1 Refer to the inset drawing. Insert one of the Extension Legs (88) into the treadmill as shown. Make sure that the Extension Leg is turned so the Thick Base Pad (90) is thread in the Bolt. Have another person support the Handrails as you complete the remaining steps. 6 89 115 111 110 111 - NordicTrack 2500 R | English Manual - Page 7
with the thick sides of the Bushings toward the center of the treadmill (refer to the inset drawing). Lift the right Handrail (89) slightly 108 107 110 106 104 105 102 7. Make sure that all parts are tightened before you use the treadmill. Keep the included allen wrench in a secure place. The - NordicTrack 2500 R | English Manual - Page 8
treadmill being damaged, always use a surge suppressor with your treadmill (see drawing 1 at the right). To purchase a surge suppressor, see your local NordicTrack dealer or call 1-800-806-3651 and order part in damage to the control system of the treadmill. If the control system is damaged, the - NordicTrack 2500 R | English Manual - Page 9
Key FEATURES OF THE CONSOLE The advanced console offers an impressive array of features to help you get the most from your exercise. When the console is in the manual mode, the speed and incline of the treadmill control the speed and incline of the treadmill as a personal trainer guides you - NordicTrack 2500 R | English Manual - Page 10
the clip to the waistband of your clothes. Stand on the foot pads of the treadmill. Find the clip attached to the key and slide the clip Clip onto the waistband of your clothes. Next, in- sert the key into the console. Test the clip by carefully taking a few steps backward until the - NordicTrack 2500 R | English Manual - Page 11
pressed, the incline will change by 0.5%. The incline range is 0% to 10%. Note: After the buttons are pressed, it may take a moment for the treadmill to reach the selected incline setting. 11 The LED track-When the manual mode or the iFIT.com mode is selected, the program display will show an LED - NordicTrack 2500 R | English Manual - Page 12
key and then reinsert it. Note: For simplicity, all instructions in this manual refer to miles. To reset the displays, press the Stop button, remove the key, and then reinsert the key moment after the button is pressed, the treadmill will automatically adjust to the first speed and incline settings for - NordicTrack 2500 R | English Manual - Page 13
: If you manually override the speed or incline setting for the current segment, when the segment ends the treadmill will automatically adjust + button. To end the program, press the Stop button, remove the key, and then reinsert the key. 4 Follow your progress with the displays. Refer to step 5 on - NordicTrack 2500 R | English Manual - Page 14
page 10. 2 Select one of the custom programs. When the key is inserted, the manual Learn Indicator mode will be selected. To select one of the for the first segment, simply adjust the speed and incline of the treadmill to the desired levels by pressing the Speed and Incline buttons. Every - NordicTrack 2500 R | English Manual - Page 15
of the custom programs. When the key is inserted, the manual Learn Indicator mode will be selected. the flashing Current Segment column and the treadmill will automatically adjust to the speed and . When the current segment is completed, the new setting will be saved in memory. To increase - NordicTrack 2500 R | English Manual - Page 16
: If your CD player has separate LINE OUT and PHONES jacks, see instruction A below. If your CD player has only one jack, see instruction B. A. Plug one end of the audio cable into the jack on the front of the treadmill near the power cord. Plug the other end of the cable into the - NordicTrack 2500 R | English Manual - Page 17
CONNECT YOUR COMPUTER Note: If your computer has a 3.5mm LINE OUT jack, see instruction A. If your computer has only a PHONES jack, see instruction B. A. Plug one end of the audio cable into the jack on the front of the treadmill near the power cord. Plug the other end of the cable into the LINE - NordicTrack 2500 R | English Manual - Page 18
key fully into the console. See GETTING STARTED on page 10. 2 Select the iFIT.com mode. When the key is inserted, the manual begin guiding you through your workout. Simply follow your personal trainer's instructions. Note the speed and/or incline of the treadmill is about to change. CAUTION: Always - NordicTrack 2500 R | English Manual - Page 19
too low, you can manually override the settings at any button or remove the key and go to step 1 on page 18. Note: If the speed or incline of the treadmill does not change when See the bottom of page 24. 5 Follow your progress with the LED track and the displays. See step 5 on page 11. 6 Measure your - NordicTrack 2500 R | English Manual - Page 20
an internet service provider. A instructions to start the program. When you start the program, an on-screen countdown will begin. 7 Return to the treadmill and stand on the foot pads. Find the clip attached to the key can manually override the track and the displays. See step 5 on page 11. 9 - NordicTrack 2500 R | English Manual - Page 21
The console features an information mode that keeps track of the total number of hours that the treadmill has been operated and the total number of select the information mode, hold down the Stop button while inserting the key into the console. When the information mode is selected, the following - NordicTrack 2500 R | English Manual - Page 22
lowest position. If this is not done, the treadmill may be permanently damaged. Remove the key and unplug the power cord. CAUTION: You must be able to safely lift 45 pounds (20 kg) in order to raise, lower, or move the treadmill. 1. Hold the treadmill with your hands in the locations shown at the - NordicTrack 2500 R | English Manual - Page 23
that the on/off switch is in the on position. f. If the treadmill still will not run, please call our Customer Service Department, toll-free. PROBLEM: The displays of the console do not function properly SOLUTION: a. Remove the key from the console and unplug the a power cord. Carefully tip the - NordicTrack 2500 R | English Manual - Page 24
the power cord, insert the key and run the treadmill for a few minutes. Repeat until the walking belt is properly tightened. b 3"-4" Rear Roller Adjustment Bolts c. If the walking belt still slows when walked on, please call our Customer Service Department, tollfree. PROBLEM: The walking belt is - NordicTrack 2500 R | English Manual - Page 25
your heart rate as a guide. The chart below shows recommended will help prevent post-exercise problems. To measure your heart rate the speed and incline of the treadmill. Fat Burning EXERCISE FREQUENCY To key to success is to make exercise a regular and enjoyable part of your everyday life. 25 - NordicTrack 2500 R | English Manual - Page 26
No. NTTL11513 R0202A To locate the parts listed below, refer to the EXPLODED DRAWING attached in the center of this manual. Key No. Qty. 11 22 31 42 52 62 78 88 91 Guide Foot Grip (Left) Walking Belt Walking Deck Foot Grip (Right) Power Board Front Endcap (Right) Support Bracket Screw Support - NordicTrack 2500 R | English Manual - Page 27
The MODEL NUMBER OF THE PRODUCT (NTTL11513) • The NAME OF THE PRODUCT (NordicTrack® 2500 R treadmill) • The SERIAL NUMBER OF THE PRODUCT (see the front cover of this manual) • The KEY NUMBER AND DESCRIPTION OF THE PART(S) (see the PART LIST on pages 26 and 27 and the EXPLODED DRAWING attached in the - NordicTrack 2500 R | English Manual - Page 28
WHAT IS COVERED-The entire NordicTrack® 2500 R treadmill ("Product") is warranted to sale; store, operate, and maintain the Product as specified in the Manual; notify our Customer Service Department of any defect within 10 days after discovery of the defect; as instructed, return any defected part - NordicTrack 2500 R | English Manual - Page 29
18 32 8 19 53 55 16 20 21 17 22 15 119 1 2 3 117 8 53 55 10 5 4 9 6 7 7 4 5 117 6 14 8 53 55 11 119 2 42 41 43 56 30 23 40 39 45 35 34 33 7 38* 46 49 48 47 36 7 118 25 7 59 52 54 58 7 57 99 28 27 29 42 34 33 7 18 32 27 87 56 71 24 20 49 12 8 66 - NordicTrack 2500 R | English Manual - Page 30
EXPLODED DRAWING-Model No. NTTL11513 51 73** 74** 76 78 79 83 82 80 81 80 81 82 31 79 89 31 82 82 31 82 31 82 115 116 44** 114 69 77 114 113 110 112 111 109* 108 107 106 104 103 102 105 97 98 96 7 116 113 112 113 111 88 84* 85 90 86 75 86 90 86 101 100 7 98 88
-
 1
1 -
 2
2 -
 3
3 -
 4
4 -
 5
5 -
 6
6 -
 7
7 -
8
-
9
-
10
-
11
-
12
-
13
-
14
-
15
-
16
-
17
-
18
-
19
-
20
-
21
-
22
-
23
-
24
-
25
-
26
-
27
-
28
-
29
-
30
 |
 |
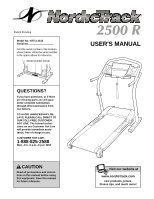
USER'S MANUAL
CAUTION
Read all precautions and instruc-
tions in this manual before using
this equipment. Save this manual
for future reference.
Serial Number Decal
Model No. NTTL11513
Serial No.
Find the serial number in the location
shown below. Write the serial number
in the space above for reference.
Visit our website at
www.nordictrack.com
new products, prizes,
fitness tips, and much more!
QUESTIONS?
If you have questions, or if there
are missing parts, we will guar-
antee complete satisfaction
through direct assistance from
our factory.
TO AVOID UNNECESSARY DE-
LAYS, PLEASE CALL DIRECT TO
OUR TOLL-FREE CUSTOMER
HOT LINE. The trained techni-
cians on our Customer Hot Line
will provide immediate assis-
tance, free of charge to you.
CUSTOMER HOT LINE:
1-888-825-2588
Mon.–Fri., 6 a.m.–6 p.m. MST
Patent Pending