Oki B4350n B4250/4350 Setup
Oki B4350n Manual
 |
View all Oki B4350n manuals
Add to My Manuals
Save this manual to your list of manuals |
Oki B4350n manual content summary:
- Oki B4350n | B4250/4350 Setup - Page 1
- Oki B4350n | B4250/4350 Setup - Page 2
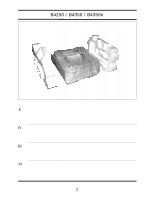
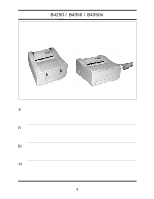
B4250 / B4350 / B4350n E Remove packing pieces and open protective plastic bag. Fr Retirez les piéces de portection en plastique. Ouverez le sac de portection en plastique. Es - Oki B4350n | B4250/4350 Setup - Page 3
. (1) Printer, (2) CD, (3) Light-shield bag, (4) Toner Cartridge, (5) Power Cable, (6)Installation Guides. Fr Vérification du contenu. (1) Imprimante, (2) CD, (3) Sac en plastique, (4) Cartouche, (5) Cordon d'alimentation, (6) Guide de Installation. Es Compruebe el contenido. (1) Impresora, (2) CD - Oki B4350n | B4250/4350 Setup - Page 4
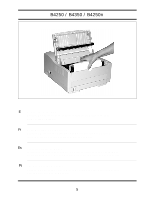
B4250 / B4350 / B4350n 1. 2. E 1. Remove any remaining shipping tape. 2. Press the cover release button and lift the cover. Fr 1. Retirez les sangles de manutention. 2. Appuyez sur le bouton permettant - Oki B4350n | B4250/4350 Setup - Page 5
B4250 / B4350 / B4250n E Remove the image drum. Caution! Do not expose drum to direct sunlight or let it sit in room light for more than 5 minutes. Fr Retirez les tambour d'impression. Attention! N'exposez pas le tambour à la - Oki B4350n | B4250/4350 Setup - Page 6
B4250 / B4350 / B4350n E Pull out protective paper and plastic film from image drum. Caution! Do not touch image drum's green surface. Do not expose the drum to direct sunlight. Fr Retirez l'emballage protégeant et la pellicule le tambours d'impression. Attention! Ne touchez pas la surface verte du - Oki B4350n | B4250/4350 Setup - Page 7
B4250 / B4350 / B4250n E Remove the drum shipping seal or sponge. Fr Retirer le dispositif d'étanchéité du tambour d'image ou l'éponge. Es Retire el retenedor del cilindro o esponja. Pt Retire a vedação do cilindro ou esponja. 7 - Oki B4350n | B4250/4350 Setup - Page 8
B4250 / B4350 / B4350n E Replace the Image Drum. Fr Remettez les tambour d'impression en place. Es Vuelva a colocar los unidade de imagen. Pt Volte a instalar os tamabore de imagens. 8 - Oki B4350n | B4250/4350 Setup - Page 9
B4250 / B4350 / B4250n E Unwrap the toner cartridge. Shake to distribute the toner. Fr Déballez la cartouche de toner. Secouez la cartouche latéralement pour répartir le toner. Es Desenvuelva el cartucho de tóner. Agite hacia ambos lados para distribuir el tóner. Pt Desembale o cartucho de toner. - Oki B4350n | B4250/4350 Setup - Page 10
B4250 / B4350 / B4350n E Remove sealing tape from the toner cartridge. Fr Retirez le ruban adhésif d'étanchéité de la cartouche de toner. Es Retire la cinta de precinto del cartucho de tóner. Pt Retire a fita de vedação do cartucho de toner. 10 - Oki B4350n | B4250/4350 Setup - Page 11
B4250 / B4350 / B4250n E Place left edge of toner into image drum. Lower right edge aligning slot (1) on shaft (2). Fr Insérez l'extrémité gauche de la cartouche de toner dans le tambour à images, et l'extrémité droite de celle-ci en alignant la fente (1) avec la tige (2). Es Coloque el extremo - Oki B4350n | B4250/4350 Setup - Page 12
B4250 / B4350 / B4350n E Lock toner cartridge with colored lever. Fr Enclenchez la cartouche de toner avec le levier de couleur. Es Bloquee el cartucho de tóner con la palanca de color. Pt Bloqueie o cartucho de toner com a alavanca colorida. 12 - Oki B4350n | B4250/4350 Setup - Page 13
B4250 / B4350 / B4250n E Close the top cover. Fr Refermez le capot supérieur. Es Cierre la cubierta superior. Pt Feche a tampa superior. 13 - Oki B4350n | B4250/4350 Setup - Page 14
B4250 / B4350 / B4350n E Pull out the paper tray. Fr Sortez le bac à papier. Es Saque la bandeja del papel. Pt Retire o tabuleiro de papel. 14 - Oki B4350n | B4250/4350 Setup - Page 15
B4250 / B4350 / B4250n E Set guides to paper size. Fr Réglez les guides suivant le format de papier utilisé. Es Ajuste las guías al tamaño del papel. Pt Ajuste as guias de acordo com o tamanho de papel. 15 - Oki B4350n | B4250/4350 Setup - Page 16
B4250 / B4350 / B4350n E Load paper. Do not fill above the PAPER FULL mark (1). Fr Mettez du papier dedans.Ne dépassez pas la marque indiquant PAPER FULL (1). Es Cargue el papel. No la llene más arriba de la marca PAPER FULL (1). Pt Coloque o papel.Não encha acima da marca de PAPER FULL (1). 16 - Oki B4350n | B4250/4350 Setup - Page 17
B4250 / B4350 / B4250n E Gently close the paper tray. Fr Repoussez le bac à papier doucement à sa place. Es Vuelva a introducir suavemente la bandeja del papel. Pt Cuidadosamente volte a instalar o tabuleiro de papel. 17 - Oki B4350n | B4250/4350 Setup - Page 18
B4250 / B4350 / B4350n E Insert the power cable. Fr Introduisez le cardon d'alimentation et mettez. Es Enchufe el cable de alimentación. Pt Insira o cabo 18 - Oki B4350n | B4250/4350 Setup - Page 19
B4250 / B4350 / B4250n E 1. Make sure both printer and computer are OFF. 2. Plug interface cable into printer port. Plug other end into 1. Asegúrese de que la impresora y la computadora estén apagadas. 2. Inserte en el conector en la porte posterior de la impresora. Conecte el otro extremo del cable - Oki B4350n | B4250/4350 Setup - Page 20
B4250 / B4350 / B4350n E If you need further assistance or have questions • See our web site: http://my.okidata.com • In the U.S. and Canada, call:1-800-OKI-DATA (1-800-654-3282) 24 hours a day, 7 days a week Fr Si vous avez besoin d'une assistance plus approfondie ou si vous avez des questions •
-
 1
1 -
 2
2 -
 3
3 -
 4
4 -
 5
5 -
 6
6 -
 7
7 -
8
-
9
-
10
-
11
-
12
-
13
-
14
-
15
-
16
-
17
-
18
-
19
-
20
 |
 |