Oki B731dn B721dn/B731dn/MPS5501 RAM installation instructions (E/F/S/P)
Oki B731dn Manual
 |
View all Oki B731dn manuals
Add to My Manuals
Save this manual to your list of manuals |
Oki B731dn manual content summary:
- Oki B731dn | B721dn/B731dn/MPS5501 RAM installation instructions (E/F/S/P) - Page 1
RAM to increase the memory capacity of your printer in cases such as if occur. Your printer supports 512 MB RAM. 4 Make sure the LED (3) indicated by the arrow is unlit. If it is lit, wait until it turns off. 3 Note � Use only genuine Oki Data products. The performance cannot be guaranteed when - Oki B731dn | B721dn/B731dn/MPS5501 RAM installation instructions (E/F/S/P) - Page 2
button. 8 Plug the AC cable and removed cables into your printer, and then turn on the power switch. 9 Press the scroll button on MB]. Note � If the value of [RAM] has not increased, turn off your printer and unplug the AC cable and all the cables, and then reinstall the additional RAM. - Oki B731dn | B721dn/B731dn/MPS5501 RAM installation instructions (E/F/S/P) - Page 3
B721dn/B731dn/MPSR55A0M1 � Utilisez uniquement des produits pour données de marque Oki Data. Les performances ne sont pas garanties en cas d'utilisation � L'électricité statique peut endommager des pièces. Déchargez votre corps de son électricité statique en touchant des parties métalliques mises à - Oki B731dn | B721dn/B731dn/MPS5501 RAM installation instructions (E/F/S/P) - Page 4
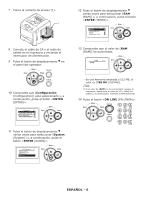
7 Fermez le capot d'accès (1). 1 12 Appuyez plusieurs fois sur le bouton de pour sélectionner [RAM (RAM)], puis sur le bouton . 8 Branchez le cordon d'alimentation et les câbles qui avaient été retirés sur l'imprimante, puis mettez l'interrupteur d'alimentation en marche. 9 du - Oki B731dn | B721dn/B731dn/MPS5501 RAM installation instructions (E/F/S/P) - Page 5
B721dn/B731dn/MPS5501 - Instalación de RAM adicional Instale RAM adicional para Si está iluminado, espere hasta que se apague. 3 Nota � Utilice exclusivamente productos originales de Oki Data. No se garantiza el rendimiento si se utilizan otros productos. � La electricidad estática podría da - Oki B731dn | B721dn/B731dn/MPS5501 RAM installation instructions (E/F/S/P) - Page 6
7 Cierre la cubierta de acceso (1). 1 12 Pulse el botón de desplazamiento varias veces para seleccionar [RAM (RAM)] y, a continuación, pulse el botón . 8 Conecte el cable de CA y el resto de cables en la impresora y encienda el interruptor de alimentación. 9 Pulse el botón de - Oki B731dn | B721dn/B731dn/MPS5501 RAM installation instructions (E/F/S/P) - Page 7
B721dn/B731dn/MPS5501 - Instalar uma RAM Adicional Instale uma RAM adicional para 4 seta está apagado. Se estiver aceso, aguarde que se apague. 3 Nota � Utilize apenas produtos Oki Data genuínos. O desempenho não pode ser garantido quando se utilizam outros produtos. � começar a trabalhar, - Oki B731dn | B721dn/B731dn/MPS5501 RAM installation instructions (E/F/S/P) - Page 8
a RAM adicional. 14 Prima o botão . 11 Prima várias vezes o botão de deslocamento para seleccionar [System (System)] e depois prima o botão . ©2013 OKI Data Americas, Inc. All rights reserved. PORTUGUÊS - 8 59416501
-
 1
1 -
 2
2 -
 3
3 -
 4
4 -
 5
5 -
 6
6 -
 7
7 -
8
 |
 |

Install additional RAM to increase the memory
capacity of your printer in cases such as if
occur. Your printer supports 512 MB RAM.
Note
�
Use only genuine Oki Data products. The performance
cannot be guaranteed when other products are used.
�
The static electricity may cause damage to the parts.
Discharge the static electricity in your body by touching
grounded metallic parts, etc. before work.
Memo
�
For banner printing, installing additional memory is
recommended.
1
Turn off your printer, and then unplug all
the cables from the printer.
Reference
�
"Turning Off the Power" P.29
2
Open the access cover (1) on the right
side of a printer.
1
3
Loosen the screw to remove the metal
plate (2).
2
4
Make sure the LED (3) indicated by the
arrow is unlit.
If it is lit, wait until it turns off.
3
5
Insert the additional RAM (4) into the
printer.
Note
�
Be careful of the orientation of the additional RAM.
The additional RAM has small dents on its connector,
4
6
Insert the right side of the metal plate
(2) into the printer, close it, then secure
it by tightening the screw.
2
B721dn/B731dn/MPS5501 - Installing
Additional RAM
ENGLISH - 1