Oki C330dn Image Drum Replacement Instructions (English, Fran栩s, Es
Oki C330dn Manual
 |
View all Oki C330dn manuals
Add to My Manuals
Save this manual to your list of manuals |
Oki C330dn manual content summary:
- Oki C330dn | Image Drum Replacement Instructions (English, Fran栩s, Es - Page 1
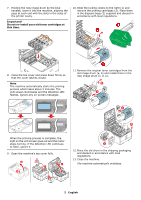
the new image drum using the priming cartridges supplied. Contents 3. Holding it by the blue handles, lift the image drum assembly, complete with toner cartridges, up and out of the machine 1: Disposal Bags 2: Image Drum with Priming Cartridges Installing the Image Drum 1. Make sure the printer is - Oki C330dn | Image Drum Replacement Instructions (English, Fran栩s, Es - Page 2
7. Holding the new image drum by the blue handles, lower it into the machine, aligning the pegs at each end with the slots in the sides of the printer cavity. Important! Do not re-install your old toner cartridges at this time. 10. Slide the locking collars to the right (1) and remove the priming - Oki C330dn | Image Drum Replacement Instructions (English, Fran栩s, Es - Page 3
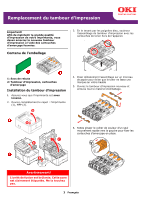
par les poignées bleu, soulevez l'assemblage de tambour d'impression avec les cartouches de toner hors de l'appareil. 1: Sacs de rebuts 2: Tambour d'impression, cartouches d'amorçage Installation du tambour d'impression 1. Assurez-vous que l'imprimante est sous tension. 2. Ouvrez complètement le - Oki C330dn | Image Drum Replacement Instructions (English, Fran栩s, Es - Page 4
les ergots à chaque extrémité dans les fentes sur les côtés de la cavité de l'appareil. Important! Ne réinstallez pas vos anciennes cartouches de toner pour le moment. 10. Glissez les colliers de verrouillage vers la droite (1) et retirez les cartouches d'amorçage (2). Placez-les dans les sacs de - Oki C330dn | Image Drum Replacement Instructions (English, Fran栩s, Es - Page 5
el conjunto sobre una hoja de papel para . 5. Abra el nuevo cilindro de imagen y desprenda los materiales de empaque. a a 6. Deslice el collar de color con un movimiento rápido vers la gauche pour fixer les cartouches en place. c b ¡Advertencia! El fusor estará caliente. Esta área cuenta con - Oki C330dn | Image Drum Replacement Instructions (English, Fran栩s, Es - Page 6
luz de LED centellea. Ignore los mensajes que aparecen en pantalla. 11. Retire los cartuchos de tóner del cilindro de imagen viejo (a, b) y instale los cartuchos de tóner originales en el nuevo cilindro de imagen (c, d, e). b a e d Cuando termina el proceso de acondiciona- miento, la luz de la - Oki C330dn | Image Drum Replacement Instructions (English, Fran栩s, Es - Page 7
para esta finalidade. Conteúdo 3. Segure o conjunto do cilindro OPC pelos pegadores azul e retire-o do equipamento, junto com os cartuchos de toner. 1: Sacos para descarte 2: Cilindro OPC, cartuchos de inicialização Instalação do novo cilindro OPC 1. Certifique-se de que a impressora esteja ligada - Oki C330dn | Image Drum Replacement Instructions (English, Fran栩s, Es - Page 8
da parte interna da impressora. Importante! Não reinstale os cartuchos de toner antigos Remova os cartuchos de toner originais do cilindro OPC antigo (a, b), e instale os cartuchos de toner originais no novo cilindro equipamento inicializará automaticamente. © 2010 Oki Data Americas, Inc. 59408602
-
 1
1 -
 2
2 -
 3
3 -
 4
4 -
 5
5 -
 6
6 -
 7
7 -
8
 |
 |
1
English
Image Drum Replacement
Français, consultez la page 3
•
Español, ver página 5
•
Português, ver página 7
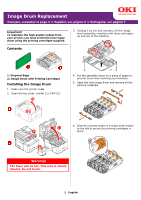
Important!
To maintain the high quality output from
your printer, you must prime the new image
drum using the priming cartridges supplied.
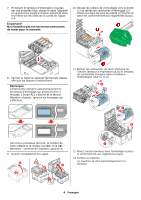
Contents
1: Disposal Bags
2: Image Drum with Priming Cartridges
Installing the Image Drum
1.
Make sure the printer is
on
.
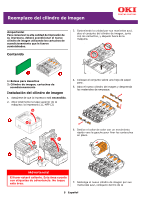
2.
Open the top cover: printer (1), MFP (2).
3.
Holding it by the blue handles, lift the image
drum assembly, complete with toner cartridges,
up and out of the machine
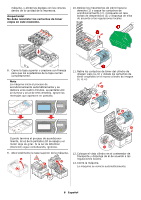
4.
Put the assembly down on a piece of paper to
prevent toner from marking your furniture.
5.
Open the new image drum and remove all the
packing materials.
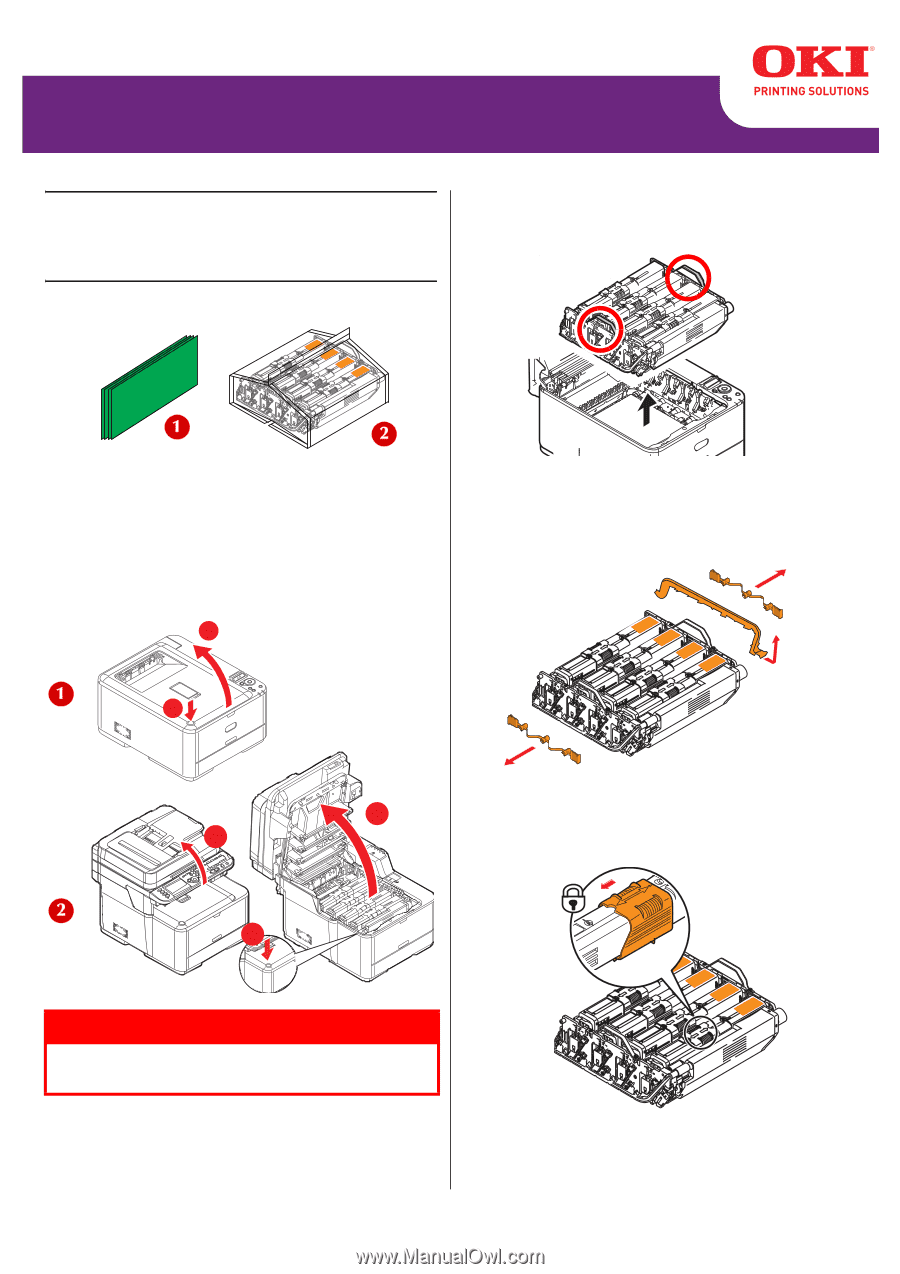
6.
Slide the colored collars in a single swift motion
to the left to secure the priming cartridges in
place.
Warning!
The fuser will be hot. This area is clearly
labeled. Do not touch.
b
c
a
b
a