Oki C5400 Fuser Instructions
Oki C5400 Manual
 |
View all Oki C5400 manuals
Add to My Manuals
Save this manual to your list of manuals |
Oki C5400 manual content summary:
- Oki C5400 | Fuser Instructions - Page 1
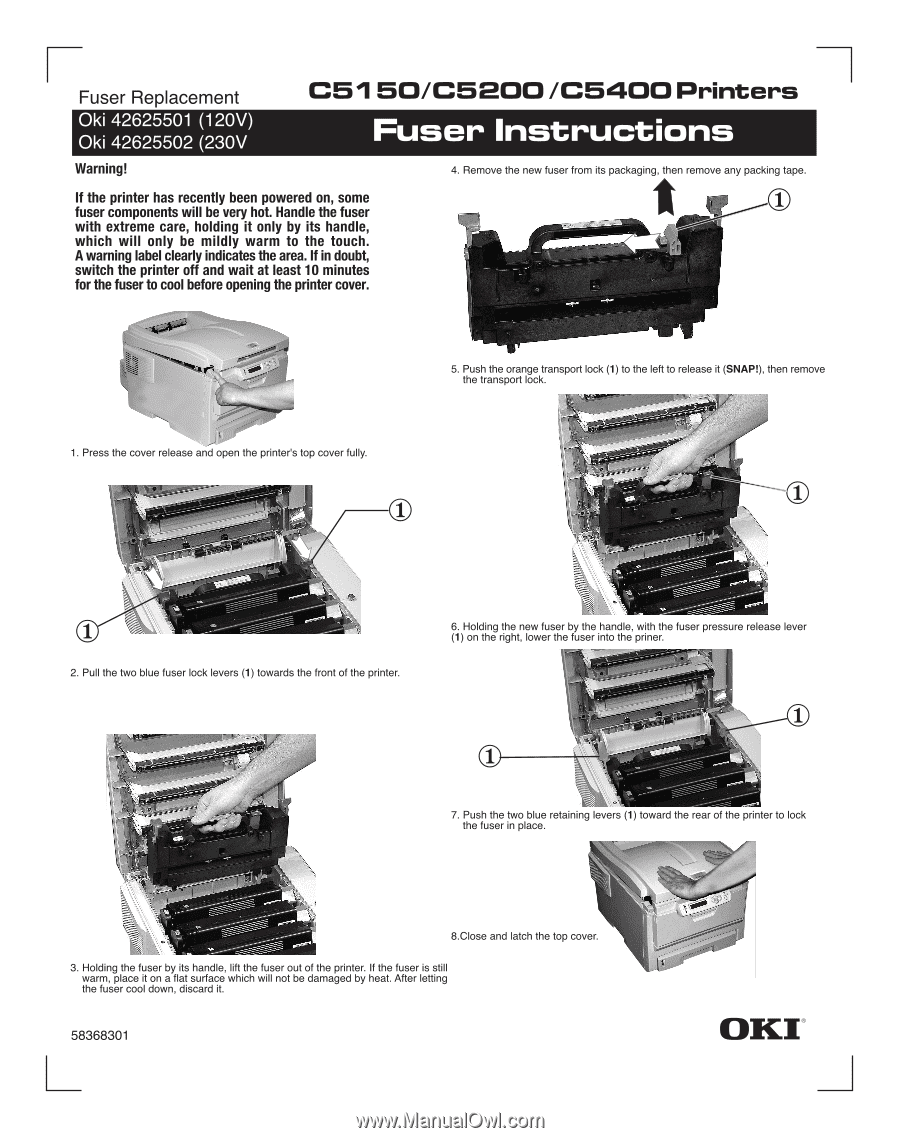
Fuser Replacement Oki 42625501 (120V) Oki 42625502 (230V Warning! C5150/C5200 /C5400 Printers Fuser Instructions 4. Remove the new fuser from its packaging, then remove any packing tape. If the printer has recently been powered on, some fuser components will be very hot. Handle the fuser with
-
 1
1
 |
 |
Fuser
Replacement
C5150/C5200 /C5400 Printers
Warning!
If
the
printer
has
recently
been
powered
on,
some
fuser
components
will
be
very
hot.
Handle
the
fuser
with
extreme
care,
holding
it
only
by
its
handle,
which
will
only
be
mildly
warm
to
the
touch.
A
warning
label
clearly
indicates
the
area.
If
in
doubt,
switch
the
printer
off
and
wait
at
least
10
minutes
for
the
fuser
to
cool
before
opening
the
printer
cover.
1.
Press
the
cover
release
and
open
the
printer's
top
cover
fully.
V!
-
1
1
2.
Pull
the
two
blue
fuser
lock
levers
(1)
towards
the
front
of
the
printer.
3.
Holding
the
fuser
by
its
handle,
lift
the
fuser
out
of
the
printer.
If
the
fuser
is
still
warm,
place
it
on
a
flat
surface
which
will
not
be
damaged
by
heat.
After
letting
the
fuser
cool
down,
discard
it.
58368301
4.
Remove
the
new
fuser
from
its
packaging,
then
remove
any
packing
tape.
5.
Push
the
orange
transport
lock
(1)
to
the
left
to
release
it
(SNAP!),
then
remove
the
transport
lock.
4;
\
r
-
rt
,
tf\
6.
Holding
the
new
fuser
by
the
handle,
with
the
fuser
pressure
release
lever
(1)
on
the
right,
lower
the
fuser
into
the
priner.
O
1
7.
Push
the
two
blue
retaining
levers
(1)
toward
the
rear
of
the
printer
to
lock
the
fuser
in
place.
8.Close
and
latch
the
top
cover.