Oki C7200 English: C7200 & C7400 Series Setup Guide, Version 02
Oki C7200 Manual
 |
View all Oki C7200 manuals
Add to My Manuals
Save this manual to your list of manuals |
Oki C7200 manual content summary:
- Oki C7200 | English: C7200 & C7400 Series Setup Guide, Version 02 - Page 1
guide when installing your printer. 1 Install the Printer h Select a Location (see p. 3) h Unpack (see p. 3) h Check Components (see p. 4) h Record the Serial No. (see p. 4) h Remove Shipping Materials (see p. 5) h Prepare Image Drums (see p. 5) h Install Toner of your OKI C7000 Series Printer. Now - Oki C7200 | English: C7200 & C7400 Series Setup Guide, Version 02 - Page 2
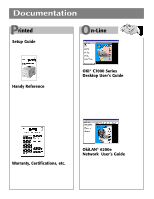
Desktop User's Guide • Print Media • Control Panel • Printer Menus • Working with Color • Document Handling • Downloaded Fonts • Overlays • Proof & Print • Secure Print • Managing Hard Drive • Managing Flash SIMM • Print Resolution • Problem Solving • Maintenance • Service & Support • Accessories - Oki C7200 | English: C7200 & C7400 Series Setup Guide, Version 02 - Page 3
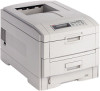
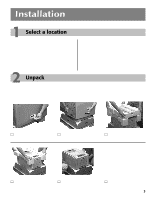
1 Select a location 2 • Firm, level surface capable of supporting at least 110 lbs (50 kg). • Clearance: - Left RH • Away from direct sunlight ! CAUTION! The printer weighs 106 pounds. Use more than one person to lift the printer. Use appropriate lifting techniques. ! It's a good idea - Oki C7200 | English: C7200 & C7400 Series Setup Guide, Version 02 - Page 4
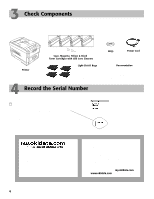
printer. Use appropriate lifting techniques. Cyan, Magenta, Yellow & Black Toner Cartridges with LED Lens Cleaners CD(s) With Drivers & On-Line User's Guides Power Cord Printer your printer and to take advantage of Oki Data's myokidata.com service. Personalized, web-based support* for the OKI - Oki C7200 | English: C7200 & C7400 Series Setup Guide, Version 02 - Page 5
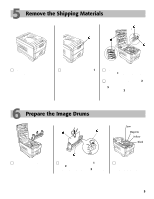
on the blue lever (2), remove the orange transport lock (3) from the end of the fuser, then push the lever (2) toward the back of the printer. 6 Prepare the Image Drums Cyan Magenta Yellow Black □ Lift out the four image drums and place them on a flat surface. □ Remove the protective sheet - Oki C7200 | English: C7200 & C7400 Series Setup Guide, Version 02 - Page 6
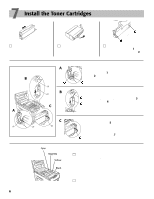
the right. A Lower the left end of the cartridge into the image drum closest to the front of the printer, so that the tube (1) on the drum slides into the port (2) on the toner cartridge. B A 6 B C Press the cartridge toward the left slightly, then lower the right end, aligning the white tab - Oki C7200 | English: C7200 & C7400 Series Setup Guide, Version 02 - Page 7
Gauge: Indicates the amount of paper left in the tray. □ Pull the paper tray out of the printer and adjust the paper guides (1) and rear paper stopper (2) for the size paper you are using. □ Fan the paper (max. 530 sheets 20-lb. paper) and load it. Keep it - Oki C7200 | English: C7200 & C7400 Series Setup Guide, Version 02 - Page 8
Printer Driver 13 The On-Line Network User's Guide The on-line OkiLAN® 6200e Network User's Guide contains instructions for setting up the printer ® Programs ® OKI C Series Network User's Guide ® Network User's Guide. Network Connection ! No Ethernet® cable is supplied with the printer. Use an - Oki C7200 | English: C7200 & C7400 Series Setup Guide, Version 02 - Page 9
® and UNIX® environments with a Java Virtual Machine installed. OKI Storage Device Manager For remote management of the printer's internal hard disk drive (optional on all but C7400dxn) and flash memory (all models). © Workstation Drivers/Software Printer Drivers • Adobe® PostScript® • PCL® On-Line - Oki C7200 | English: C7200 & C7400 Series Setup Guide, Version 02 - Page 10
line OkiLAN 6200e Network User's Guide) LAN Manager or LAN Server Use OkiNet Utilities (see "LAN Manager/LAN Server" in the on-line OkiLAN 6200e Network User's Guide) Direct Network Printing for Windows Clients Use OkiNet Connect to print directly to a network printer from a Windows workstation (see - Oki C7200 | English: C7200 & C7400 Series Setup Guide, Version 02 - Page 11
printer's front panel; see "Network Menu" in the on-line Desktop User's Guide. ! If DHCP is active, the printer directory. 3. Click OK. 4. Select the OKI printer model you have, then click Continue. 5. Install and follow the on-screen instructions to complete installation. Configure the OkiLAN - Oki C7200 | English: C7200 & C7400 Series Setup Guide, Version 02 - Page 12
Select Oki Data OkiNet Connect IP Monitor and click New Port. The Add OkiNet Connect Port dialog box appears. 6. Highlight the printer's current IP address in the list of printers on the Add OkiNet Connect Port screen and click Add. 7. Click OK. ! Refer to your OkiLAN 6200e Network User's Guide for - Oki C7200 | English: C7200 & C7400 Series Setup Guide, Version 02 - Page 13
. See "Accessories" in the on-line C9000 Series Desktop User's Guide. To activate the Duplex Unit and Hard Disk Drive in the PCL driver: □ Click Start ® Settings ® Printer. □ Right click the OKI C7200 or C7400 PCL printer icon, then click Printing Preferences (Windows 2000), Properties (Windows Me - Oki C7200 | English: C7200 & C7400 Series Setup Guide, Version 02 - Page 14
12 USB Install: Windows Windows Drivers Supplied The printer comes with two Windows drivers: Adobe PostScript and PCL. USB Drivers for the following Windows systems are supplied: • Windows 2000 Professional • Windows Me • Windows 98 USB Port Connection ! No USB interface cable is supplied with the - Oki C7200 | English: C7200 & C7400 Series Setup Guide, Version 02 - Page 15
Swatch Utility Click Start ® Programs ® OKI C Series ® Color Swatch Utility. (For more information on the Color Swatch Utility, see the on-line C7000 Series Desktop User's Guide.) Activate the Duplex Unit and Internal Hard Drive in the Printer Driver See page 13 for instructions on how to do this - Oki C7200 | English: C7200 & C7400 Series Setup Guide, Version 02 - Page 16
Open the Color Swatch Utility Click Start ® Programs ® OKI C Series ® Color Swatch Utility. (For more information on the color utilities, see the on-line C7000 Series User's Guide). Activate the Duplex Unit and Internal Hard Drive in the Printer Driver See page 13 for instructions on how to do this. - Oki C7200 | English: C7200 & C7400 Series Setup Guide, Version 02 - Page 17
! Be sure to switch off antivirus software before installing a printer driver. □ Turn the printer on, then turn the computer on. □ Place the CD supplied with the printer in the CD-ROM drive, then double-click the OKI CD icon that appears on the desktop. □ Open the MAC folder and double-click the - Oki C7200 | English: C7200 & C7400 Series Setup Guide, Version 02 - Page 18
C7400dxn), you must enter the driver and activate them. ! This procedure is also used when installing optional memory SIMMs or auxiliary paper trays. See "Accessories" in the on-line C7000 Series Desktop User's Guide. 1. Activate Chooser from the Apple menu. 2. Select LaserWriter 8. 3. Click Printer - Oki C7200 | English: C7200 & C7400 Series Setup Guide, Version 02 - Page 19
to the USB Port on the printer (2). USB: Install the Driver ! Be sure to switch off antivirus software before installing a printer driver. □ Turn the printer on, then turn the computer on. □ Place the CD supplied with the printer in the CD-ROM drive. □ Double-click the OKI CD icon that appears on - Oki C7200 | English: C7200 & C7400 Series Setup Guide, Version 02 - Page 20
C7400dxn), you must enter the driver and activate them. ! This procedure is also used when installing optional memory SIMMs or auxiliary paper trays. See "Accessories" in the on-line C7000 Series Desktop User's Guide. 1. Activate Chooser from the Apple menu. 2. Select LaserWriter 8. 3. Click Printer - Oki C7200 | English: C7200 & C7400 Series Setup Guide, Version 02 - Page 21
, one color may dominate, and printed pictures will not be as lifelike as they could be. The color balance should be set • when the printer is installed • any time the print quality seems to have deteriorated • when image drums are replaced • if you switch to a significantly different print media - Oki C7200 | English: C7200 & C7400 Series Setup Guide, Version 02 - Page 22
Print Jobs If you are using special media for an individual print job, make the temporary media setting changes in the driver as you print the job from your application. Printer Defaults If you consistently use another type of media in Tray 1 or the Multi-Purpose (MP) Tray, change the media settings - Oki C7200 | English: C7200 & C7400 Series Setup Guide, Version 02 - Page 23
For information on usable print media, see the Handy Reference Guide. Printing Transparencies Caution! Use only recommended transparencies: 3M CG3720 for individual multi-page print jobs, make the following settings in the printer driver as you print the job (File ® Print ® Properties [or Settings - Oki C7200 | English: C7200 & C7400 Series Setup Guide, Version 02 - Page 24
print jobs on thick paper, change the settings in the driver as you print the job (File ® Print ® Properties Printer Menu Settings: Thick Paper in MP Tray • MP Tray Paper Size: Letter, Legal-13, Legal-14, Legal-13.5, Executive, A4, A5, A6, B4, B5 or Custom (must be defined and saved in driver - Oki C7200 | English: C7200 & C7400 Series Setup Guide, Version 02 - Page 25
17 Check the Media Settings (cont.) Changing Media Settings for Tray1 in the Printer Menu Changing Media Settings for MP Tray in the Printer Menu Transparencies Only: Set Media Type □ Press MENU repeatedly until MEDIA MENU appears on the display. □ Press ITEM repeatedly until TRAY1 MEDIATYPE - Oki C7200 | English: C7200 & C7400 Series Setup Guide, Version 02 - Page 26
Emulation The printer is set at the factory to automatically detect the emulation of an incoming print job. To change it to always be PCL or Adobe PostScript, see "Setting the Emulation" under Control Panel, Walk-up Functions in the on-line C7000 Series User's Guide. Display Language If you wish - Oki C7200 | English: C7200 & C7400 Series Setup Guide, Version 02 - Page 27
File ® Print. □ In the Print dialog box, select the appropriate OKI C Series printer driver, then click OK. 20 Install the Handy Reference □ Remove the registered trademark of Folex Imaging. i486 is a trademark of Intel Corporation. Java is a trademark or registered trademark of Sun Microsystems, - Oki C7200 | English: C7200 & C7400 Series Setup Guide, Version 02 - Page 28
4620 Tel: (856) 235-2600 FAX: (856) 222-5320 http://www.okidata.com Oki Data Americas, Inc., 2735 Matheson Blvd. East, Unit 1, Mississauga, Ontario, Canada L4W 4M8 Tel: (800) 654-3282 FAX: (905) 238-4427 Oki Data de Mexico, S.A. de C.V., Mariano Escobedo No. 748 - 8 Piso, Col Anzures, e. p. 11590
-
 1
1 -
 2
2 -
 3
3 -
 4
4 -
 5
5 -
 6
6 -
 7
7 -
8
-
9
-
10
-
11
-
12
-
13
-
14
-
15
-
16
-
17
-
18
-
19
-
20
-
21
-
22
-
23
-
24
-
25
-
26
-
27
-
28
 |
 |

1
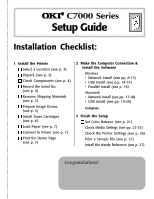
Install the Printer
Select a Location (see p. 3)
Unpack (see p. 3)
Check Components (see p. 4)
Record the Serial No.
(see p. 4)
Remove Shipping Materials
(see p. 5)
Prepare Image Drums
(see p. 5)
Install Toner Cartridges
(see p. 6)
Load Paper (see p. 7)
Connect to Power (see p. 7)
Print the Demo Page
(see p. 7)
Installation Checklist:
Please cut this page out and use it as a guide when installing your printer.
2
Make the Computer Connection &
Install the Software
Windows
•
Network Install (see pp. 8-13)
•
USB Install (see p.p. 14-15)
• Parallel Install (see p. 16)
Macintosh
•
Network Install (see pp. 17-18)
•
USB Install (see pp. 19-20)
Complete
3
Finish the Setup
Set Color Balance (see p. 21)
Check Media Settings (see pp. 22-25)
Check the Printer Settings (see p. 26)
Print a Sample File (see p. 27)
Install the Handy Reference (see p. 27)
OKI
fi
C7000 Series
Setup Guide
Congratulations!
This completes the installation of your OKI C7000
Series Printer. Now it’s time to let your imagination run
free and enjoy some colorful printing!
For more information, see the documents listed on the
back of this checklist.