Oki C7300 C7100/C7300/C7500 2nd/3rd Tray Installation Procedures
Oki C7300 Manual
 |
View all Oki C7300 manuals
Add to My Manuals
Save this manual to your list of manuals |
Oki C7300 manual content summary:
- Oki C7300 | C7100/C7300/C7500 2nd/3rd Tray Installation Procedures - Page 1
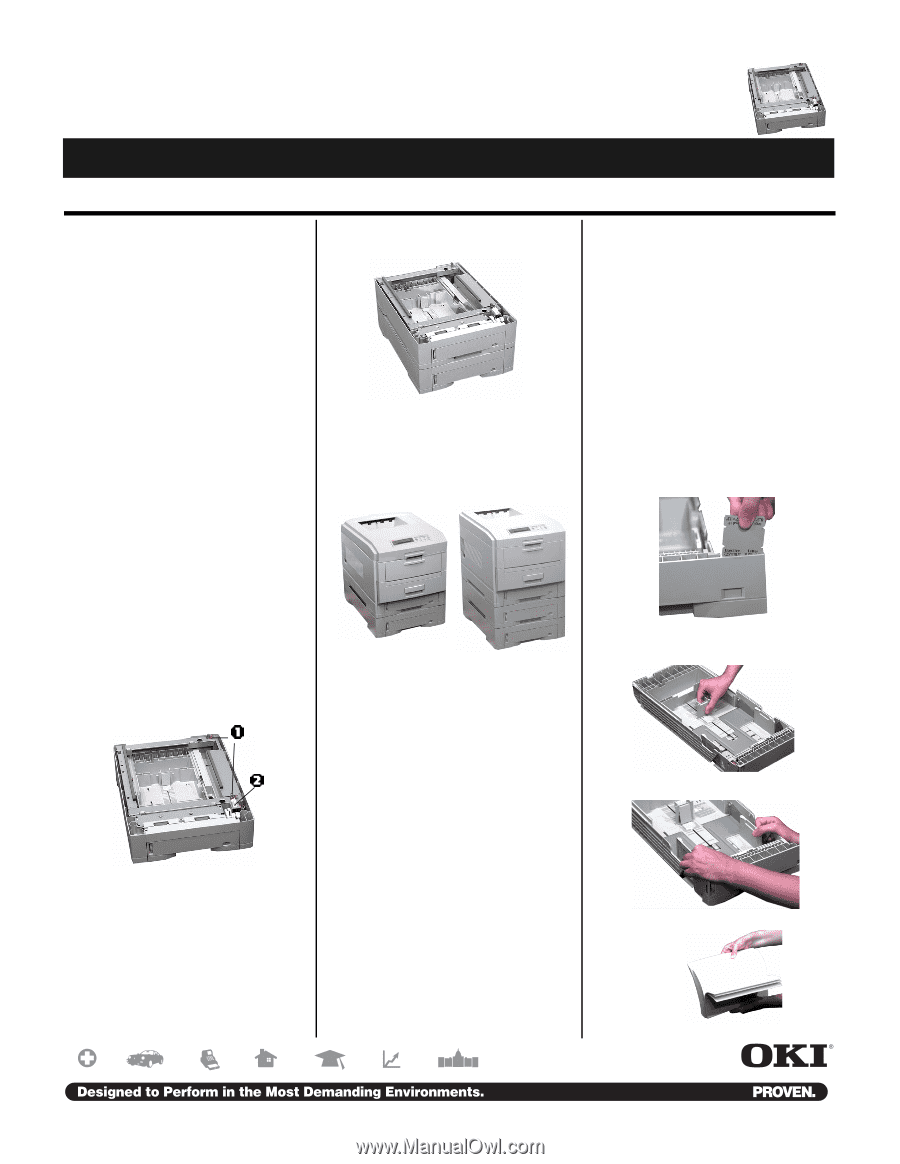
C7100/C7300/C7500 2nd/3rd Tray Installation Instructions Tray Part Number: 41945401 PHASE 1: INSTALL THE AUXILIARY TRAY(S) You can install up to two auxiliary paper trays on the printer. 1. Unpack the tray(s) and remove the shipping materials. 2. Turn off the printer and unplug the power cord. - Oki C7300 | C7100/C7300/C7500 2nd/3rd Tray Installation Procedures - Page 2
trays), then click OK. 5. Click OK, then close the Printers dialog box. Windows PostScript® Driver 1. Click Start - Settings - Printers. The Printers dialog box opens. 2. Right click the OKI C7100, C7300 or C7500 PostScript printer icon, then click Properties. 3. Click the Device Settings tab
-
 1
1 -
 2
2
 |
 |
C7100/C7300/C7500
2nd/3rd Tray
Installation Instructions
Tray Part Number: 41945401
58364501
P
HASE
1: I
NSTALL
THE
A
UXILIARY
T
RAY
(
S
)
You can install up to two auxiliary
paper trays on the printer.
1.
Unpack the tray(s) and remove the
shipping materials.
2.
Turn off the printer and unplug the
power cord.
3.
Remove the interface cable.
4.
Optional
: To lighten the weight of
the printer and make it easier to
install on the auxiliary tray(s):
a.
Remove the paper tray from the
printer.
b.
Open the top cover and lift out
the toner/drum cradle, then
close the cover and move the
printer aside.
Careful! Cover
the cradle to protect the drums
from light while they are out-
side the printer
.
5.
Move the tray into position (paper
tray facing front). Note the location
of the pins (1) and connector (2) on
the tray.
6.
If you are installing two trays, place
the first tray on top of the second
one, aligning the holes/connector in
the bottom of the upper tray with
pins/connector on the lower tray.
7.
Lower the printer onto the auxiliary
tray(s), aligning the printer with the
tray and lowering the holes/plug in
the bottom of the printer onto the
pins/socket on the tray.
8.
Reattach the interface cable.
9.
If necessary, open the cover and
reinstall the toner/drum cradle, then
reinstall the paper tray.
10.Plug in the power cord and turn on
the printer.
11. Access the printer menu and check
to be sure that the printer is
recognizing the newly installed
trays:
a.
Press MENU repeatedly until
MEDIA MENU appears on the
display.
b.
Press ITEM + repeatedly until
you see TRAY2 MEDIATYPE
on the display.
c.
If you installed two trays, press
ITEM + until you see TRAY3
MEDIATYPE on the display.
d. If you do not see TRAY2
MEDIATYPE or TRAY3
MEDIATYPE, the printer is
not properly attached to the
connector on the tray(s) and
you need to lift the printer and
reposition it.
P
HASE
2: L
OAD
P
RINT
M
EDIA
1.
Pull out the tray.
a.
If necessary, lift out the media
indicator at the right end of the
tray and reposition it to corre-
spond with the media you will
normally use in that tray.
b.
Position the paper guides in the
tray.
2.
If using paper, fan it.