Oki GL408e GL408e/GL412e RFID Kit Install Guide
Oki GL408e Manual
 |
View all Oki GL408e manuals
Add to My Manuals
Save this manual to your list of manuals |
Oki GL408e manual content summary:
- Oki GL408e | GL408e/GL412e RFID Kit Install Guide - Page 1
RFID KIT INSTALLATION GUIDE For printer models: GL 4XXe Series For printer models: Read this Installation Guide before and during the installation of the above accessory. Keep this Installation Guide handy for future reference. 1 - Oki GL408e | GL408e/GL412e RFID Kit Install Guide - Page 2
your new SATO product. Be sure to read this quick guide thoroughly before using this printer. It is an integral part of the product and should be kept in the immediate vicinity of the device and available to the operating staff. 1.2 Limitation of liability All information in this manual have been - Oki GL408e | GL408e/GL412e RFID Kit Install Guide - Page 3
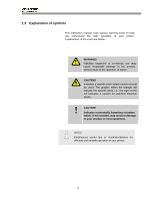
1.3 Explanation of symbols This instruction manual uses various warning icons to help you understand the safe operation of your printer. Explanations of the icons are below. WARNING! Indicates neglectful or erroneous use may cause irreparable damage to the product, serious injury to the operator, or - Oki GL408e | GL408e/GL412e RFID Kit Install Guide - Page 4
sato-int.com SATO Americas SATO SATO LABELING SATO sato-europe.com SATO Pacific & Oceania SATO INTERNATIONAL ASIA @sato-int.com SATO my SATO .com SATO AUTO- - 63091318 SATO AUSTRALIA PTY -5335 SATO NEW SATO offices, refer to www.satoworldwide.com Extensive contact information of worldwide SATO - Oki GL408e | GL408e/GL412e RFID Kit Install Guide - Page 5
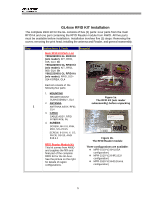
and Reader, and general reassembly. Step 1 Instructions & Tools Main RFID Kit Parts List Y9812220001 GL RFID Kit (w/o reader), KIT, RFID, 915, GL4 Or Y9812220001 GL RFID Kit (w/o reader), KIT, RFID, 869, GL4 Or Y9812220001 GL RFID Kit (w/o reader), RFID, 910 914-KOREA, GL4 Image(s) Each kit - Oki GL408e | GL408e/GL412e RFID Kit Install Guide - Page 6
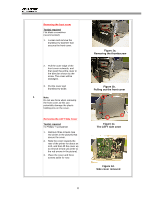
Tool(s) required #1 Phillips + screwdriver 1. Remove three screws (see red circles in the picture) that secure the cover. 2. Slide the cover towards the rear of the printer for about an inch, and then lift the cover up to remove it from unit (refer to the red arrows in the picture). 3. Place the - Oki GL408e | GL408e/GL412e RFID Kit Install Guide - Page 7
Removing the Print Head 1. Release the print head assembly by turning the head lock latch counterclockwise. 2. Press the spring-loaded tab as indicated here, to release the print head. 3. Disconnect the data and power cables from the print head. 2 4. Set the print head aside for now. Note: ESD - Oki GL408e | GL408e/GL412e RFID Kit Install Guide - Page 8
Installing the antenna Part(s) Required ANTENNA ASSY, RFID, SL4M SCREW, 6-19 HL X 1/2, PHCR, SS410, ANSI B18.6.4 Tool(s) required #1 Phillips + screwdriver - 12 in. lb 1. Remove the gap sensor paddle (circled red) by sliding it out. Set the gap sensor paddle aside for later use. 2. Remove the - Oki GL408e | GL408e/GL412e RFID Kit Install Guide - Page 9
. 4. Attach the reader subassembly to the printer with the supplied 4 screw (circled red in Figure 4b). 5. Tighten and torque the screw. 6. Close and latch the deck assembly. 7. Position the antenna handle above the printed orangecolored marker's location for testing. Note When installing - Oki GL408e | GL408e/GL412e RFID Kit Install Guide - Page 10
appears after the printer reboots, go to step 4. 2. Press the Up, Down, Left, and Right keys at the same time to access the factory Menus. 3. Press the Up key until RFID Freq Band displays. 4. Press the Down and ENTER key at the same time until the message ENTER SWITCH UNLOCKED is displayed. Table - Oki GL408e | GL408e/GL412e RFID Kit Install Guide - Page 11
11
-
 1
1 -
 2
2 -
 3
3 -
 4
4 -
 5
5 -
 6
6 -
 7
7 -
8
-
9
-
10
-
11
 |
 |

1
RFID KIT INSTALLATION GUIDE
Read this Installation Guide before and during the installation of
the above accessory. Keep this Installation Guide handy for
future reference.
For printer models:
For printer models:
GL 4XX
e
Series